Sync Plans
In this section, we explain all the operations you can do about sync plans.
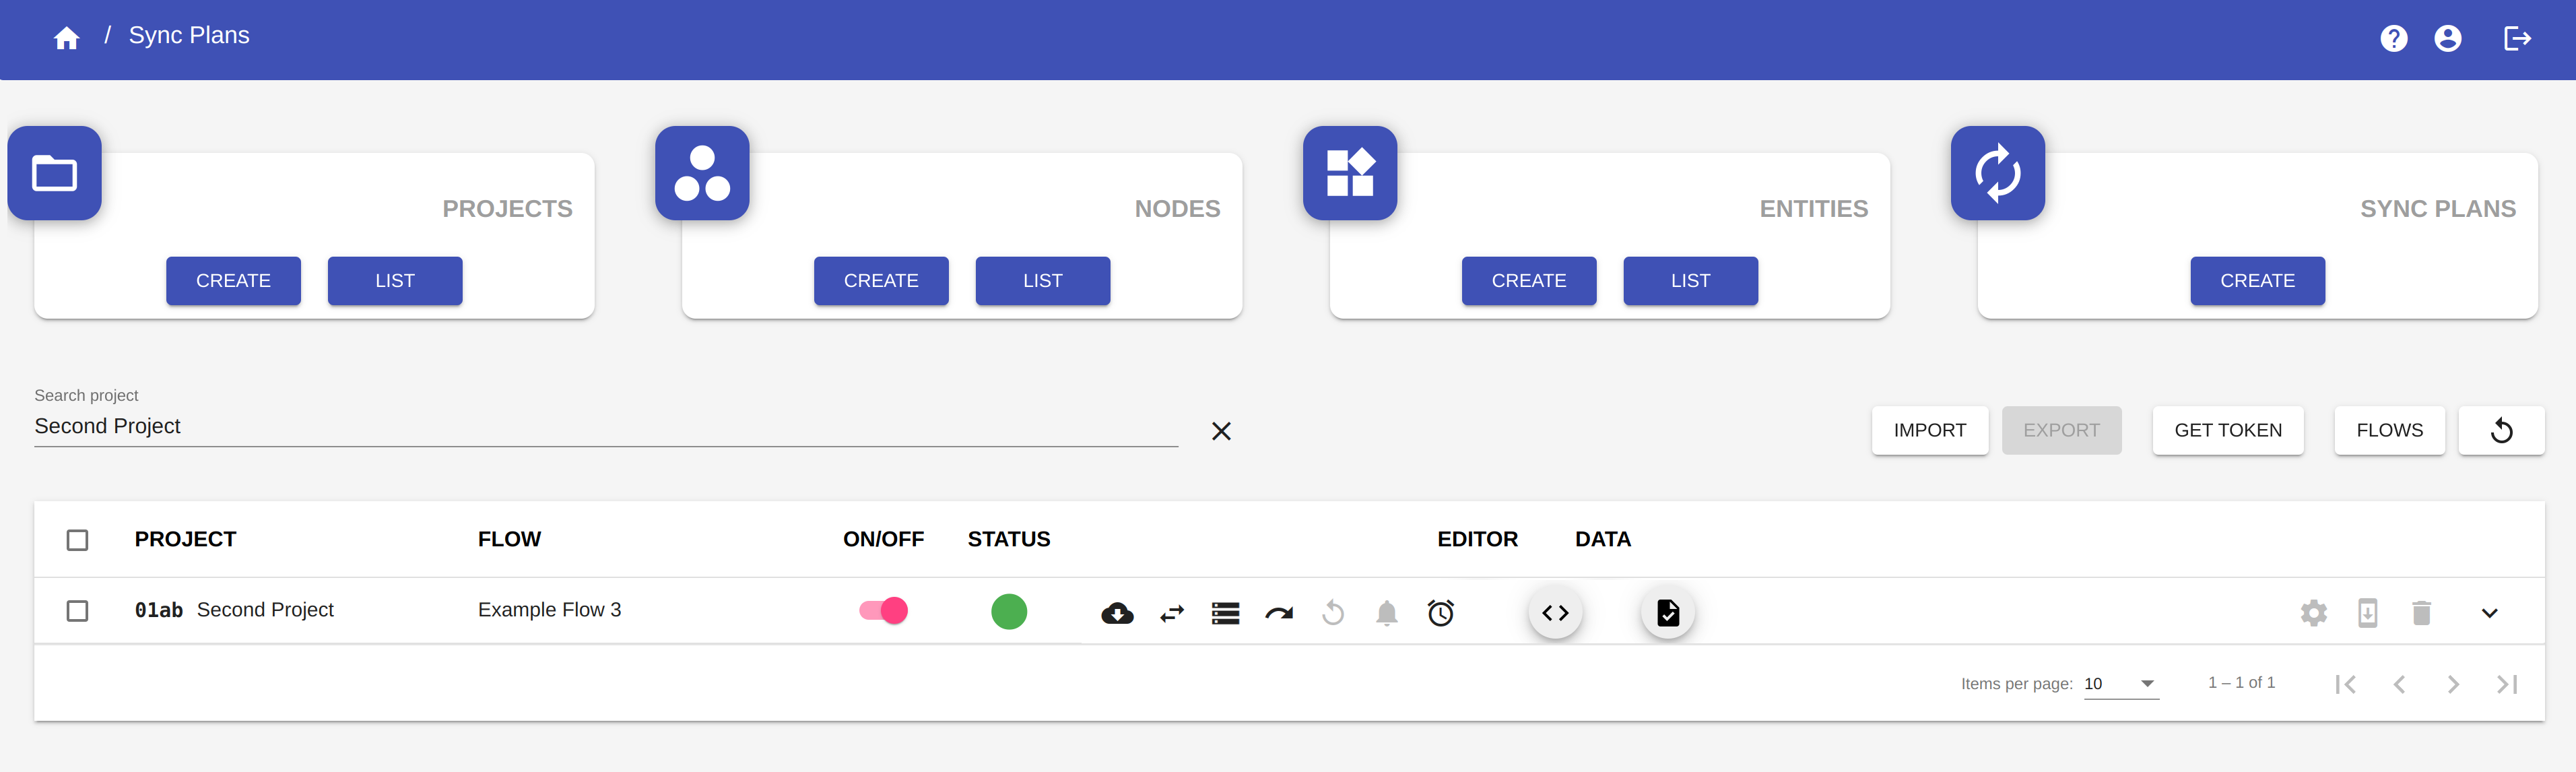
From the Dashboard, click on the button Sync Plans to access to the Sync Plans section.

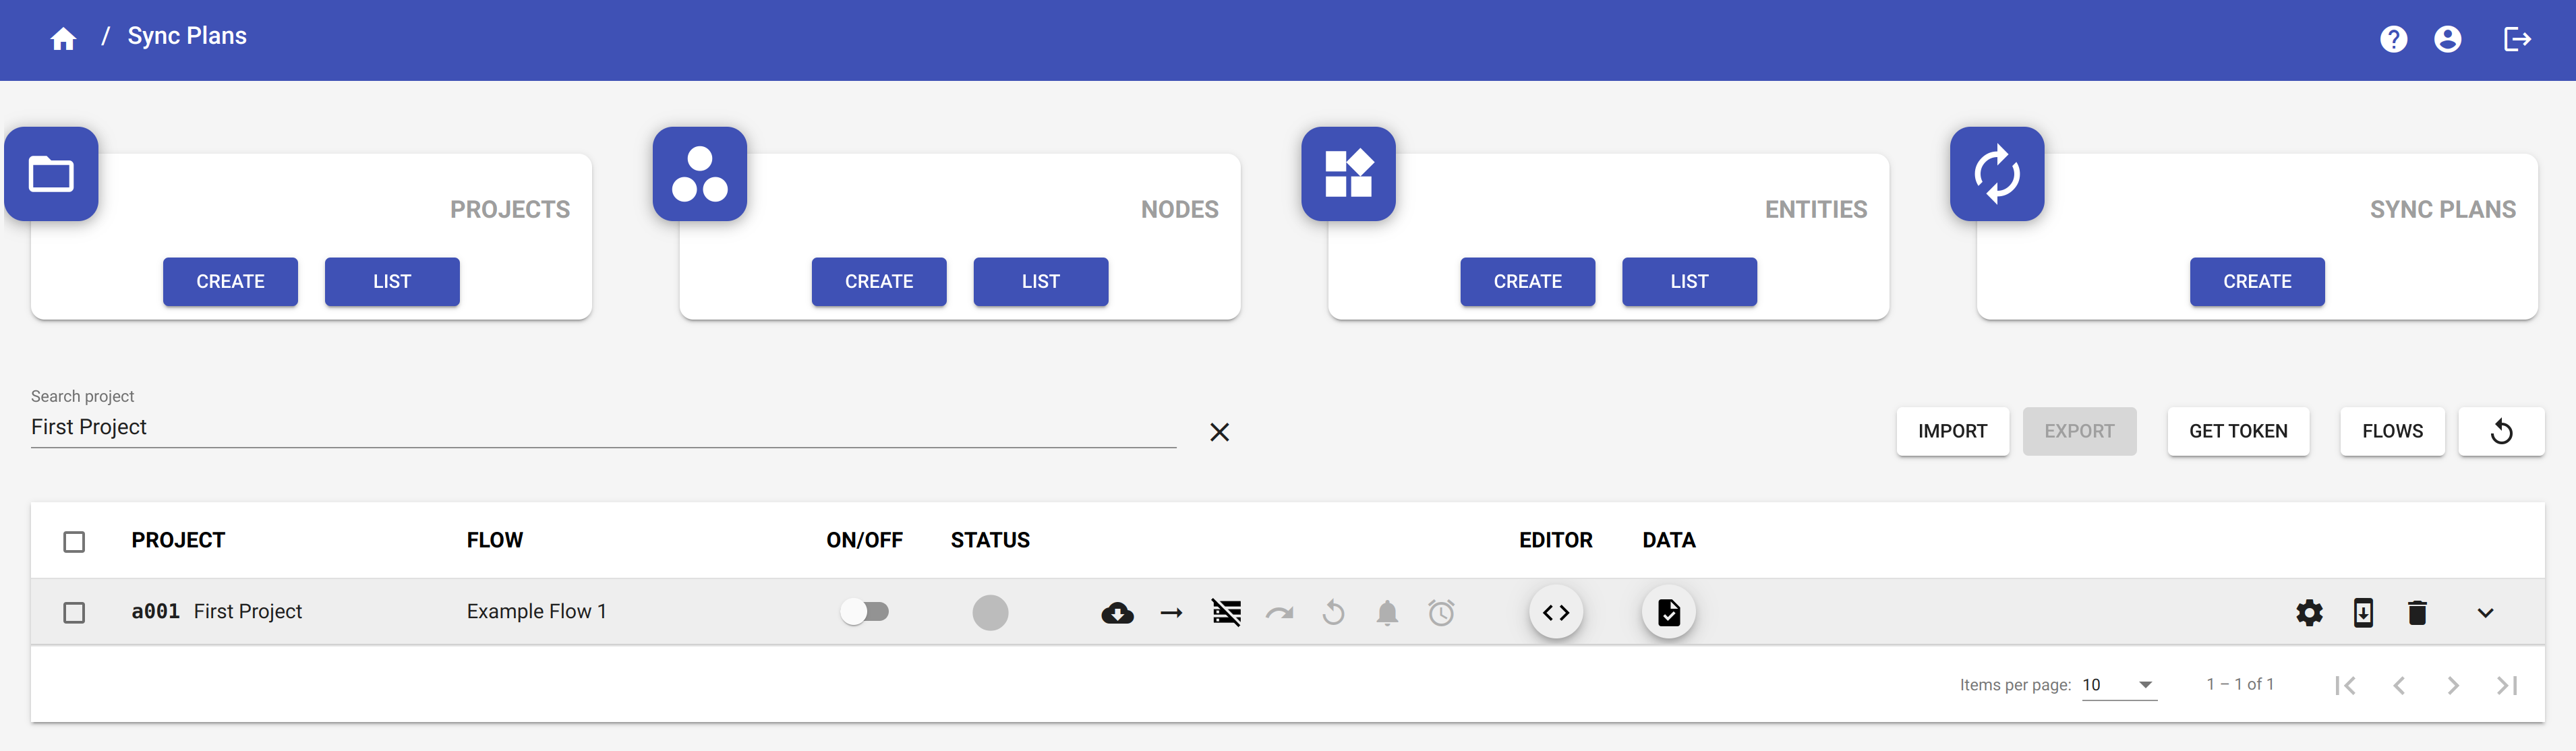
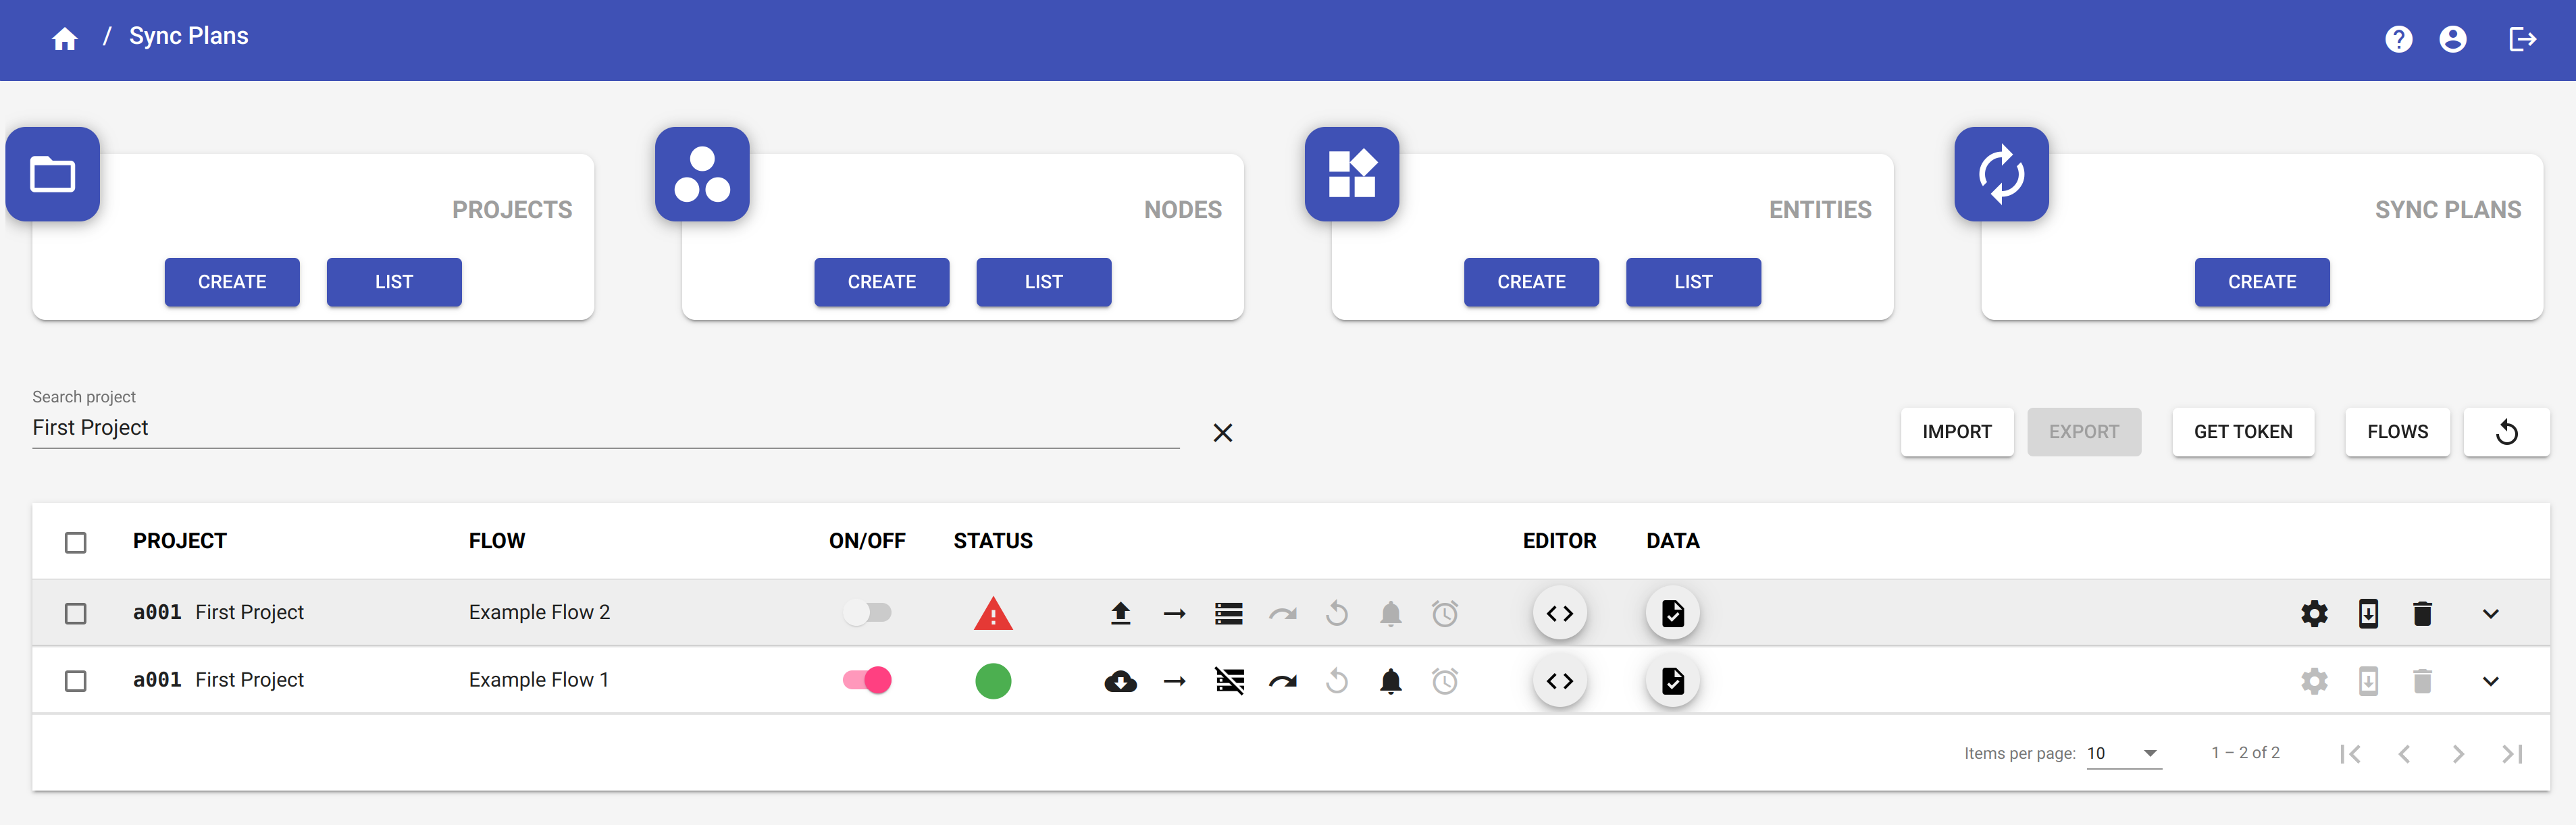
Sync plan list
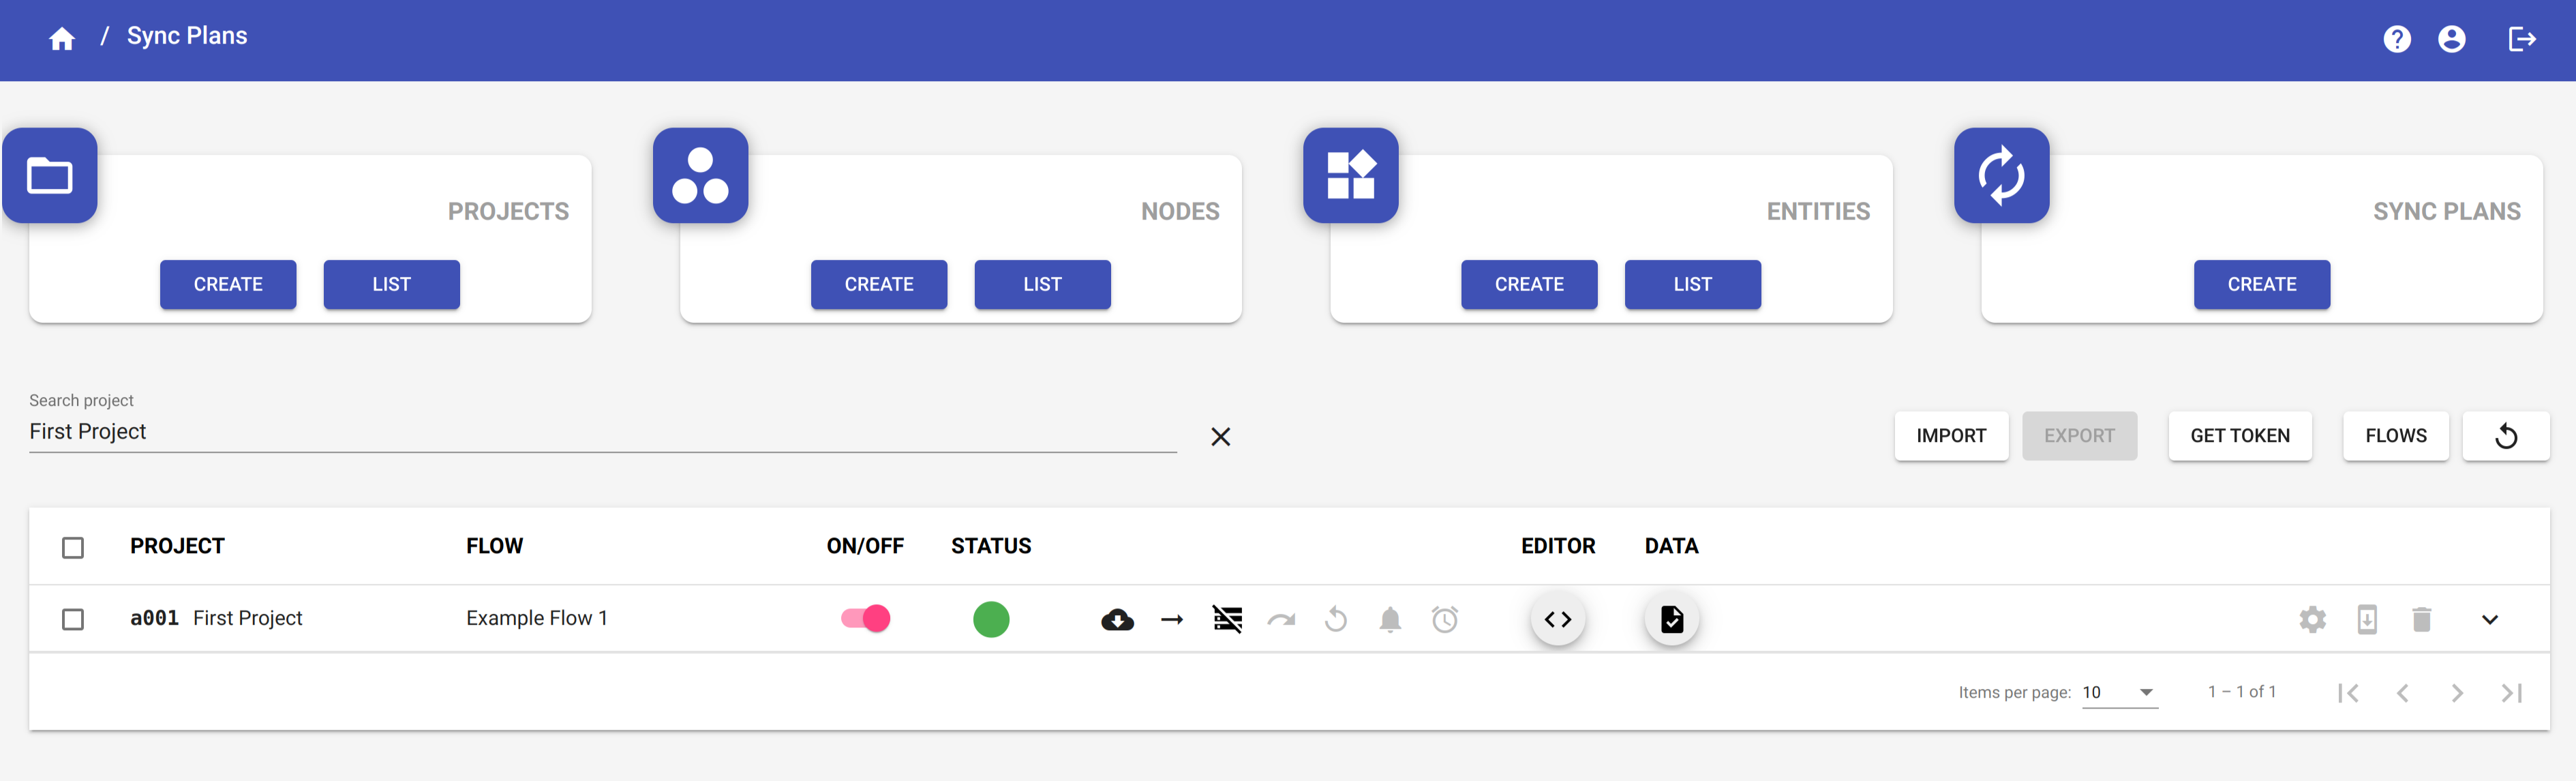
Here you find the list of all your sync plans.
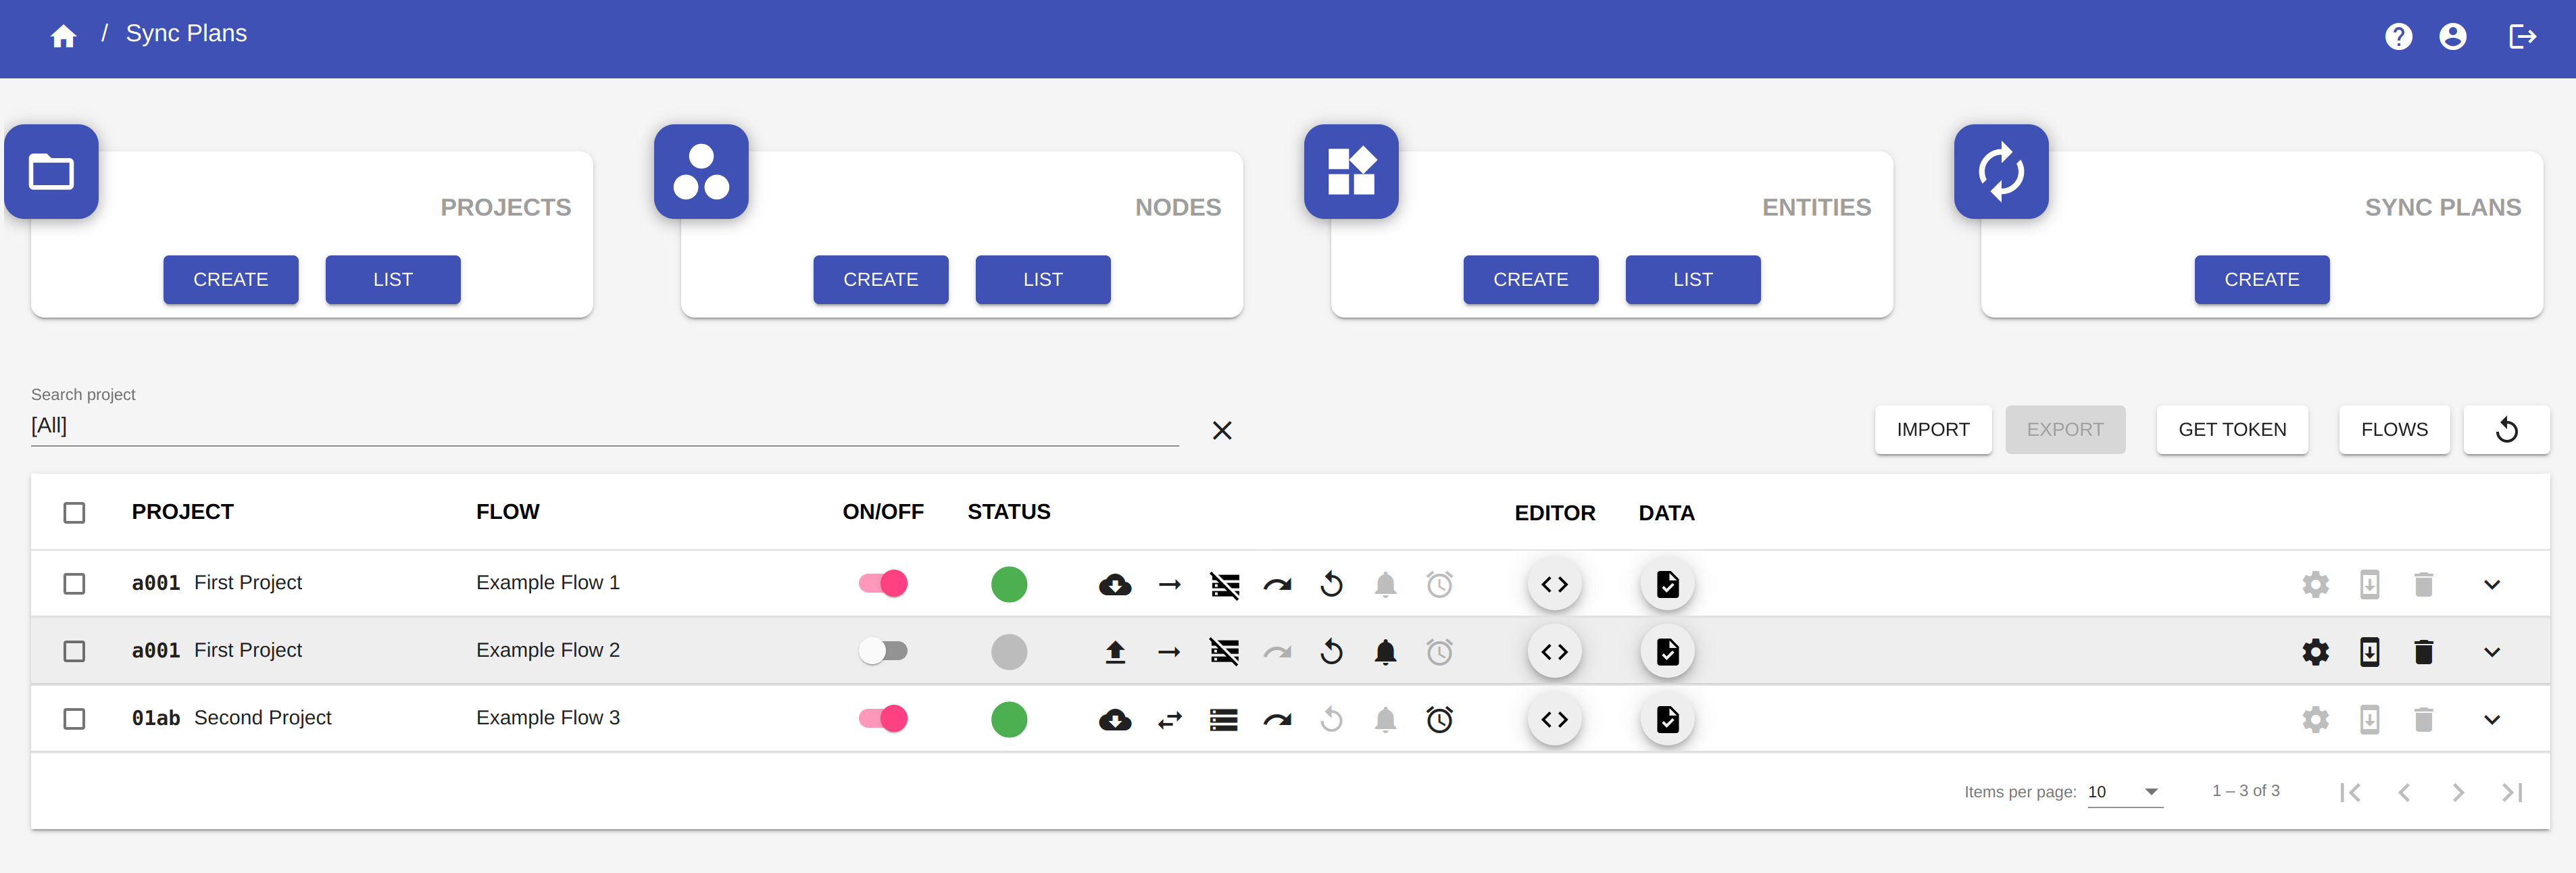
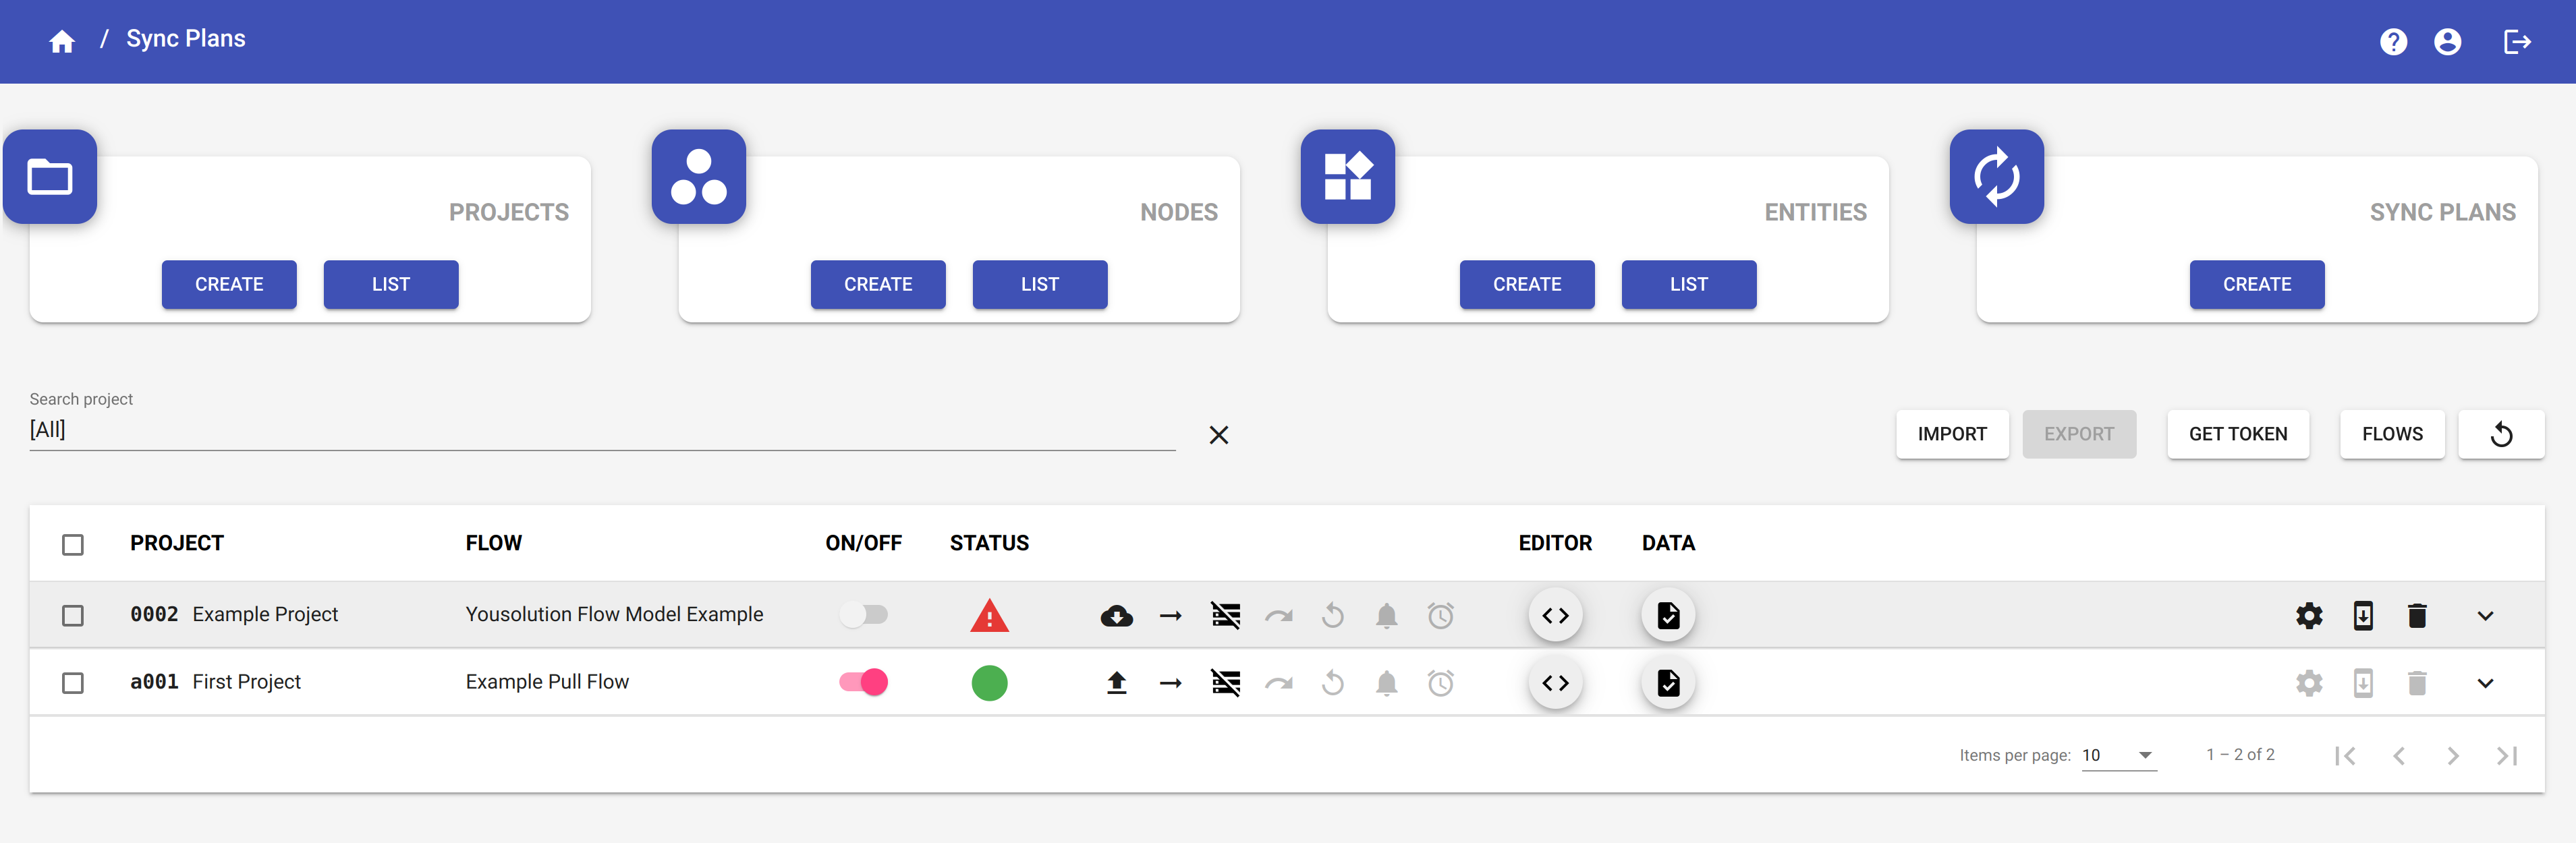
Each row of the table represents a sync plan. You can expand the row by clicking on it to view additional information about the sync plan.

The column ON/OFF indicates whether the synchronization is on or off. Switch the button to start or stop synchronization.
The column STATUS indicates the status of the sync plan and, by clicking on it, you can access the sync plan queues.
The first icon after the STATUS column indicates the delivery strategy of the flow.
- The PUSH delivery strategy is indicated by the icon

- The PULL delivery strategy is indicated by the icon

The second icon after the STATUS column indicates whether the synchronization is unidirectional or bidirectional:
- The icon
 indicates that the synchronization is unidirectional.
 - The icon
 indicates that the synchronization is bidirectional.
The third icon after the STATUS column indicates whether the sync plan is storable or not-storable:
- The icon
 indicates that the sync plan is not storable.
 - The icon
 indicates that the sync plan is storable and the storable period has no limits.
 - The icon
 indicates that the sync plan is storable and the storable period is limited.
The icons  indicates which sync plan settings are enabled.
- The icon
 indicates whether the skip errors option is enabeld or disabled.
 - The icon
 indicates whether the retry option is enabled or disabled.
 - The icon
 indicates whether the alert option is enabled or disabled.
 - The icon
 indicates whether the flow inactivity alert option is enabled or disabled.
By clicking the button ![]() in the column EDITOR, you access the Code editor page, where you can write the typescript code of the sync plan.
in the column EDITOR, you access the Code editor page, where you can write the typescript code of the sync plan.
By clicking the button 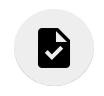 in the column DATA, you access the Documents page, where you can visualize all the synchronized documents.
By clicking the button ![]() you open the Sync plan settings dialog.
you open the Sync plan settings dialog.
By clicking the button ![]() you open the Sync plan update dialog.
you open the Sync plan update dialog.
By clicking the button ![]() you open the Sync plan delete dialog.
you open the Sync plan delete dialog.
One-to-many synchronization
The one-to-many synchronization allows you to create groups of sync plans that share the same source node and the same entity.
If you send messages from the source node, these messages will be synchronized by the platform and then sent to each target node of the flows of the group at the same time.
It is possible to define a name for the group of the flows that is displayed in the sync plan list over the flow name.
NOTE
The name of the group appears only when there are at least two flows belonging to the same group.
WARNING
The flows of a group must be contained in the same project.
NOTE
-
A group of flows can contain also different type of sync plans. For example, the same group can have both push and pull type flows, or both unidirectional and bidirectional flows, or both storable and non-storable flows.
-
The sync plan settings (skip error, retry, synchronization alert and flow inactivity alert) can be individually set for each flow of the group.
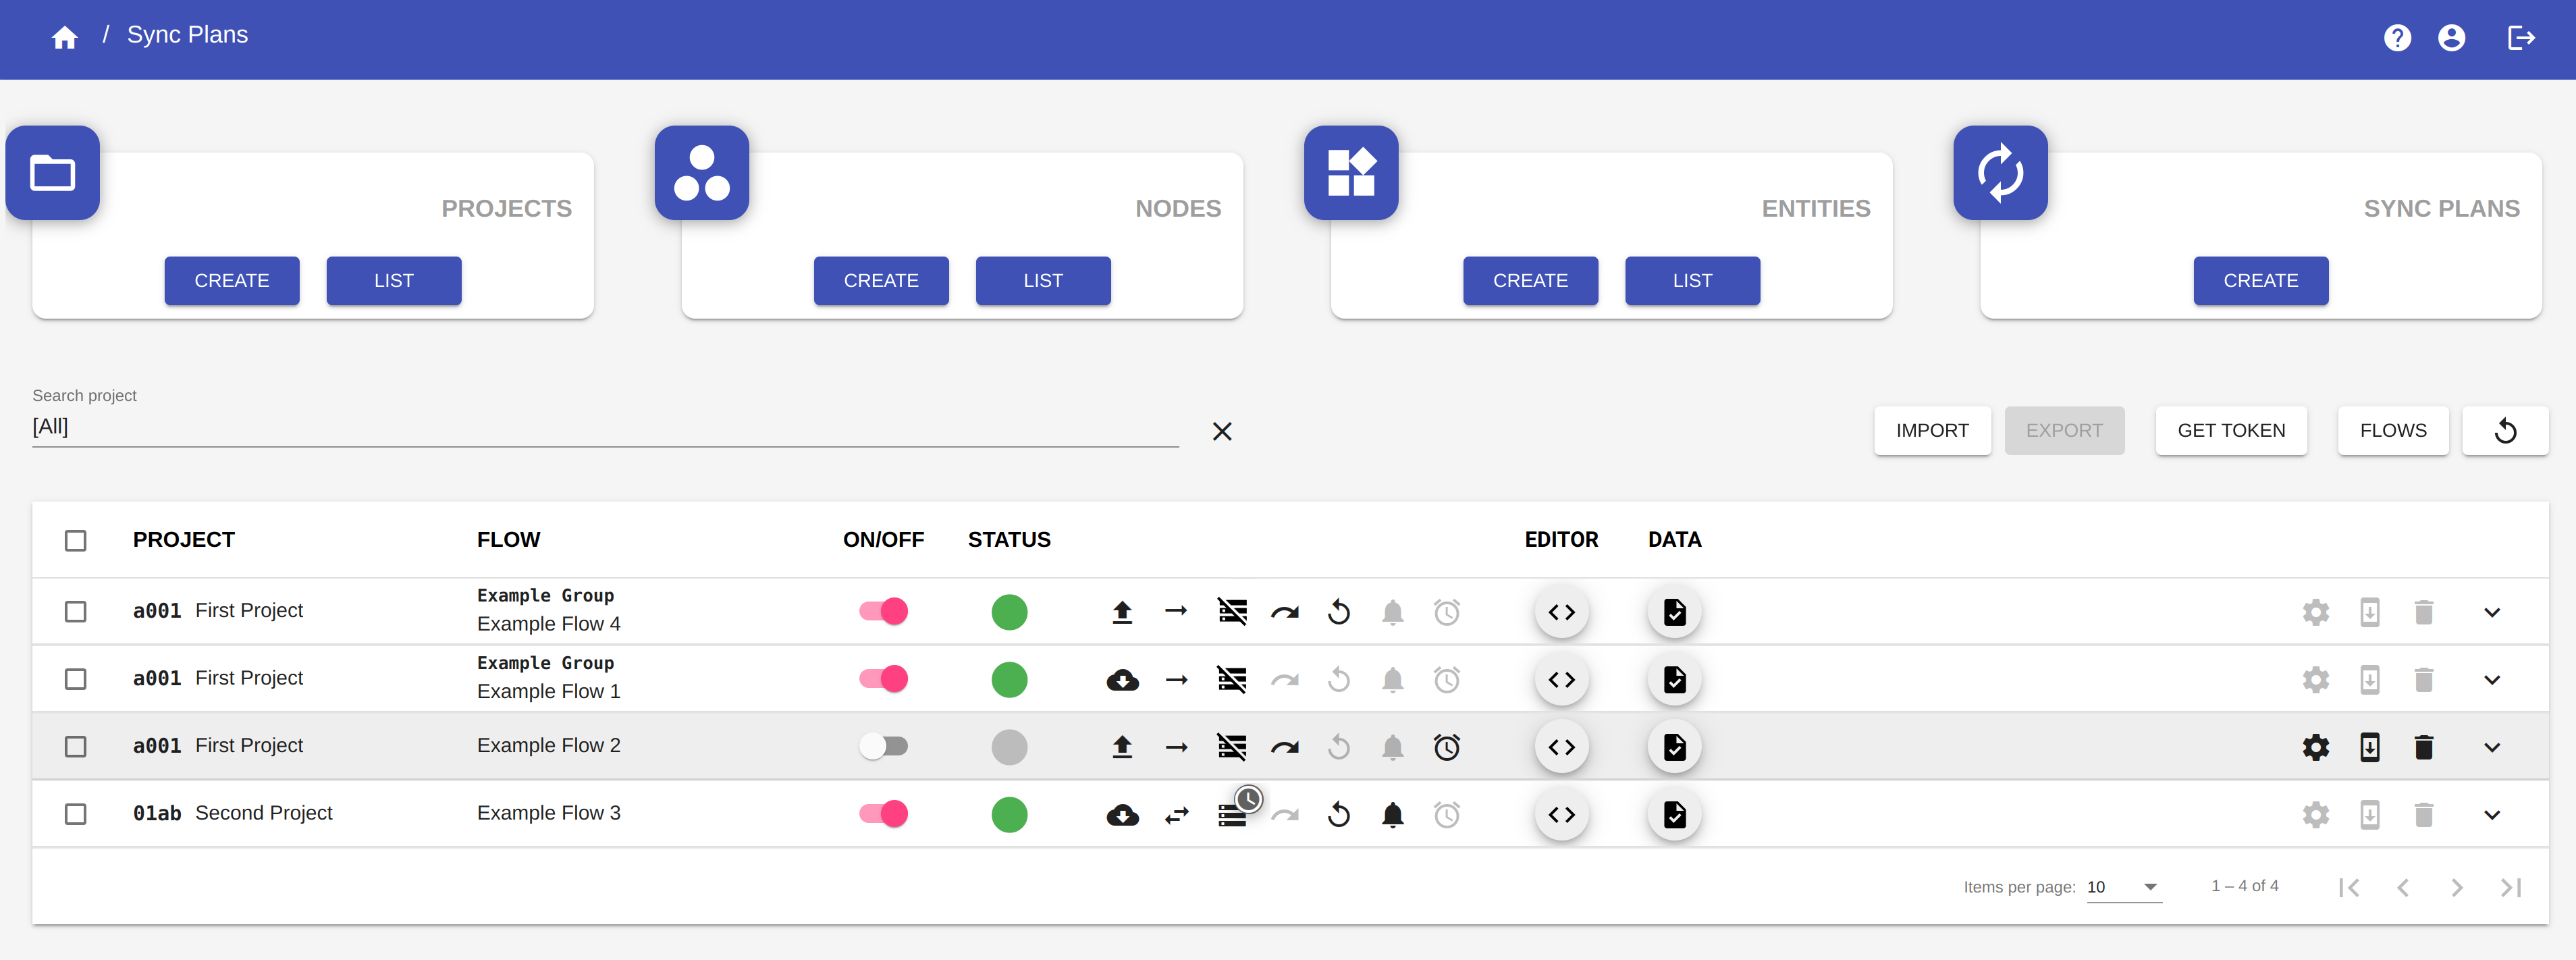
Filter sync plans
You can filter the sync plans by project. You can select the project from the Select project box.
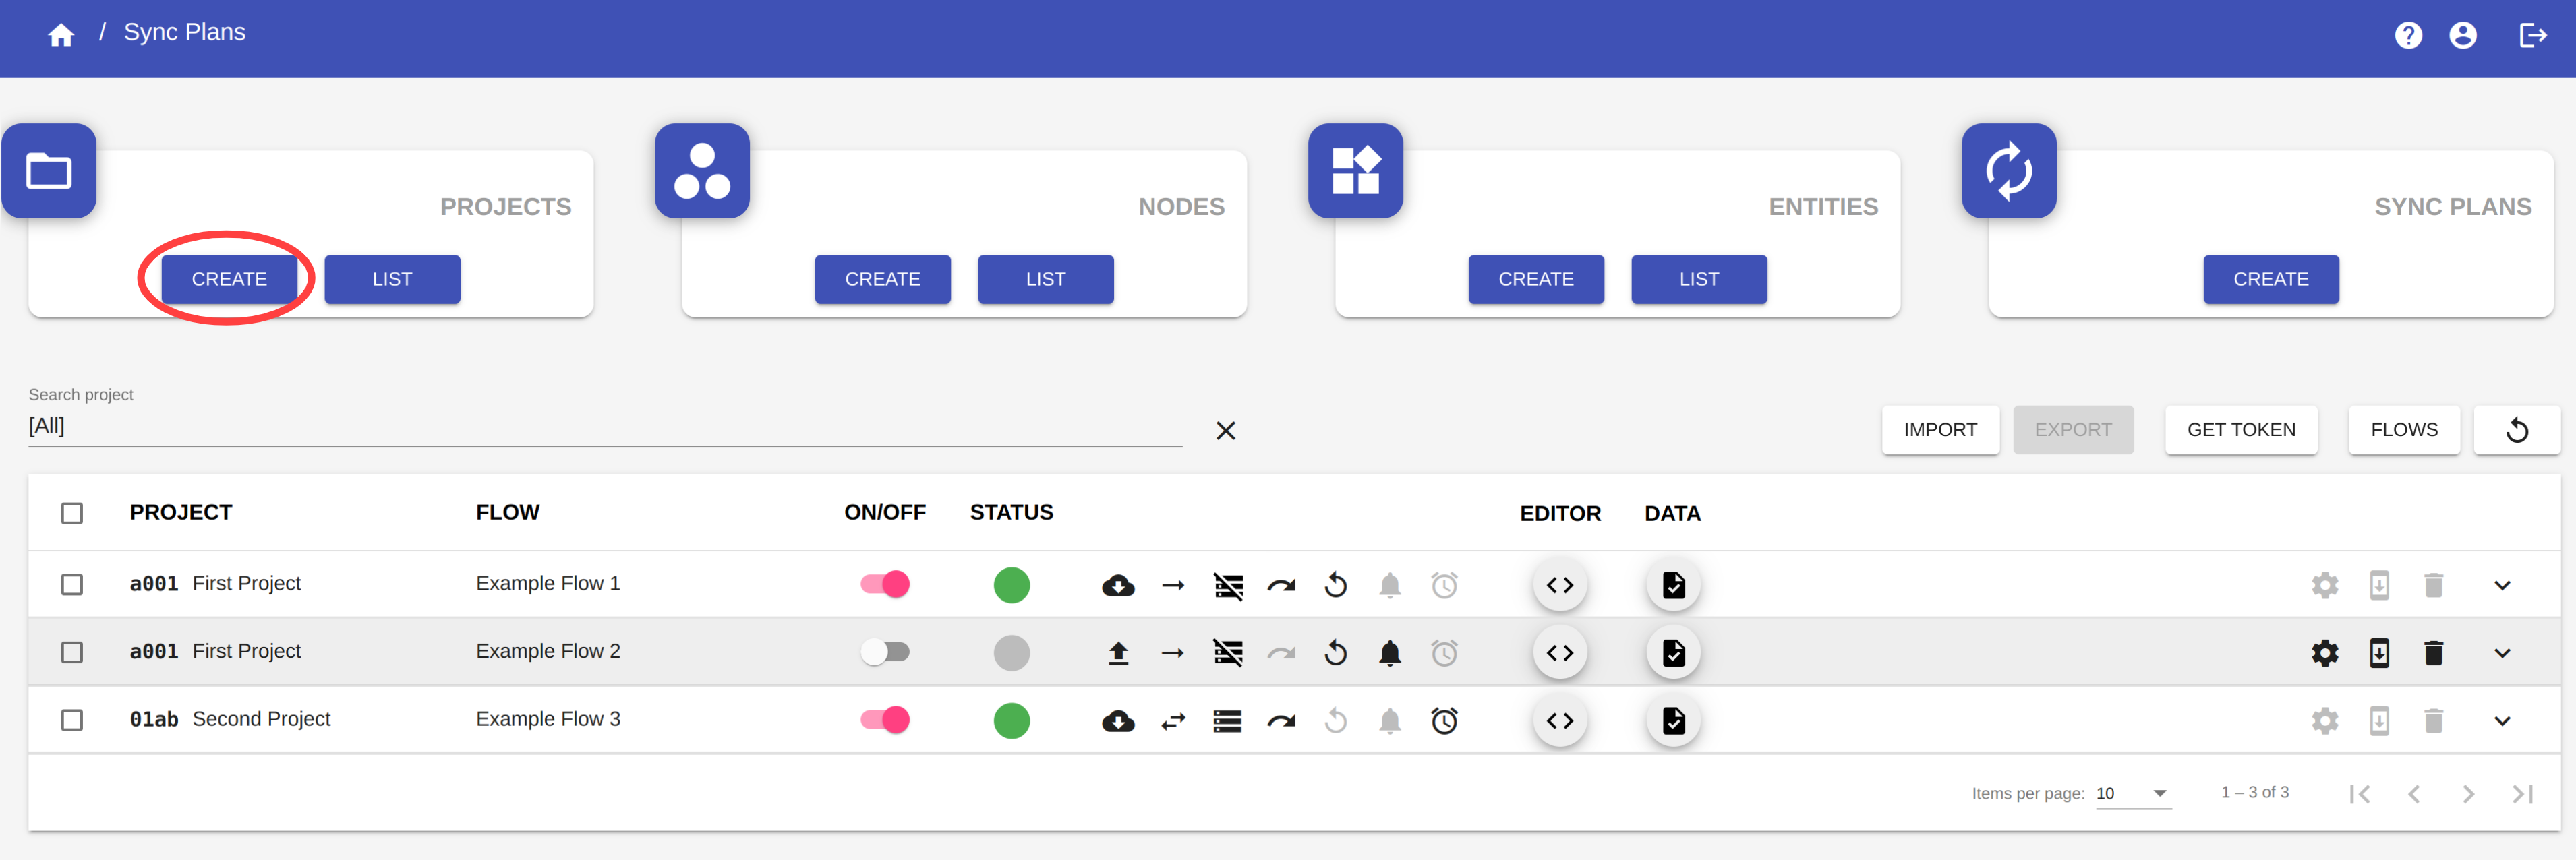
Create a project
To create a new project, click on the button CREATE in the Projects section to open the Project creation dialog.
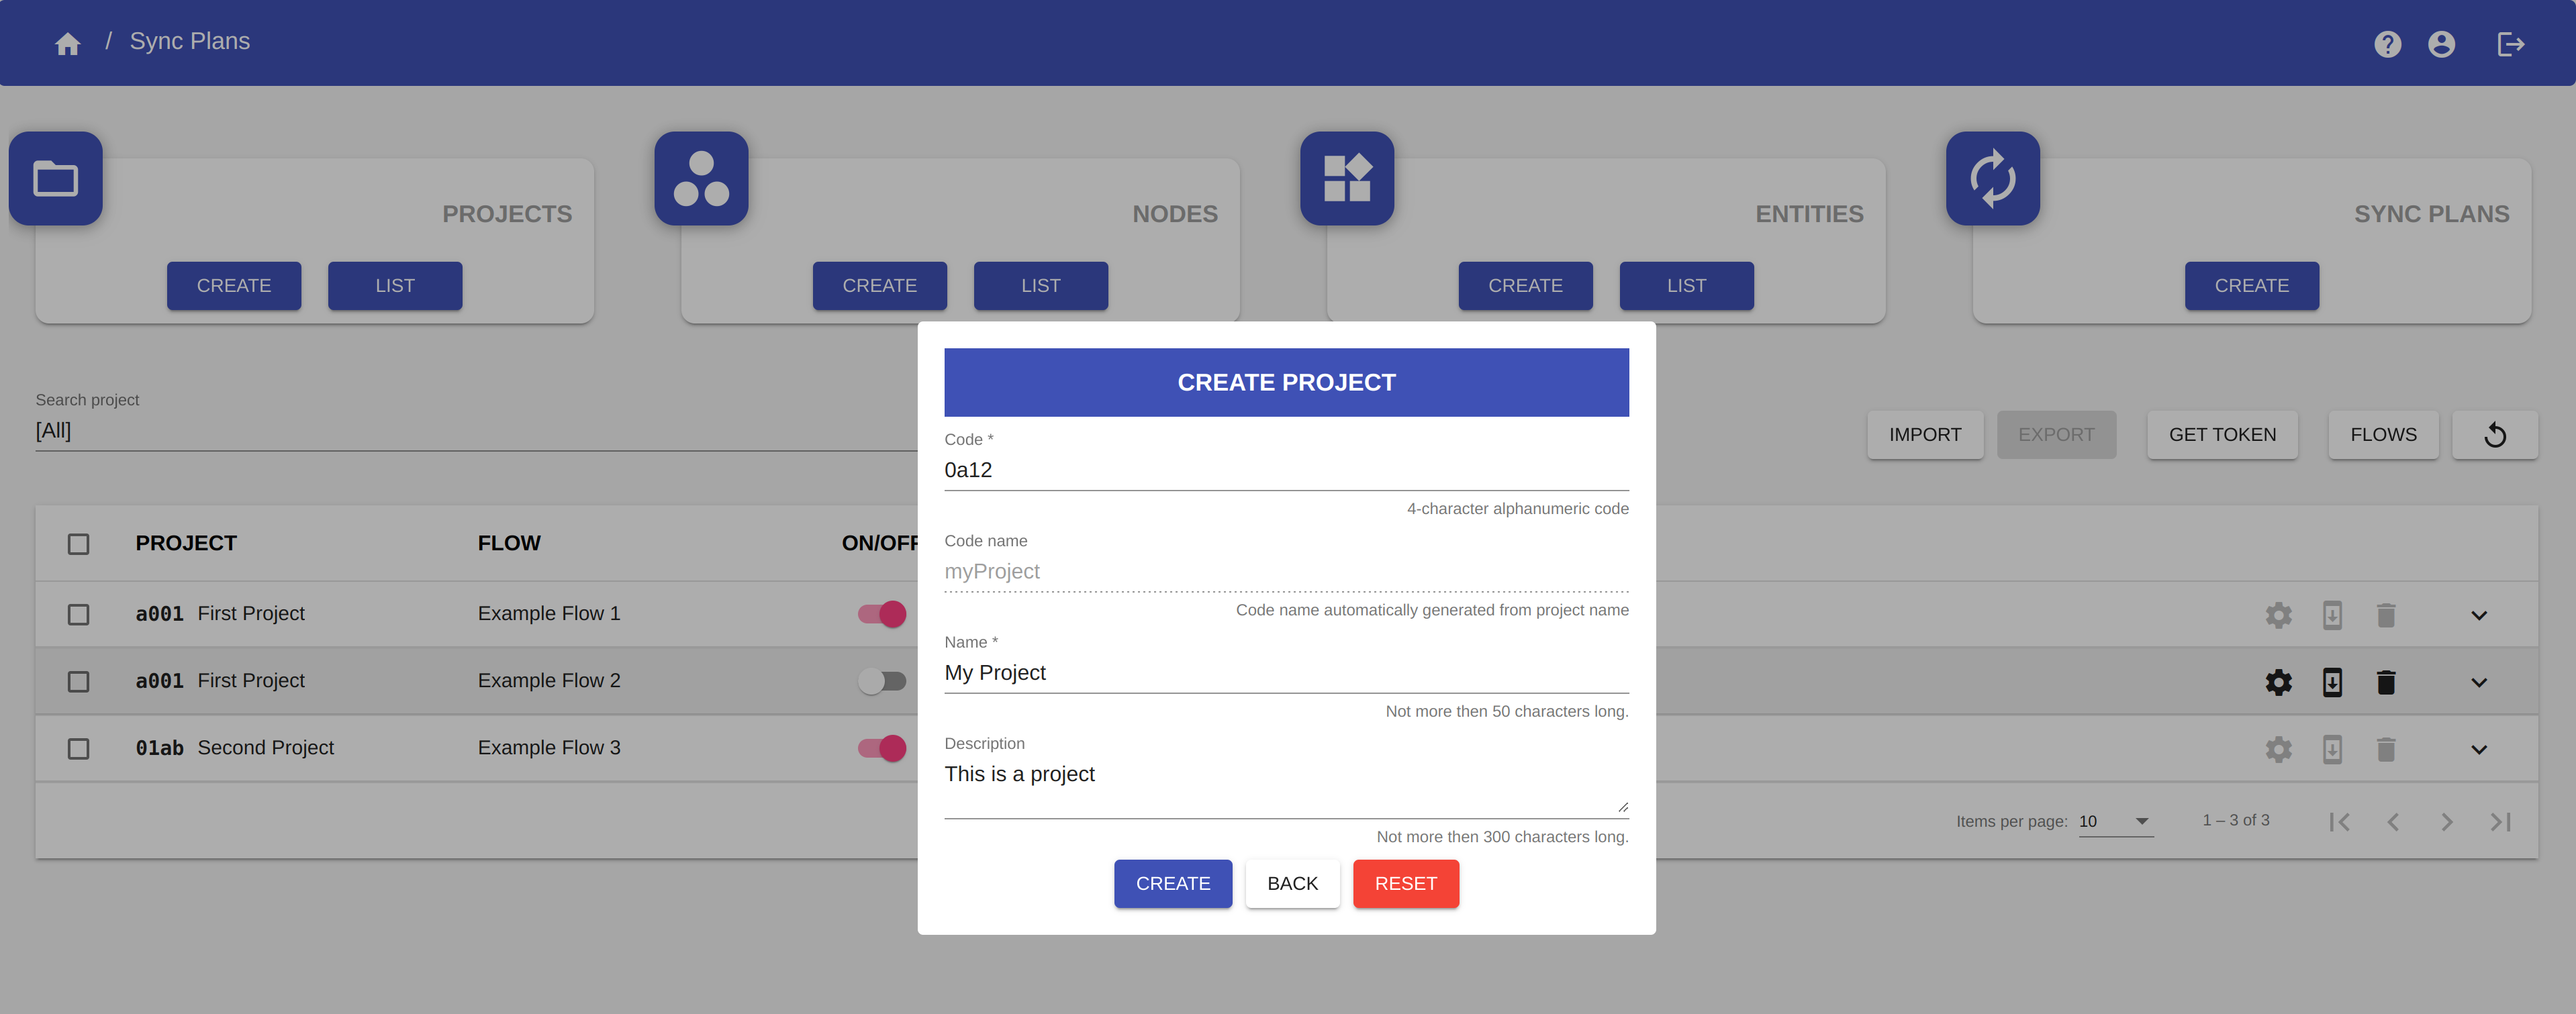
You have to fill in the following fields:
- Code: a 4-character alphanumeric code that uniquely identifies the project.
- Name: the name of the project.
- Description: an optional description of the project.
You don't have to fill in the Code name field. This is a field automatically generated from the Name field and it is used to uniquely identifies the project.
WARNING
The Name of the project must be unique.
Click on the CREATE button to create the project.
Click on the BACK button to close the Project creation dialog without creating the project.
Click on the RESET button to reset the form.
NOTE
- A project can contain one or more sync plans.
- Within a project there can be sync plans of different types (push or pull, unidirectional or bidirectional, storable or non-storable, etc.).
It is the user who determines which sync plans to include in a project (typically sync plans that are logically related).
Delete a project
By clicking on the button LIST in the Projects section, you can access the Project List dialog.
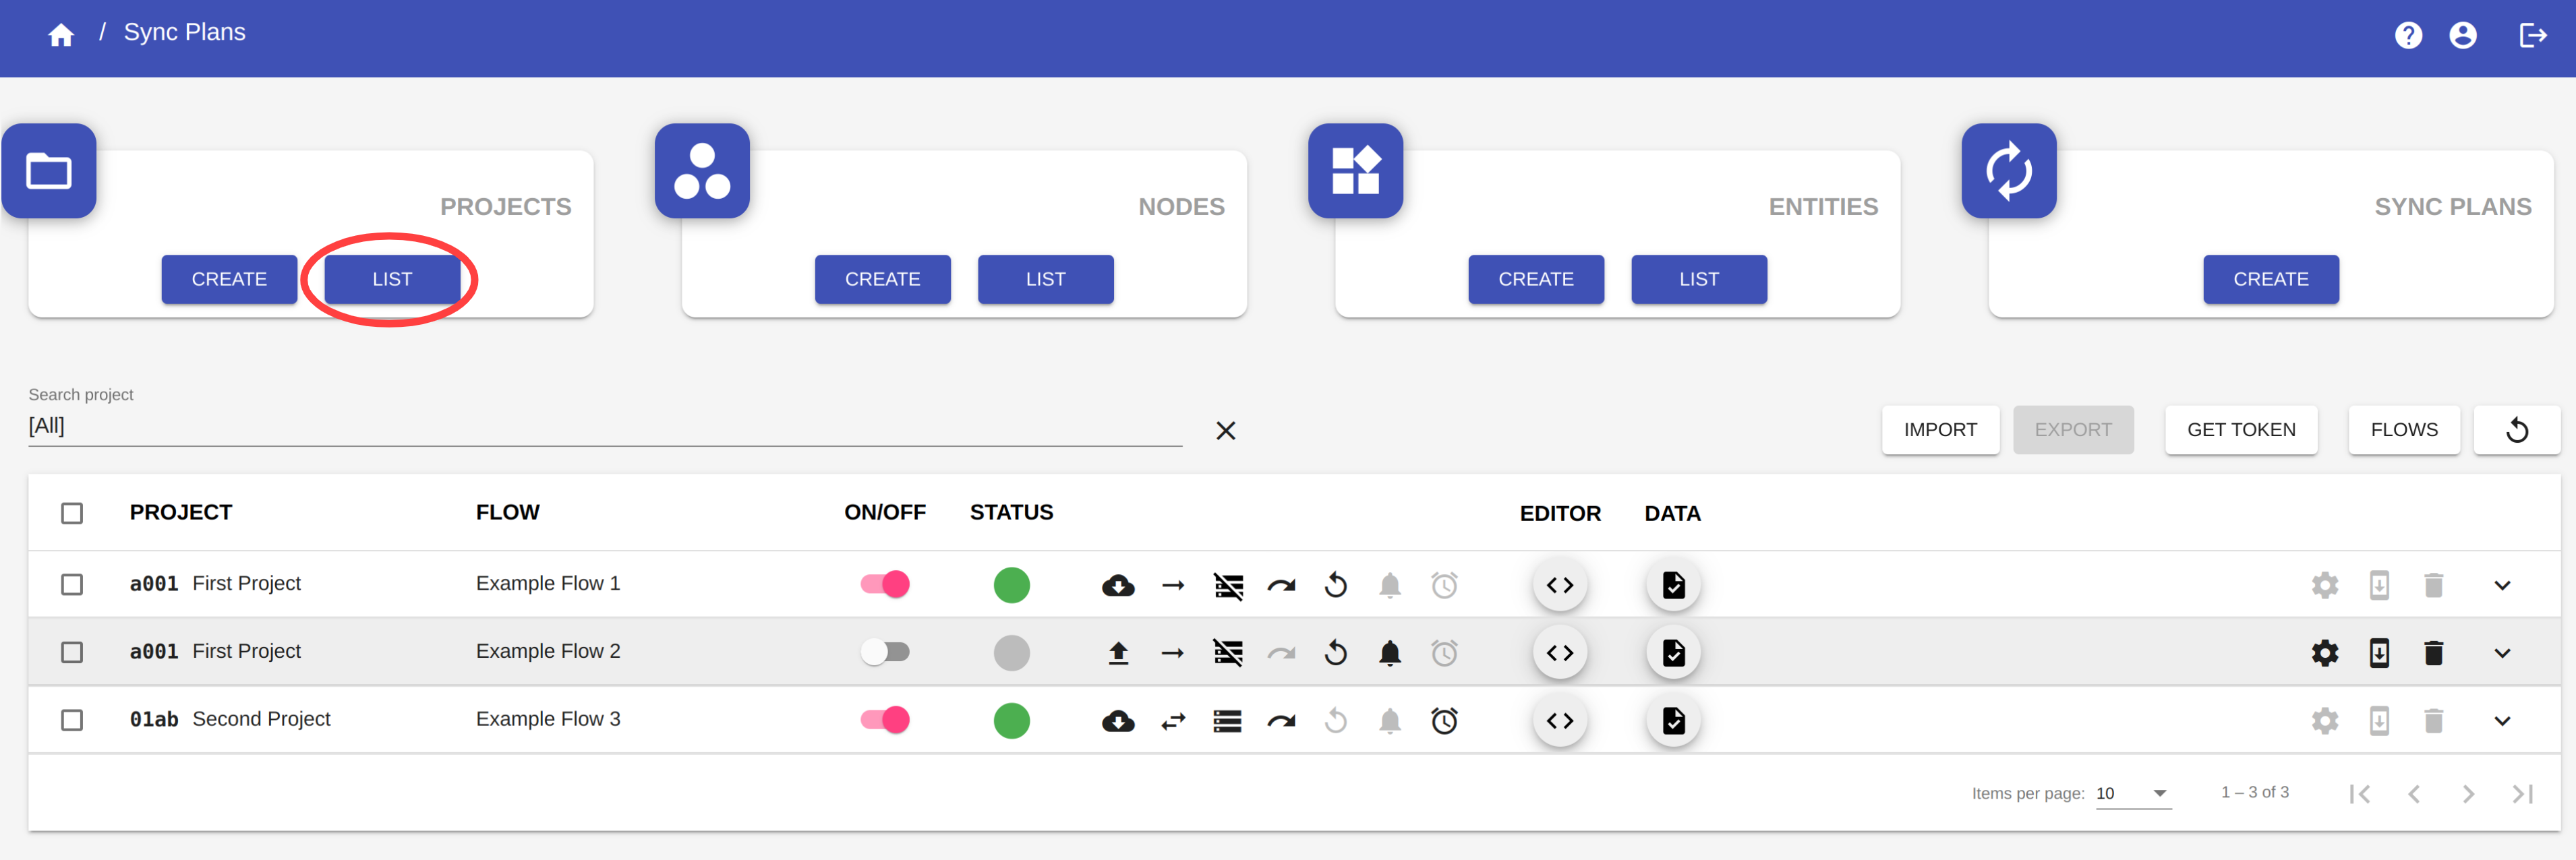
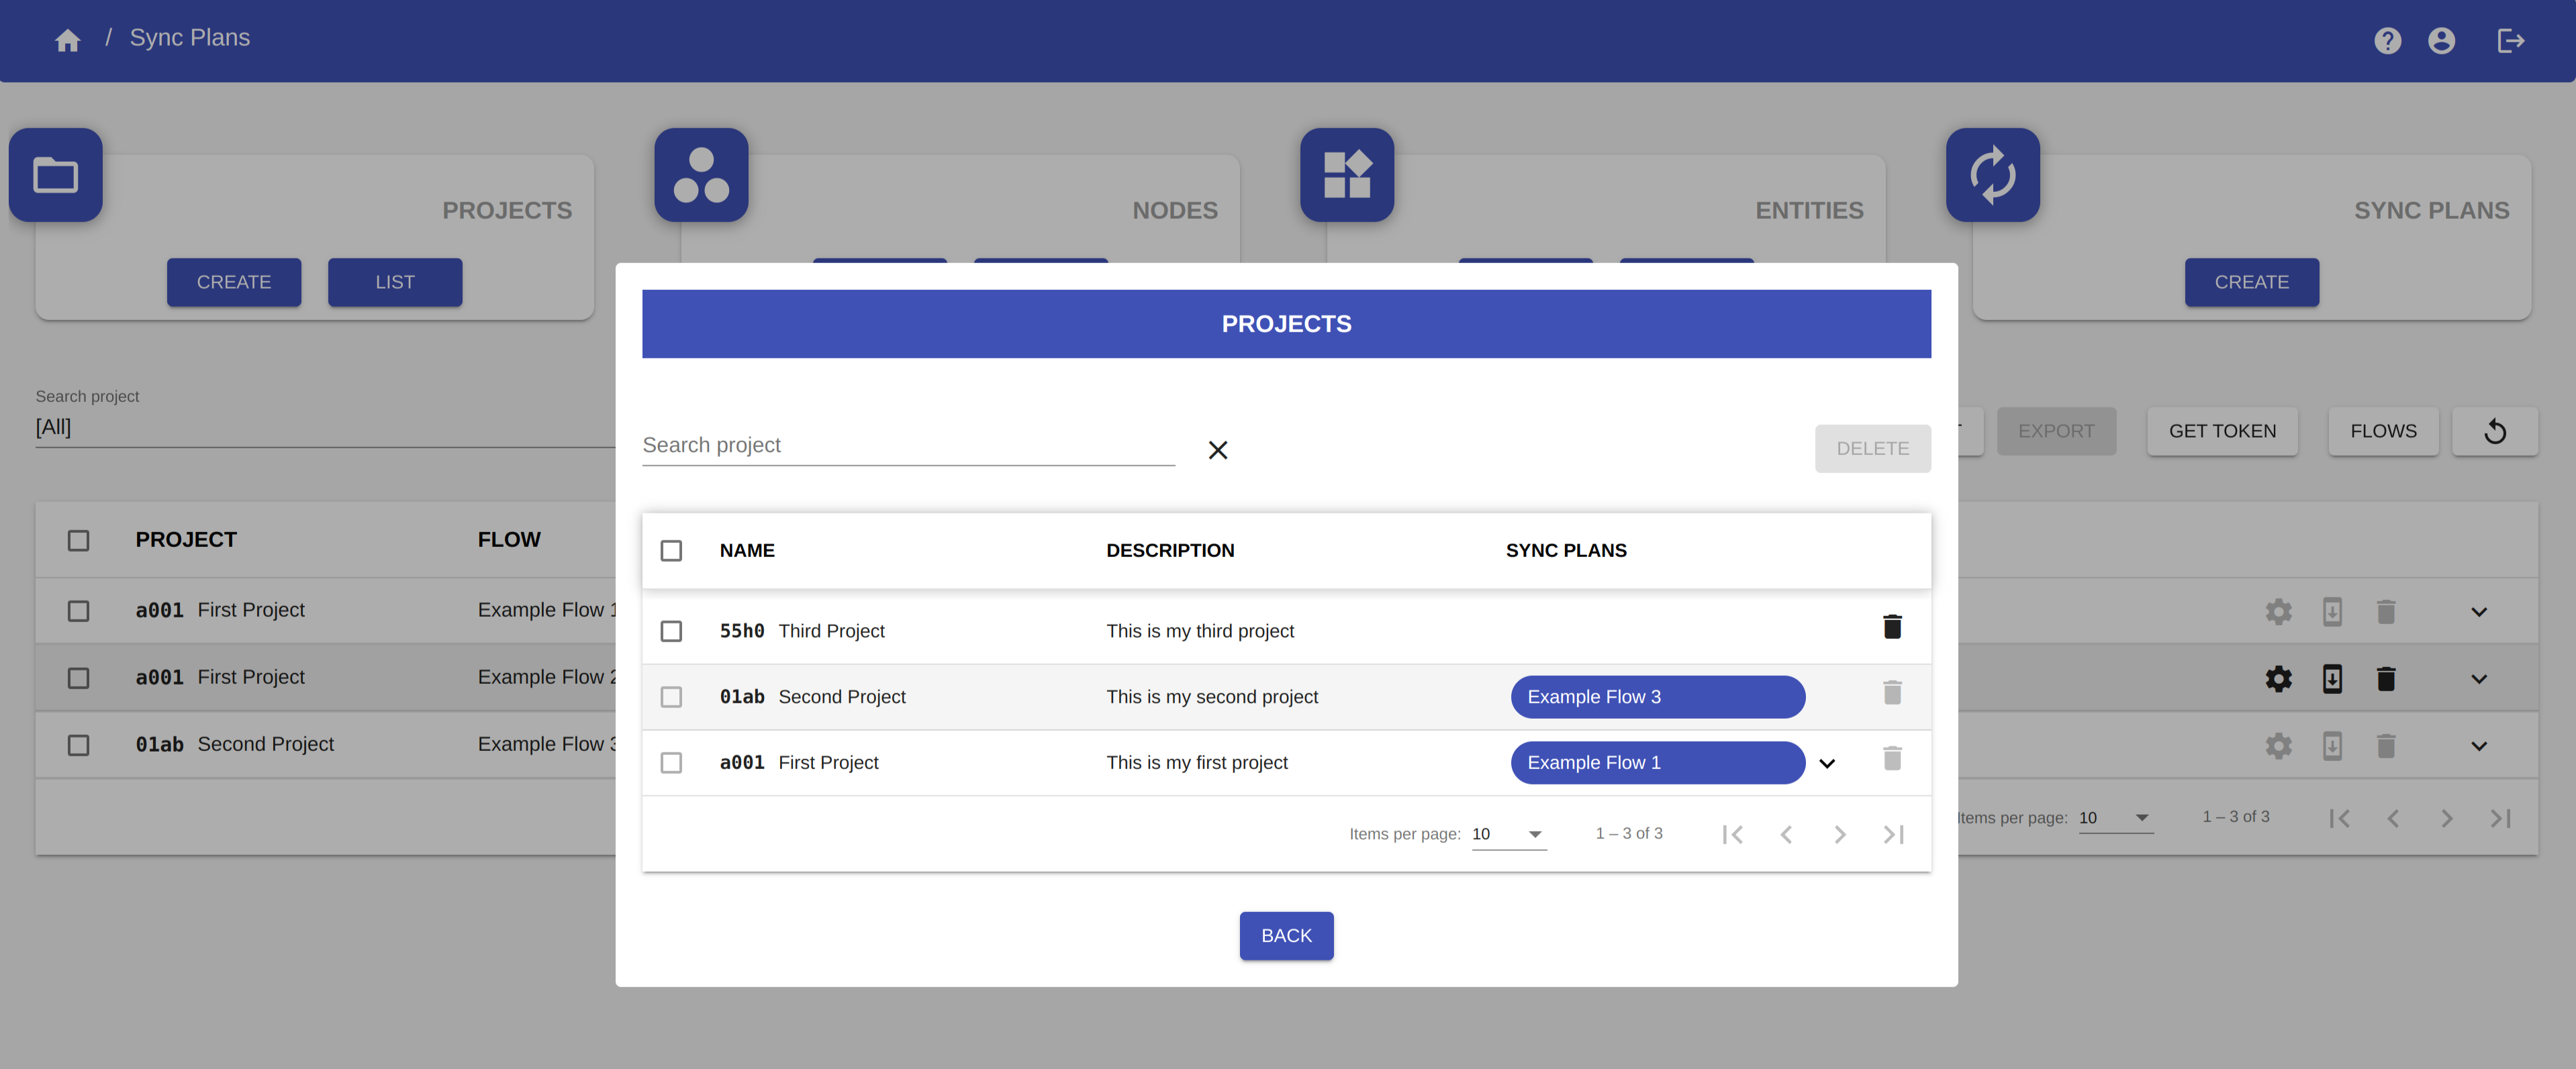
Here you can visualize the list of all the projects you have created.
You can view which sync plan are contained in each project in the column SYNC PLANS.
WARNING
You cannot delete a project if it contains sync plans.
You can search a project by using the Search project filter.
To delete a project, click on the button ![]() in the row corresponding to the project you want to delete.
in the row corresponding to the project you want to delete.
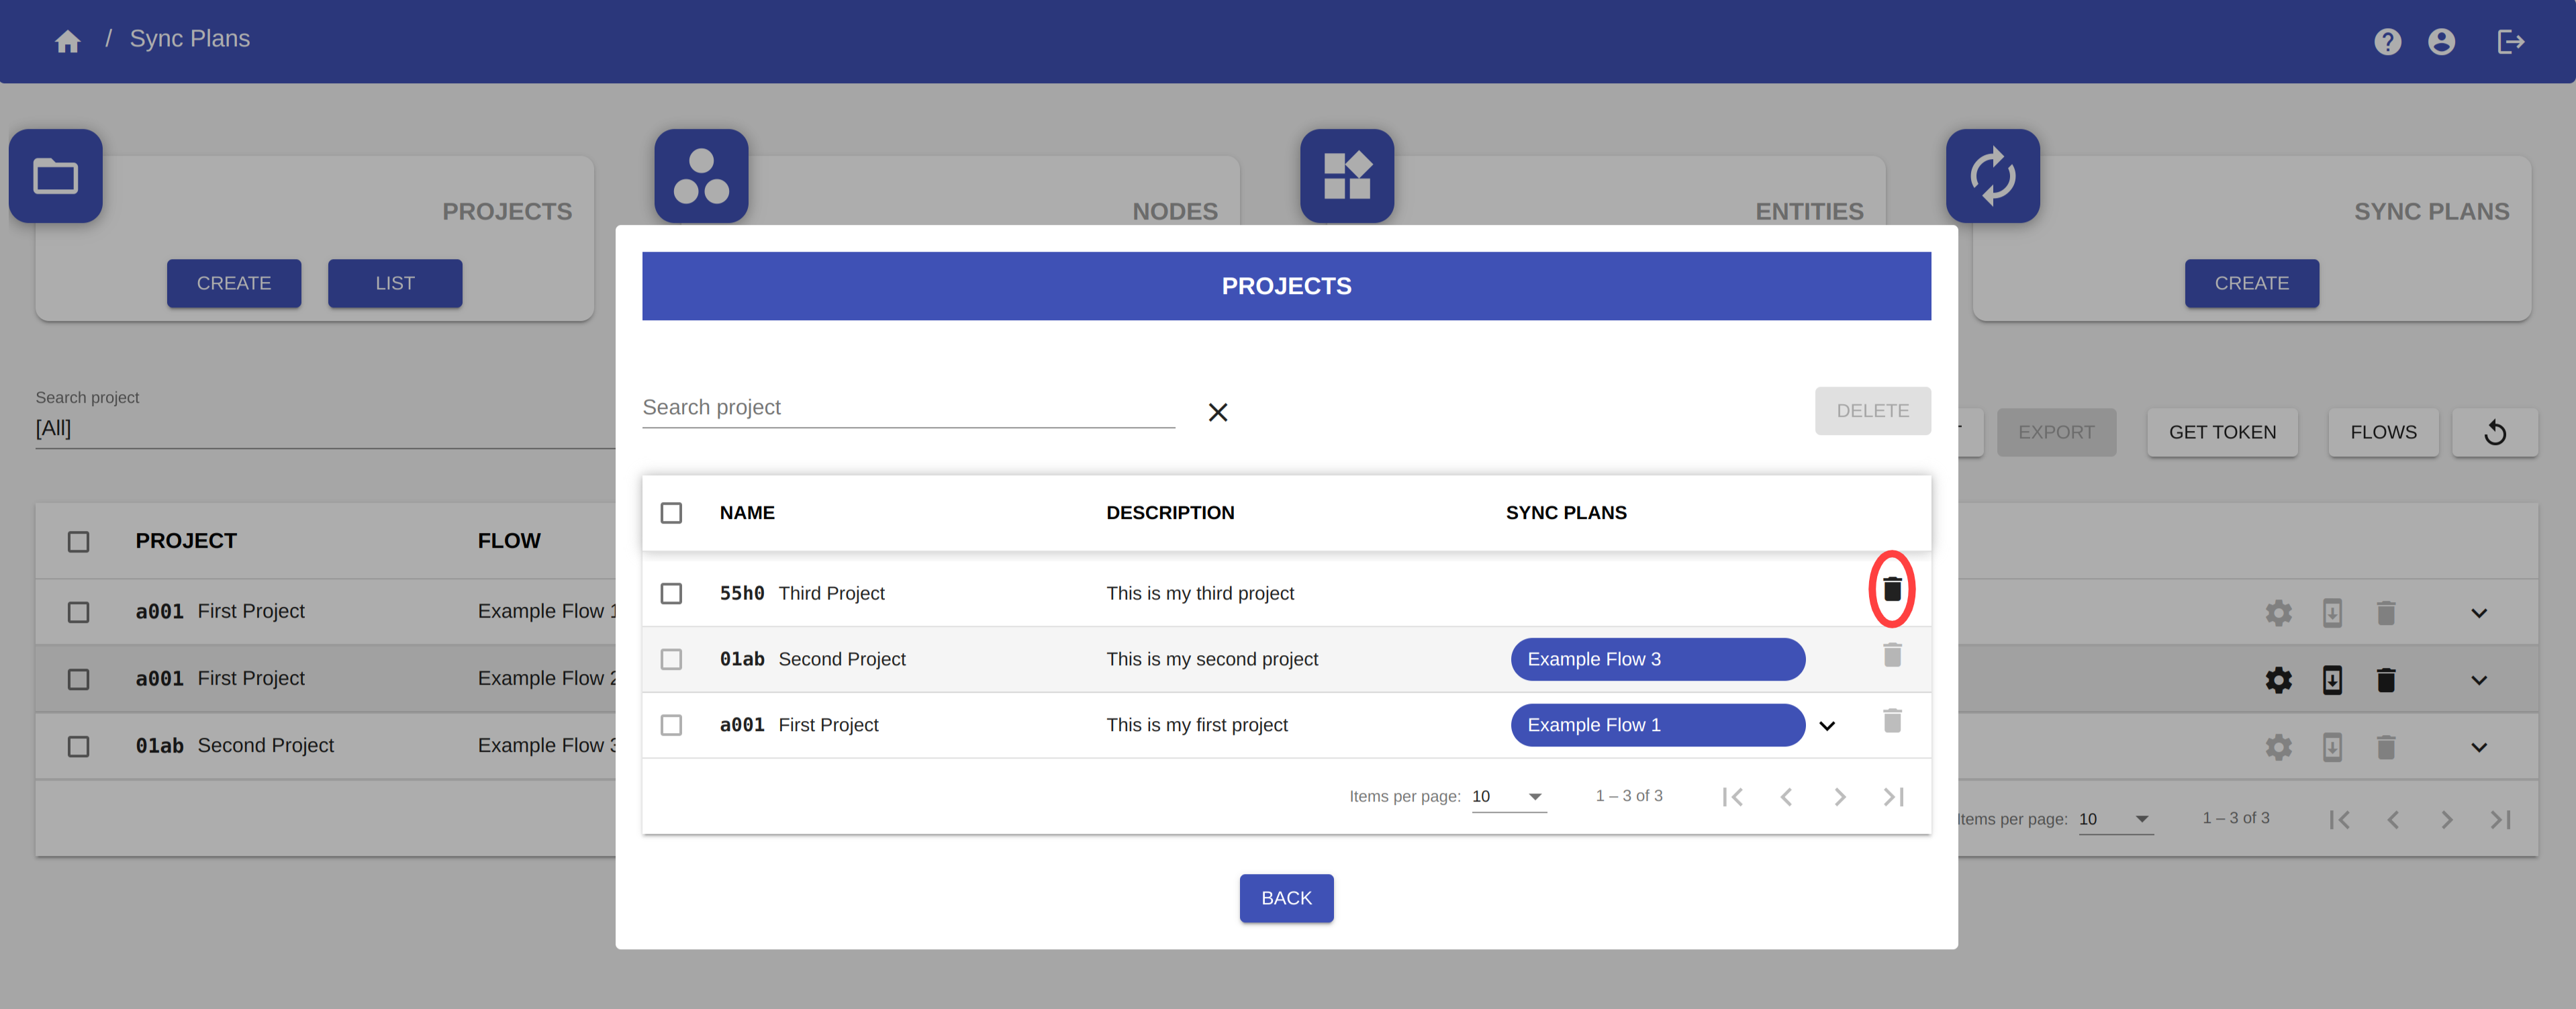
NOTE
The button ![]() is disabled for the projects that cannot be deleted.
is disabled for the projects that cannot be deleted.
You can delete more than one project at a time, by selecting the projects and then clicking on the button DELETE.
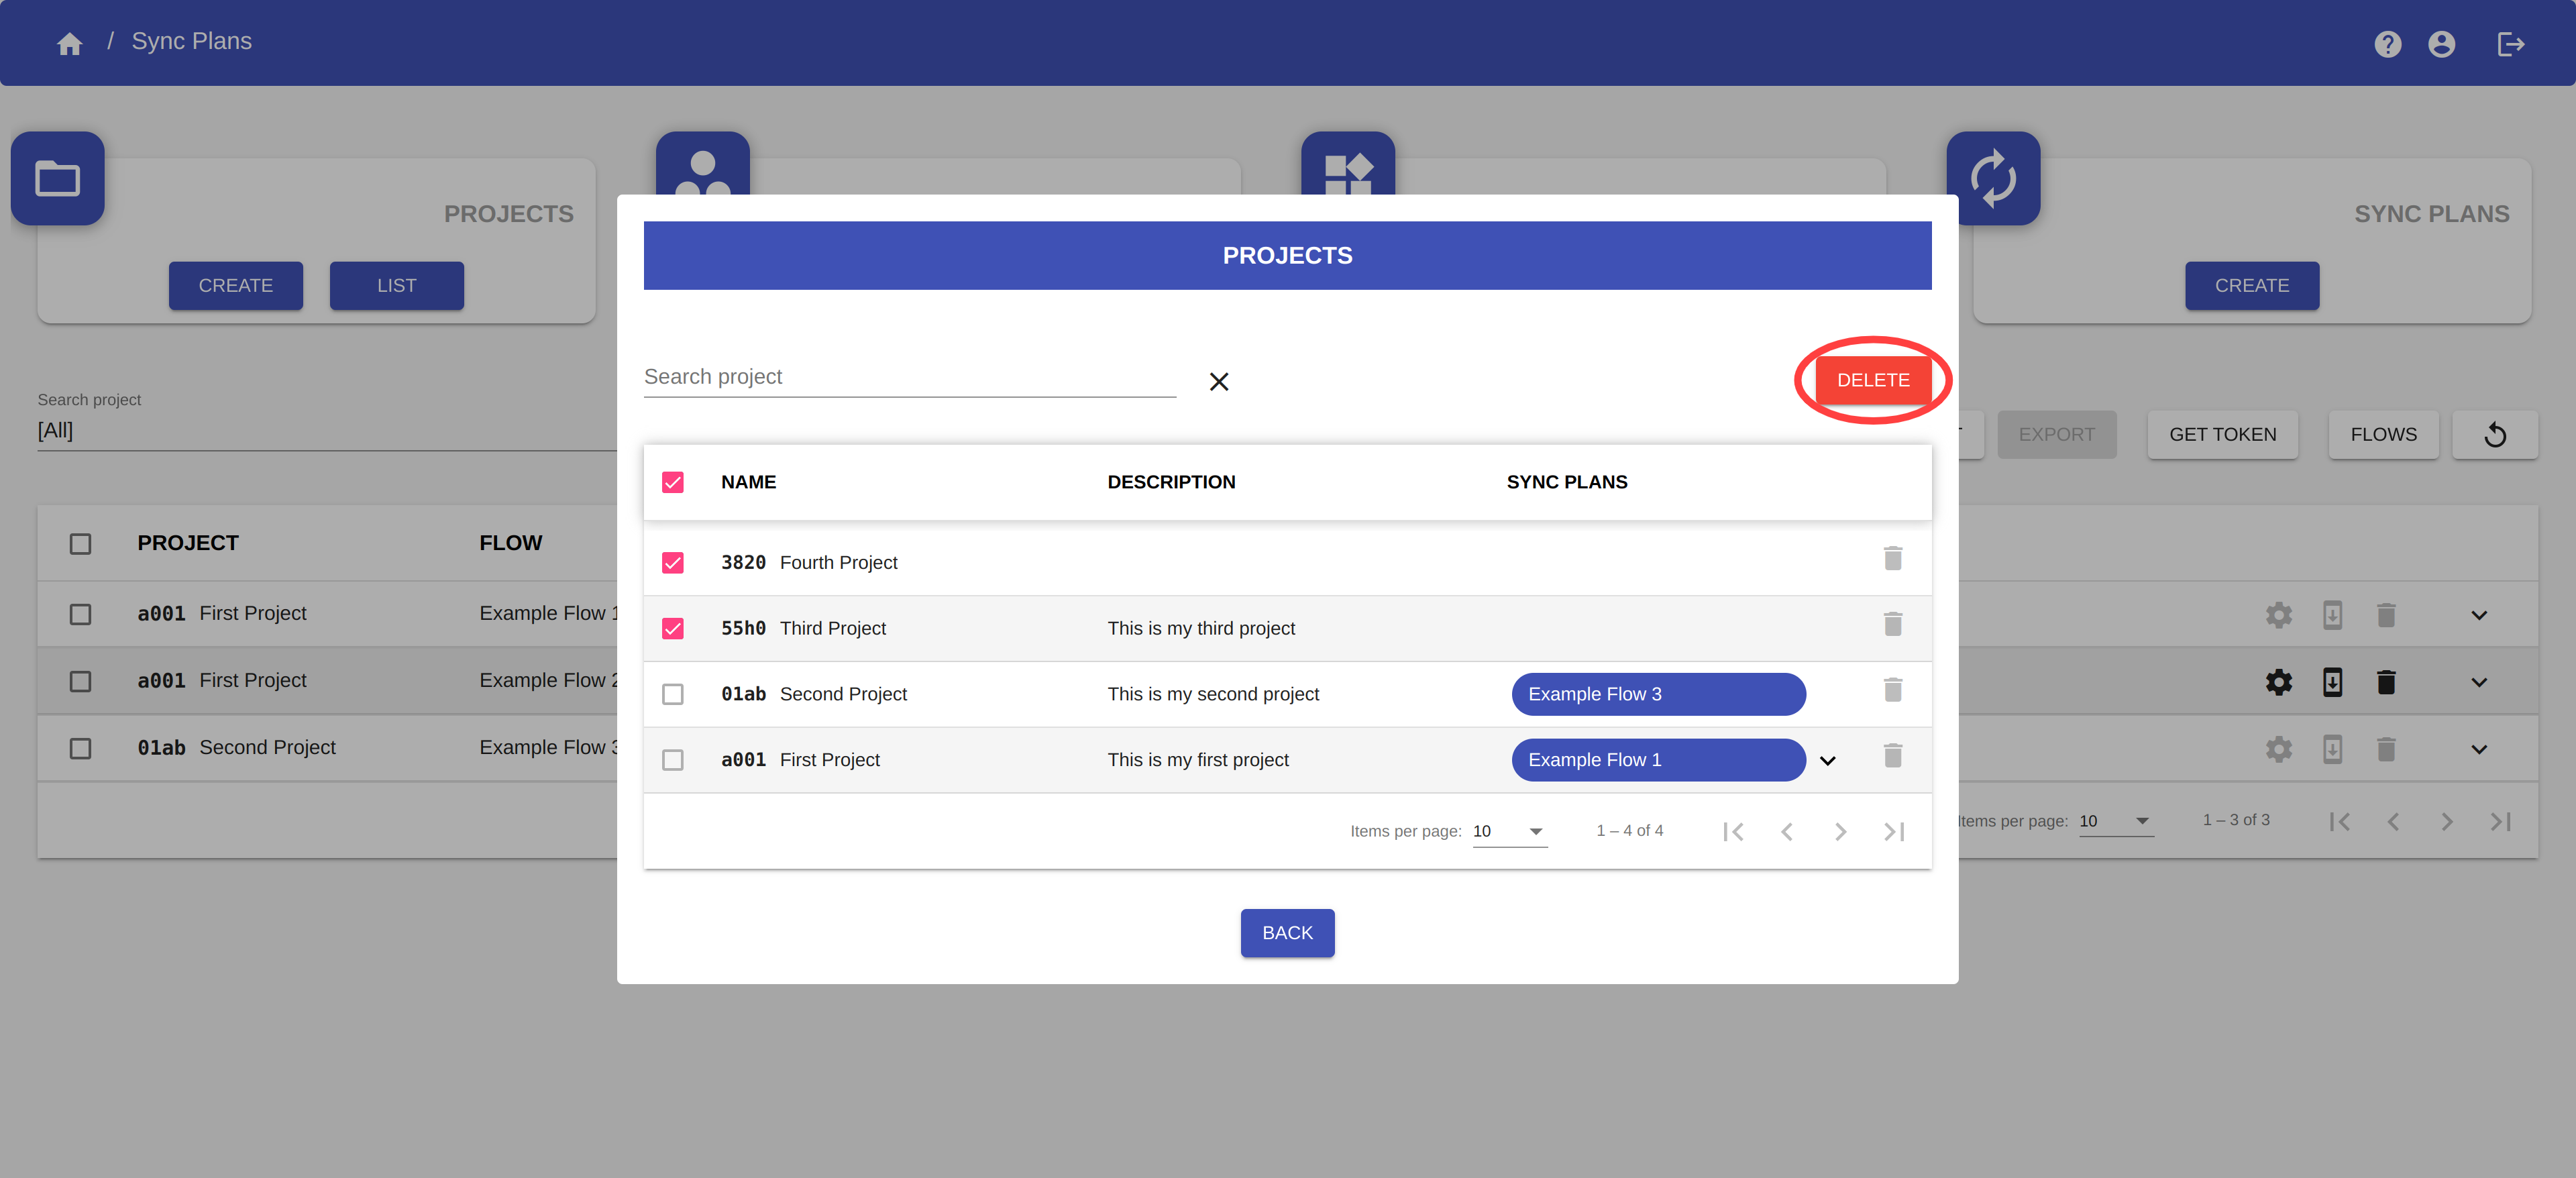
NOTE
When you select a project the button ![]() in the row will be disabled. Use the button DELETE to delete the project.
in the row will be disabled. Use the button DELETE to delete the project.
Click on the button BACK to close the dialog.
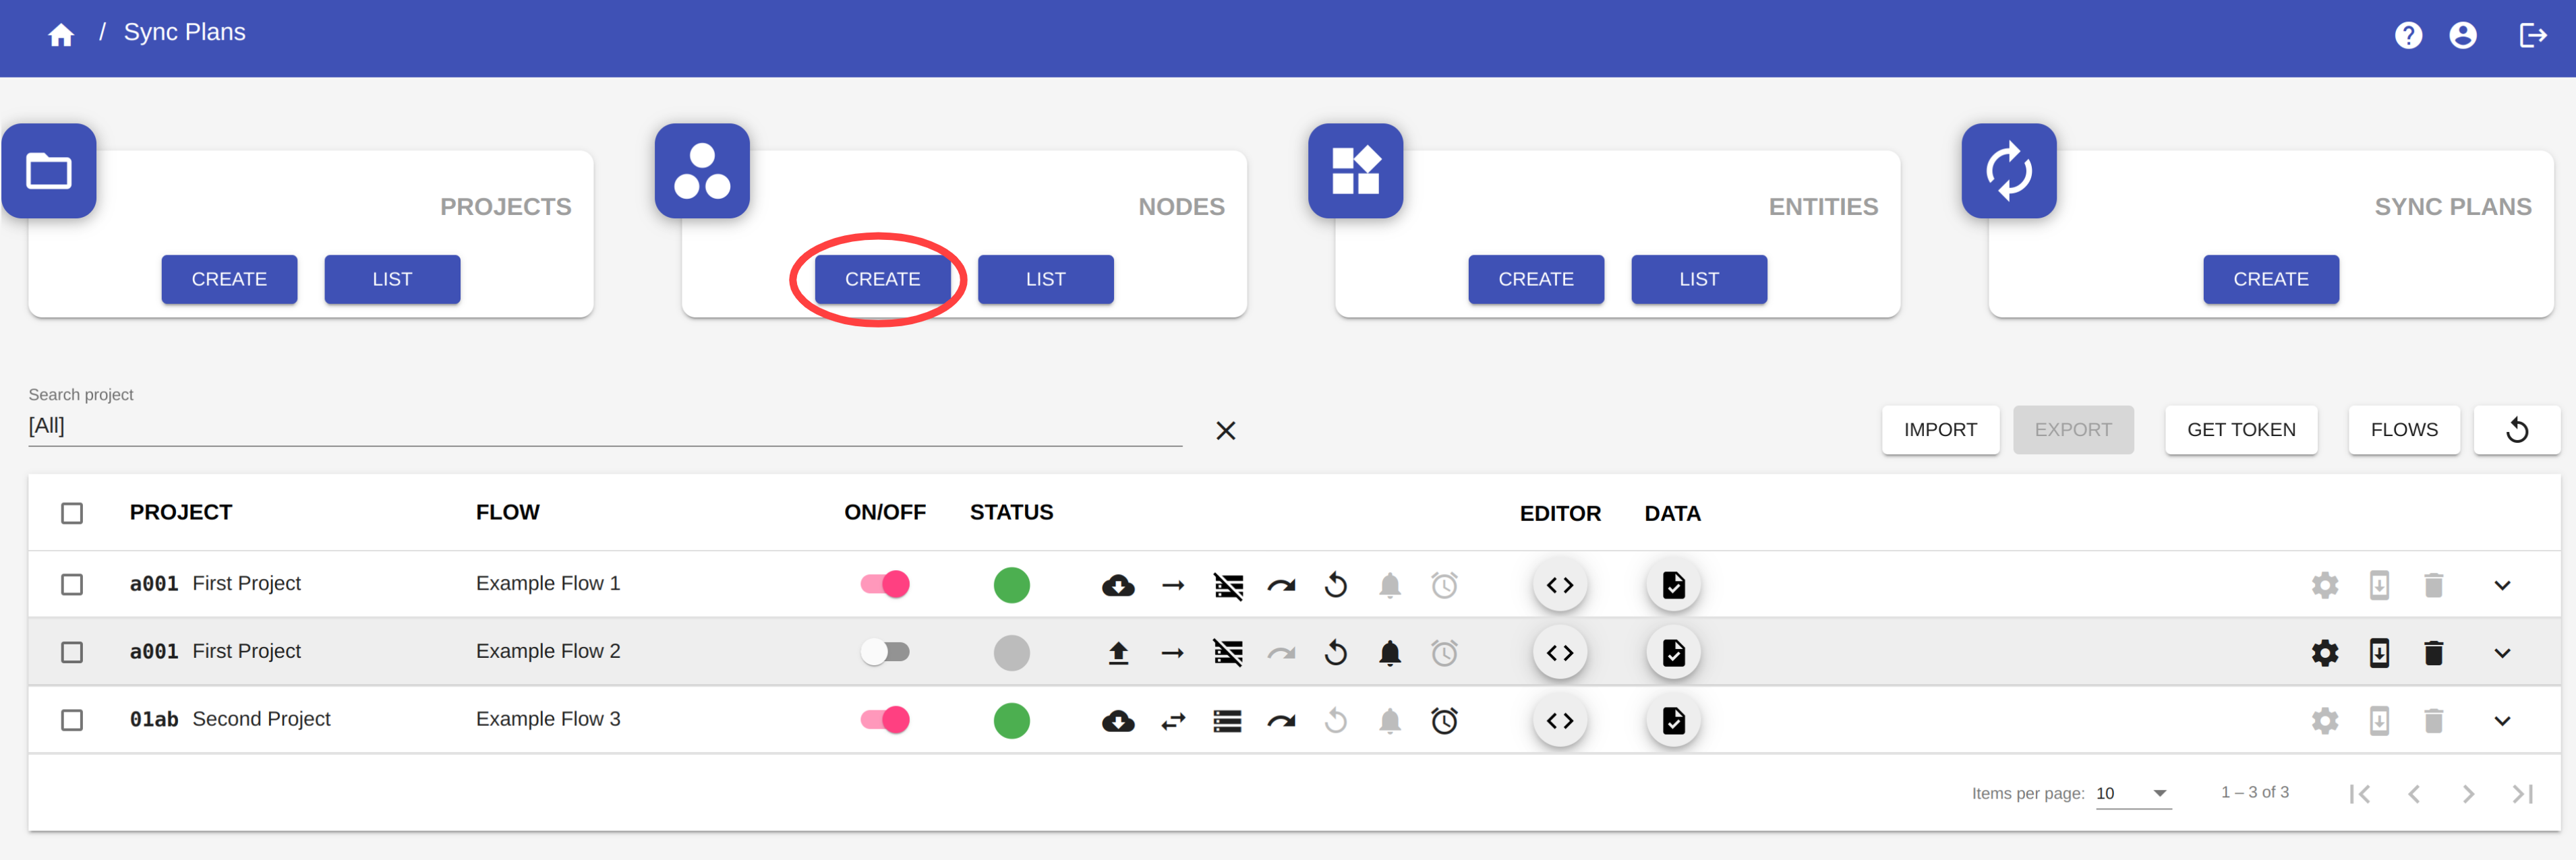
Create a node
To create a node, click on the button CREATE in the Nodes section to open the Node creation dialog.

You have to fill in the following fields:
- Name: the name of the node.
- Description: an optional description of the node.
You don't have to fill in the Code name field. This is a field automatically generated from the Name field and it is used to uniquely identifies the node.
WARNING
The Name of the node must be unique.
NOTE
The Name of the node:
- cannot start with numbers.
- spaces are not allowed at the beginning or at the end of the name.
- special characters are not allowed.
- underscore character is not allowed.
Click on the CREATE button to create the node.
Click on the BACK button to close the Node creation dialog without creating the node.
Click on the RESET button to reset the form.
Delete a node
By clicking on the button LIST in the Node section, you can access the Node List dialog.
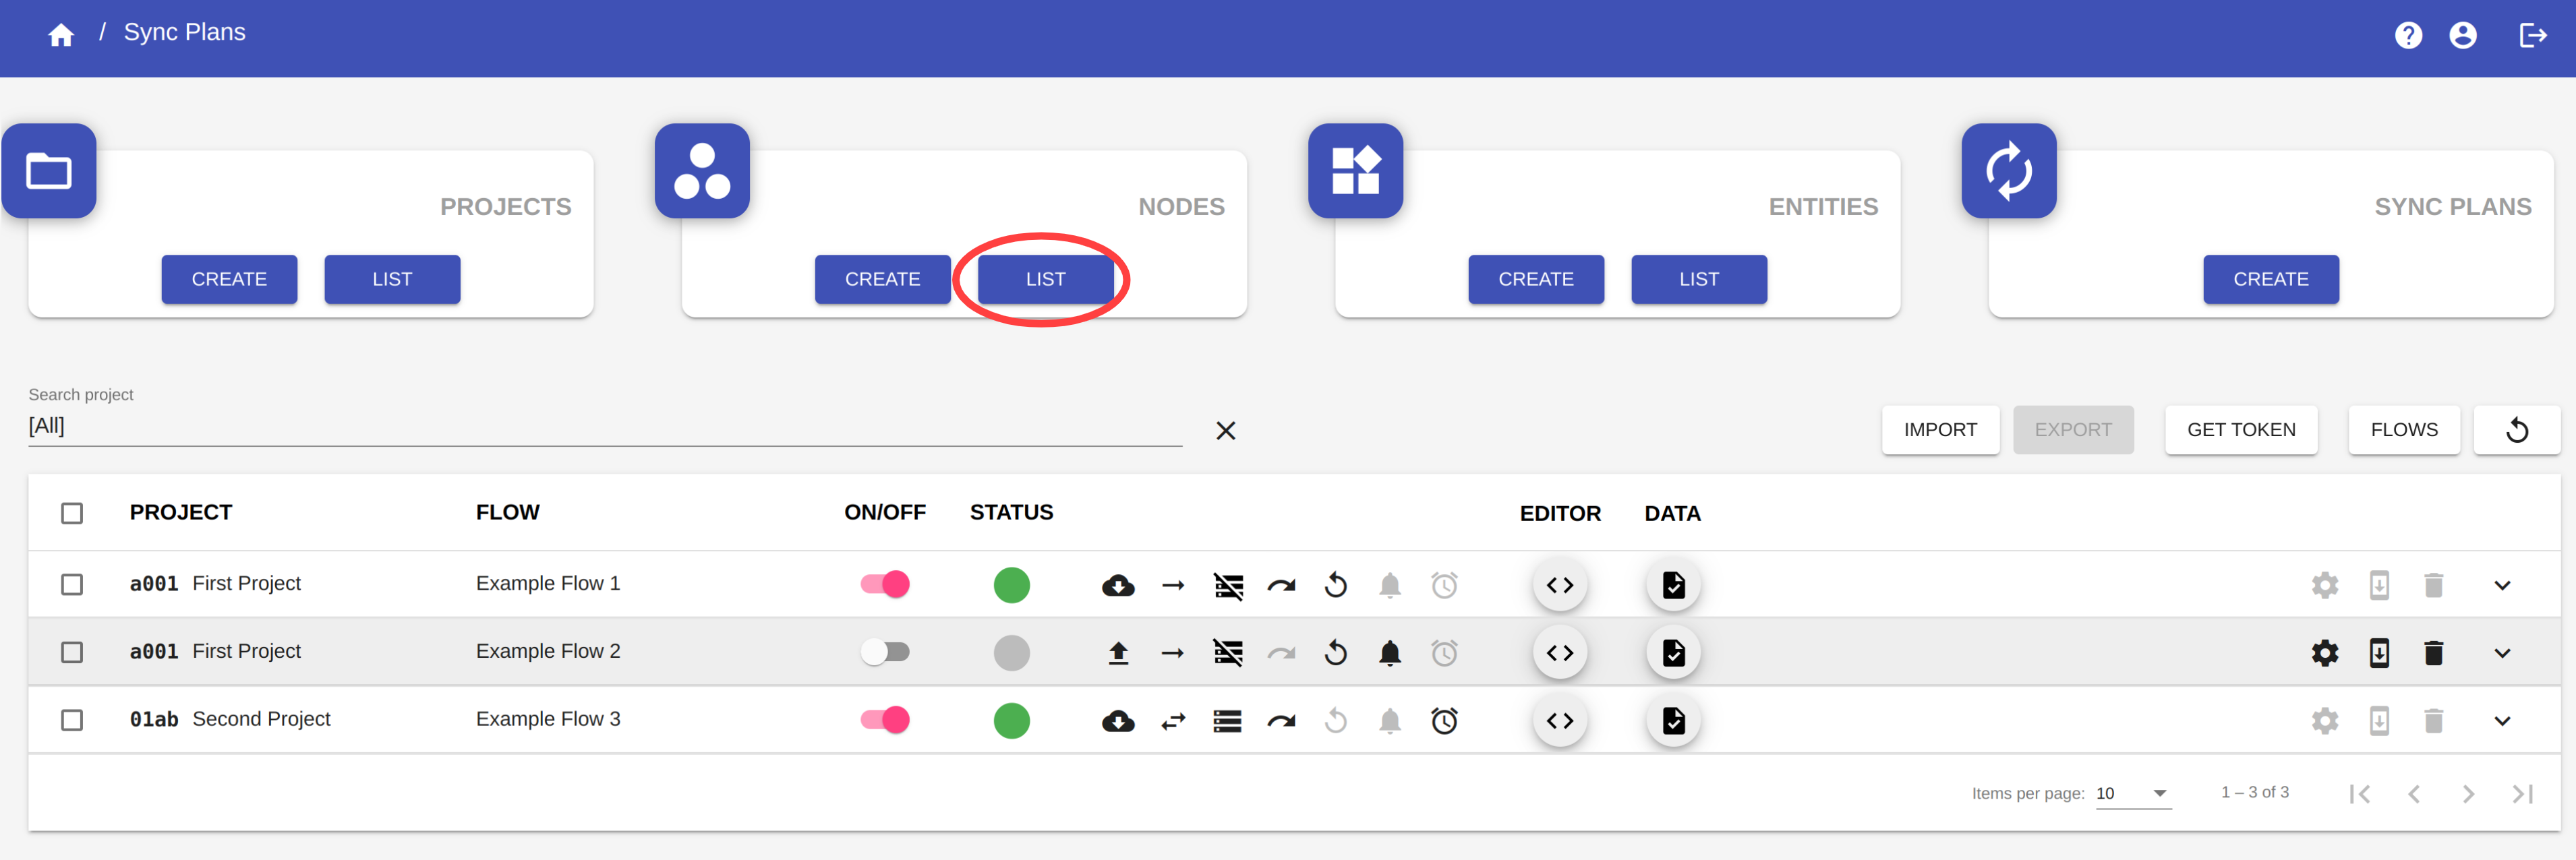
Here you can visualize the list of all the nodes you have created.
The column ID shows the id of the node, which is automatically created by the platform based on the node name entered by the user. The id is used to call the YouSolution.Cloud APIs (see the section Node-RED).
By clicking the button ![]() you can quickly copy the id of the node.
you can quickly copy the id of the node.
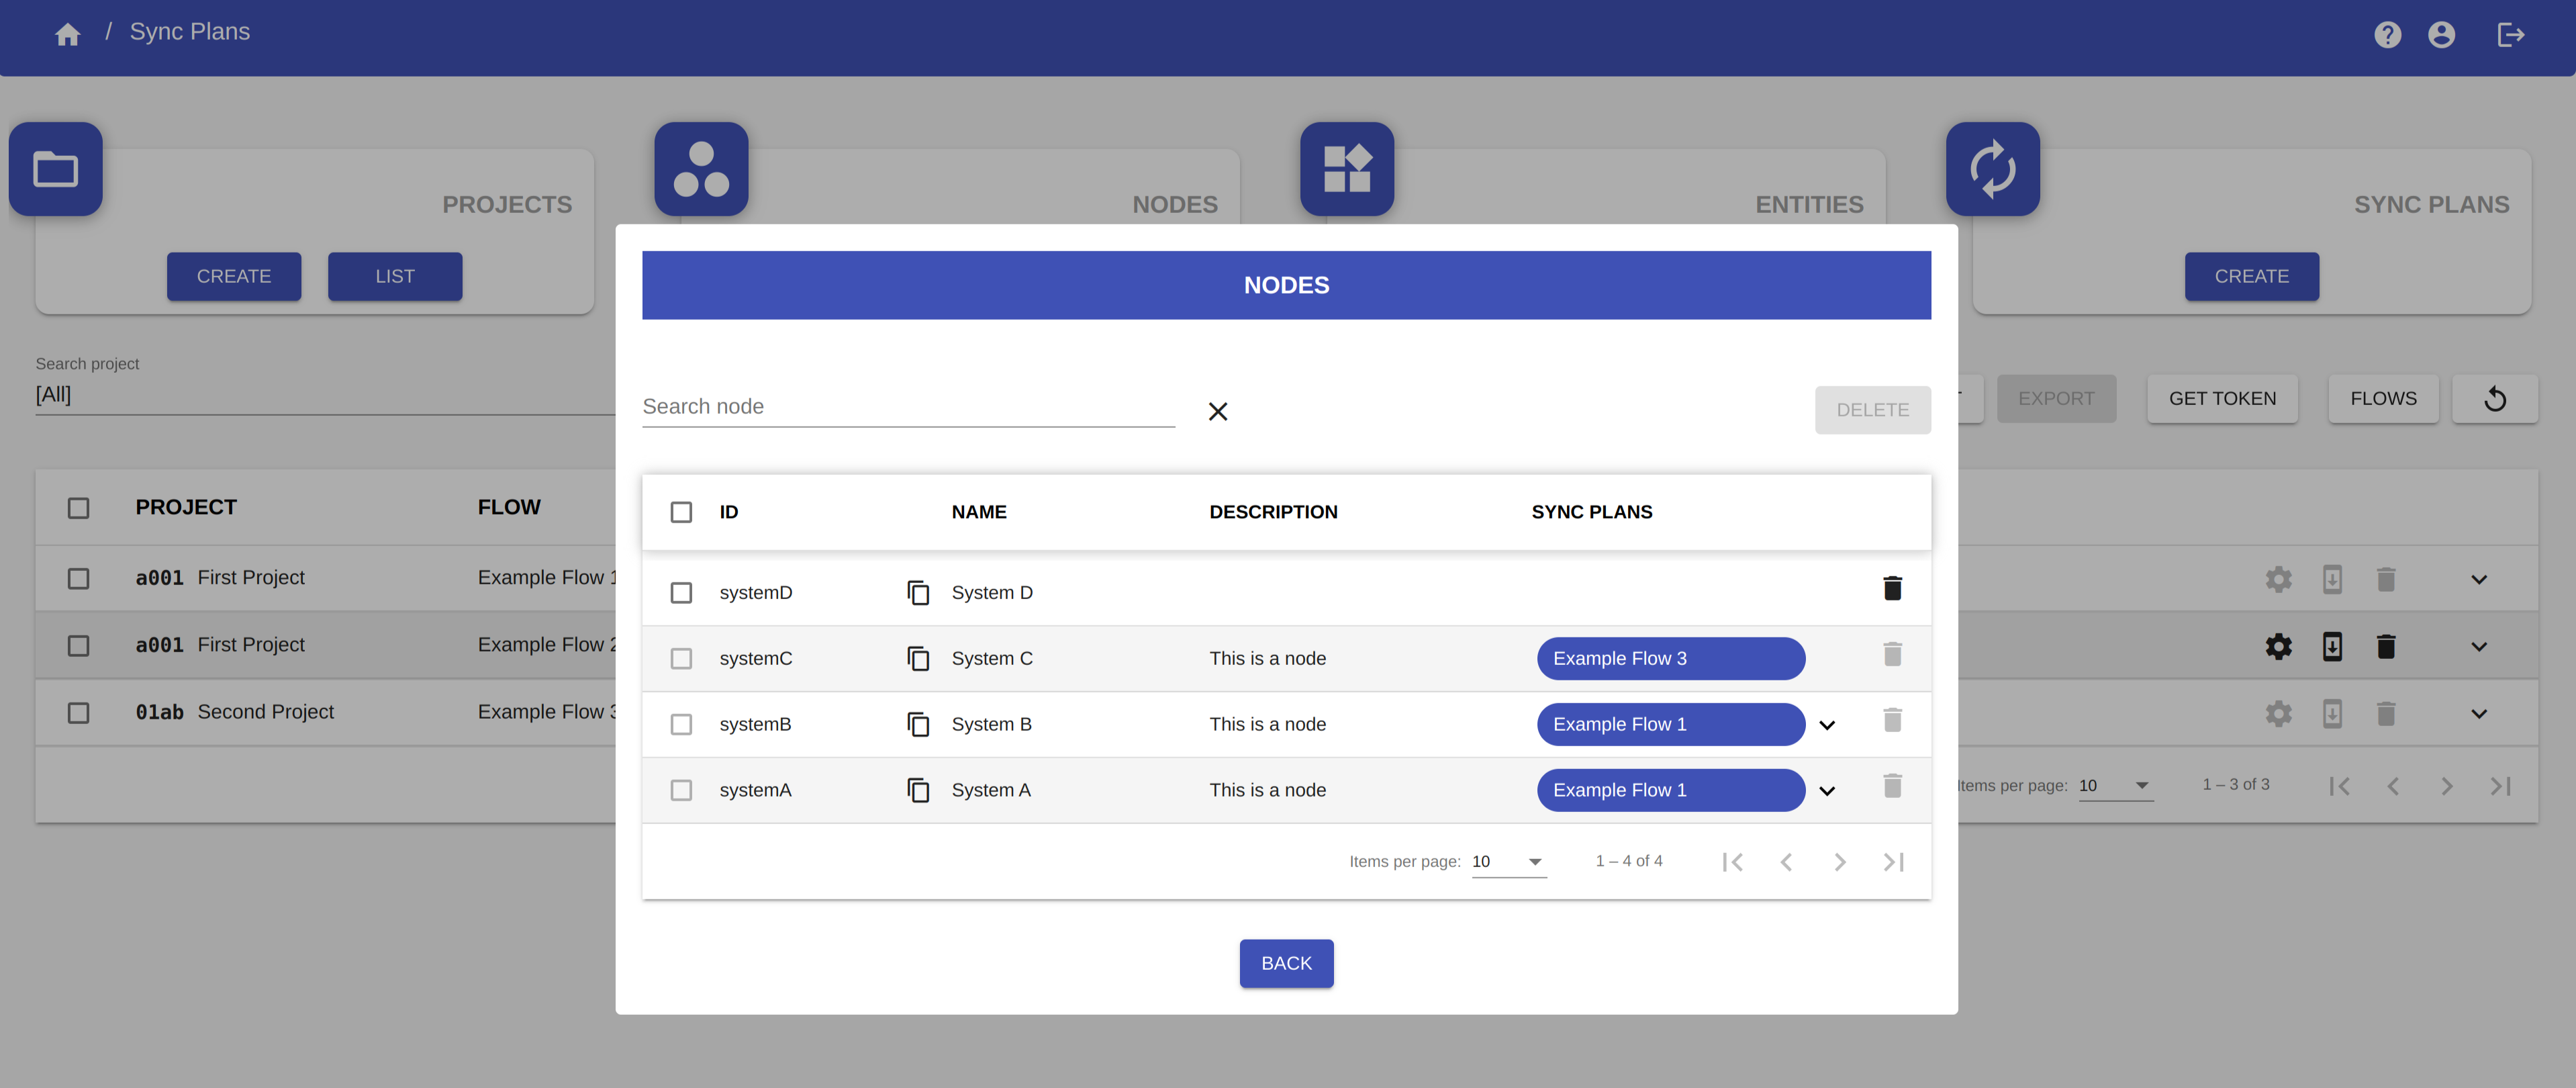
The column SYNC PLANS shows in which sync plans is used the node.
WARNING
You cannot delete a node if it is used in a sync plan.
You can search a node by using the Search node filter.
To delete a node, click on the button ![]() in the row corresponding to the node you want to delete.
in the row corresponding to the node you want to delete.
NOTE
The button ![]() is disabled for the nodes that cannot be deleted.
is disabled for the nodes that cannot be deleted.
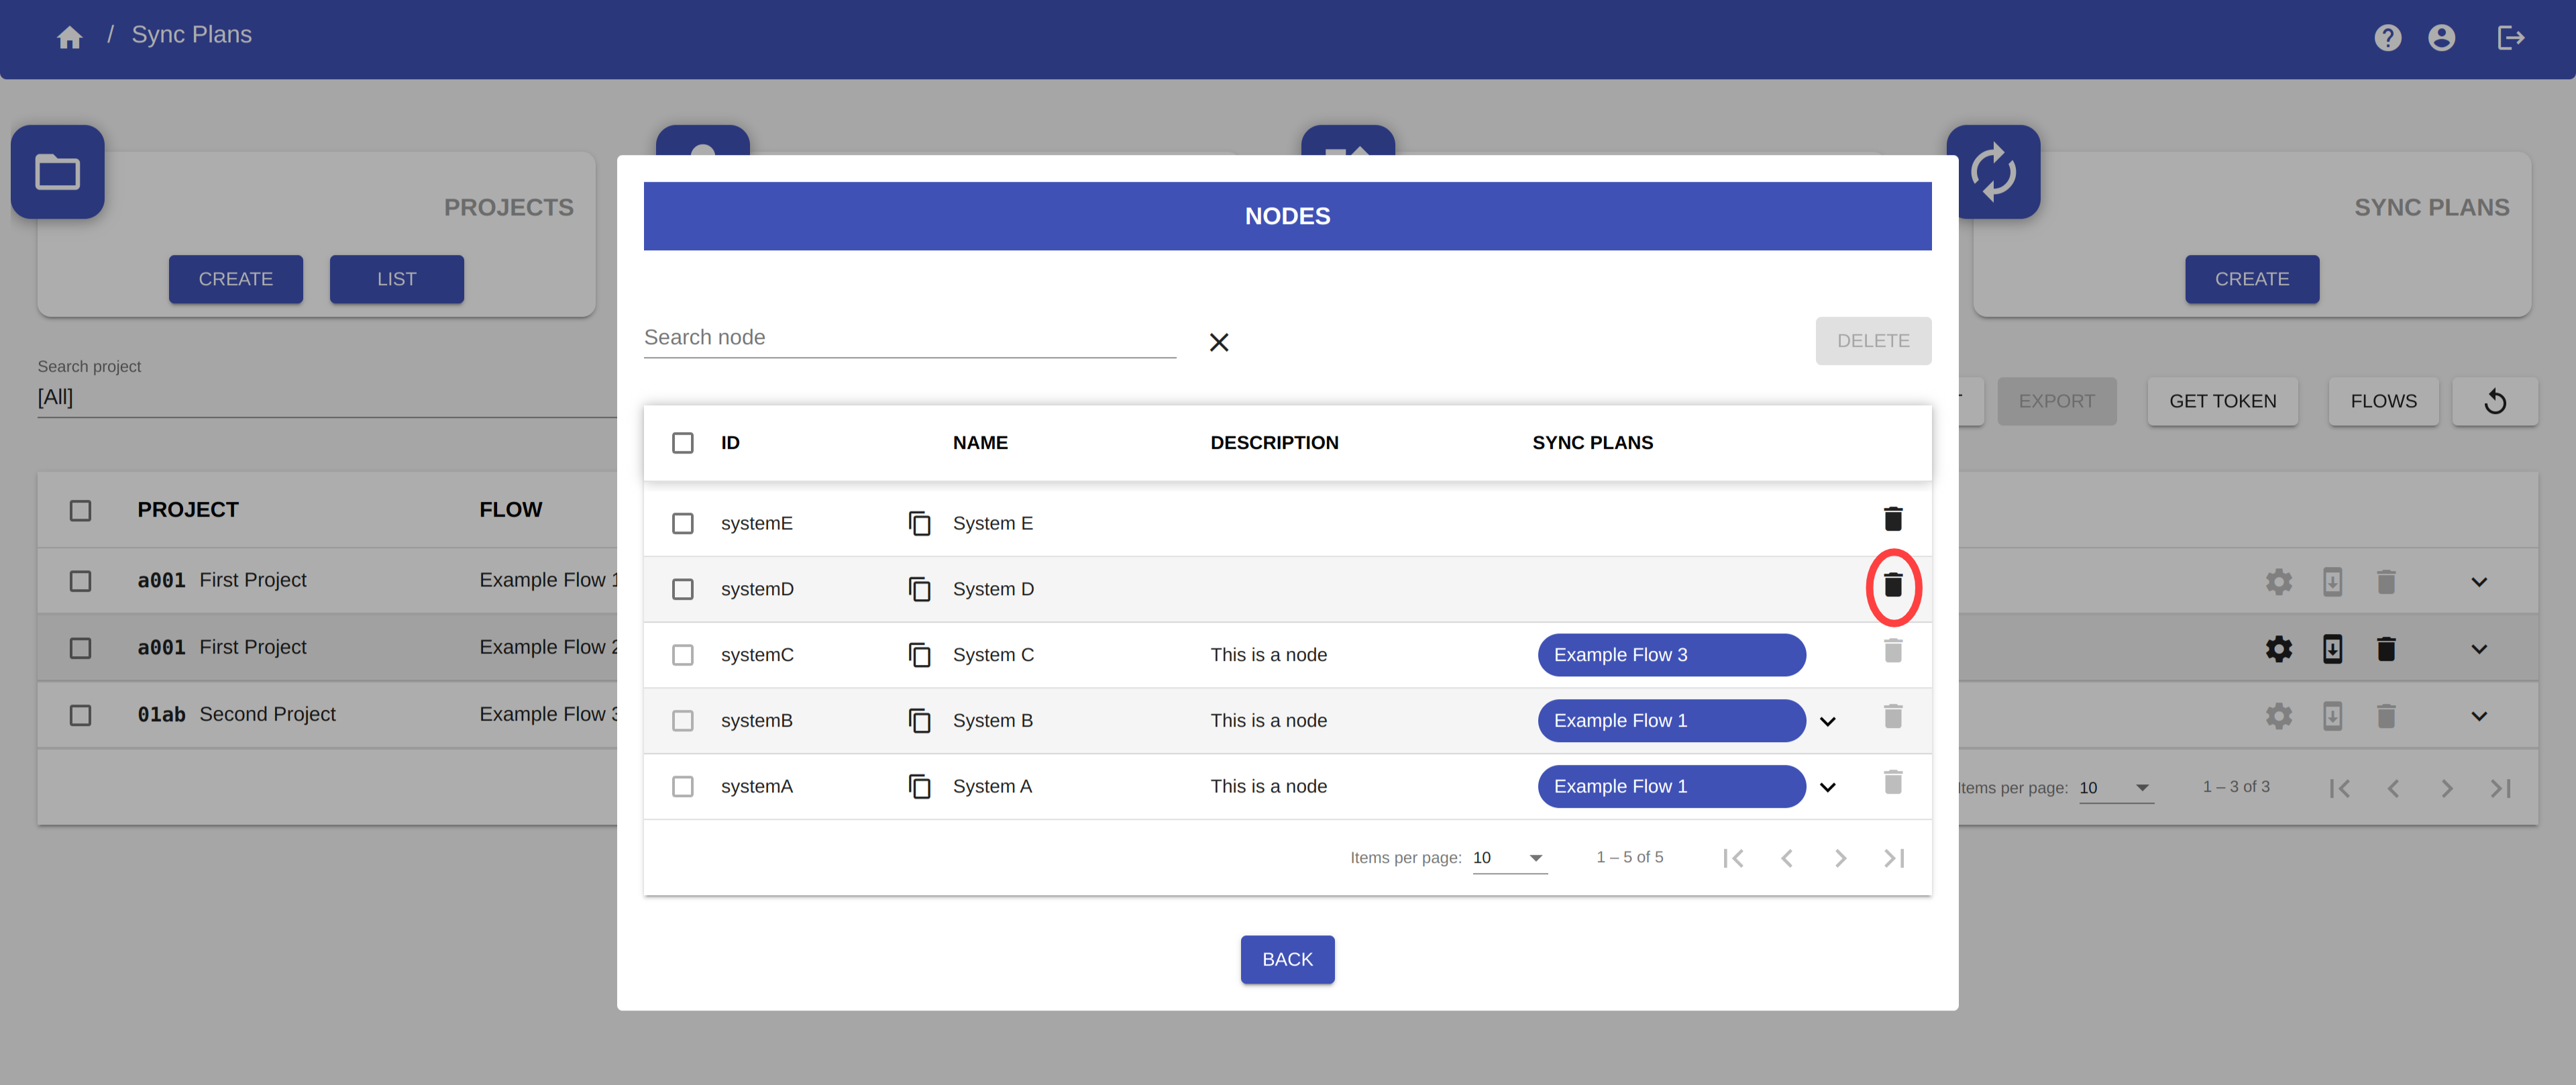
You can delete more than one node at a time, by selecting the nodes and then clicking on the button DELETE.
NOTE
When you select a node the button ![]() in the row will be disabled. Use the button DELETE to delete the node.
in the row will be disabled. Use the button DELETE to delete the node.
Click on the button BACK to close the dialog.
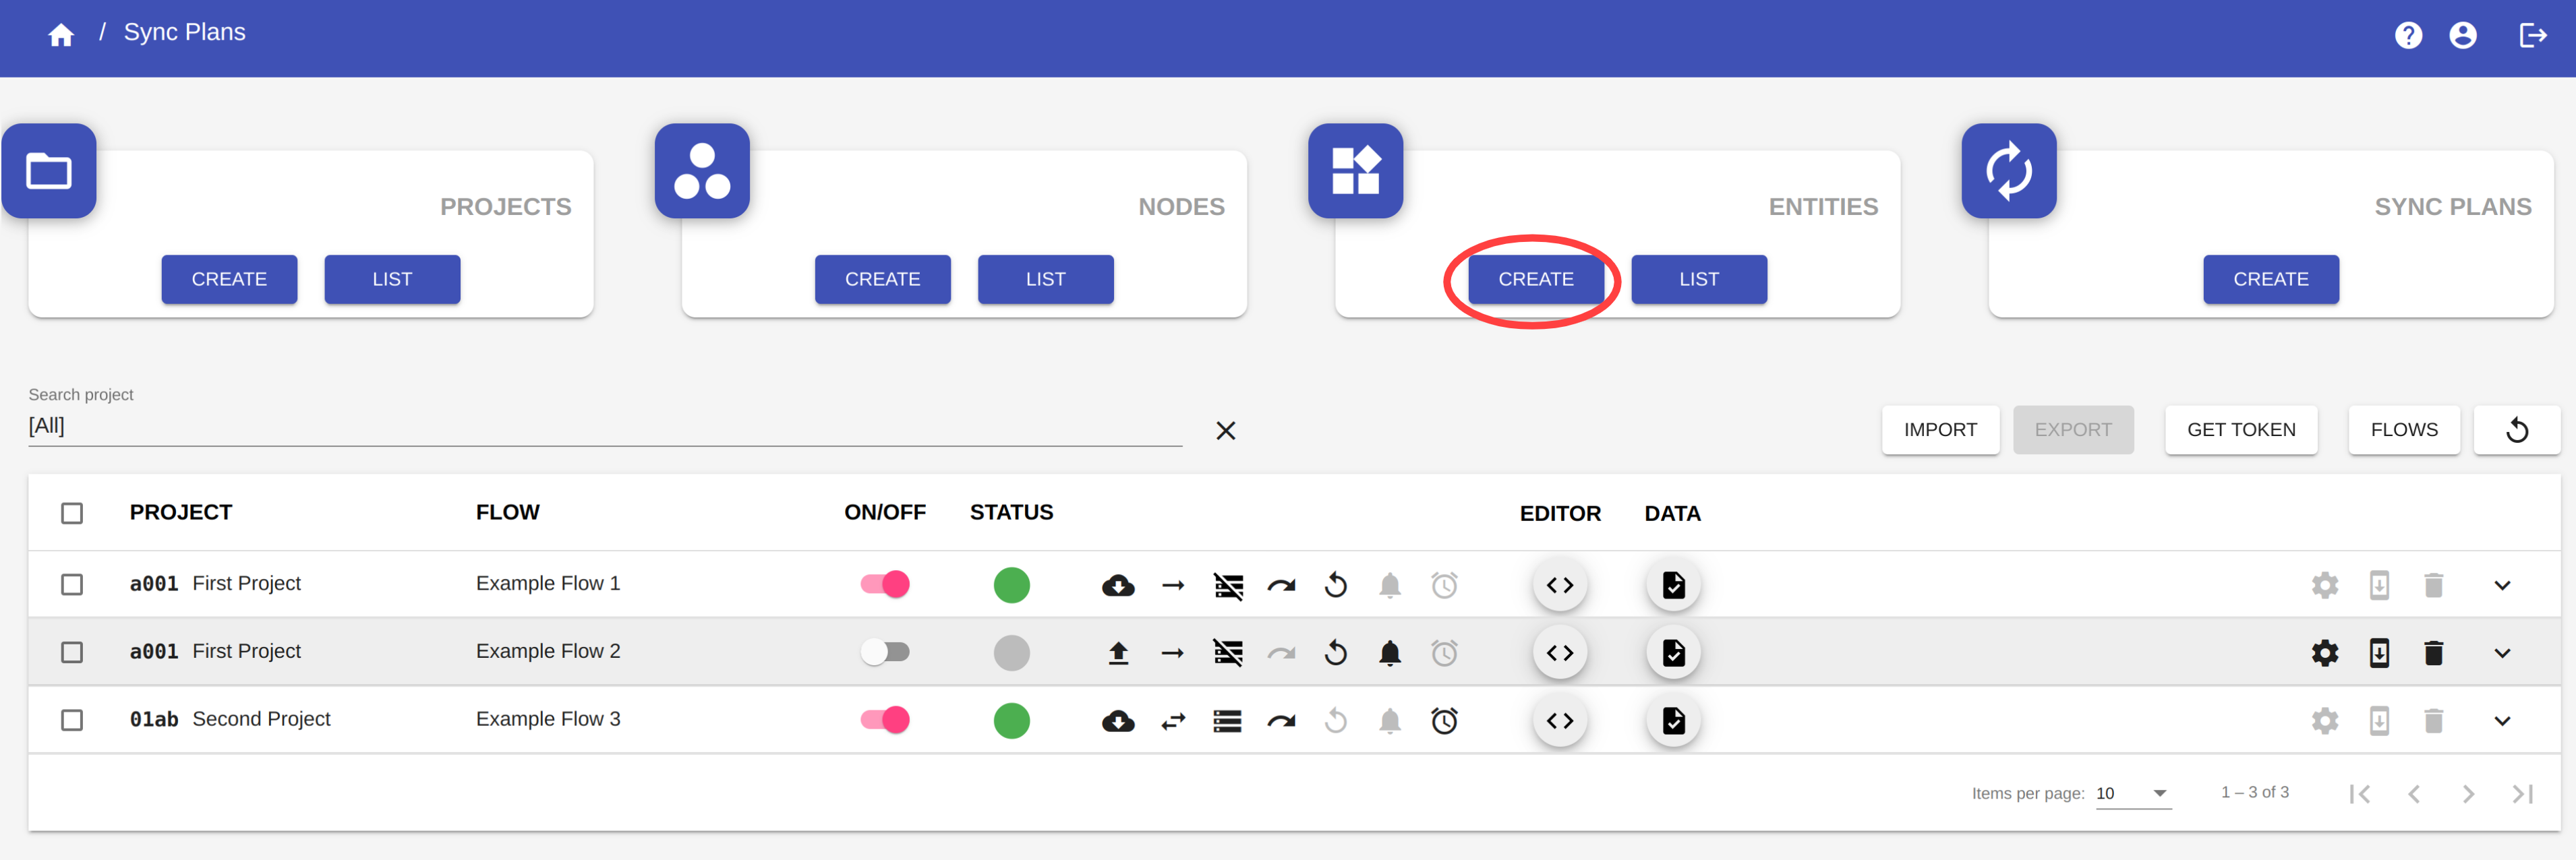
Create an entity
To create an entity, click on the button CREATE in the Entities section to open the Entity creation dialog.
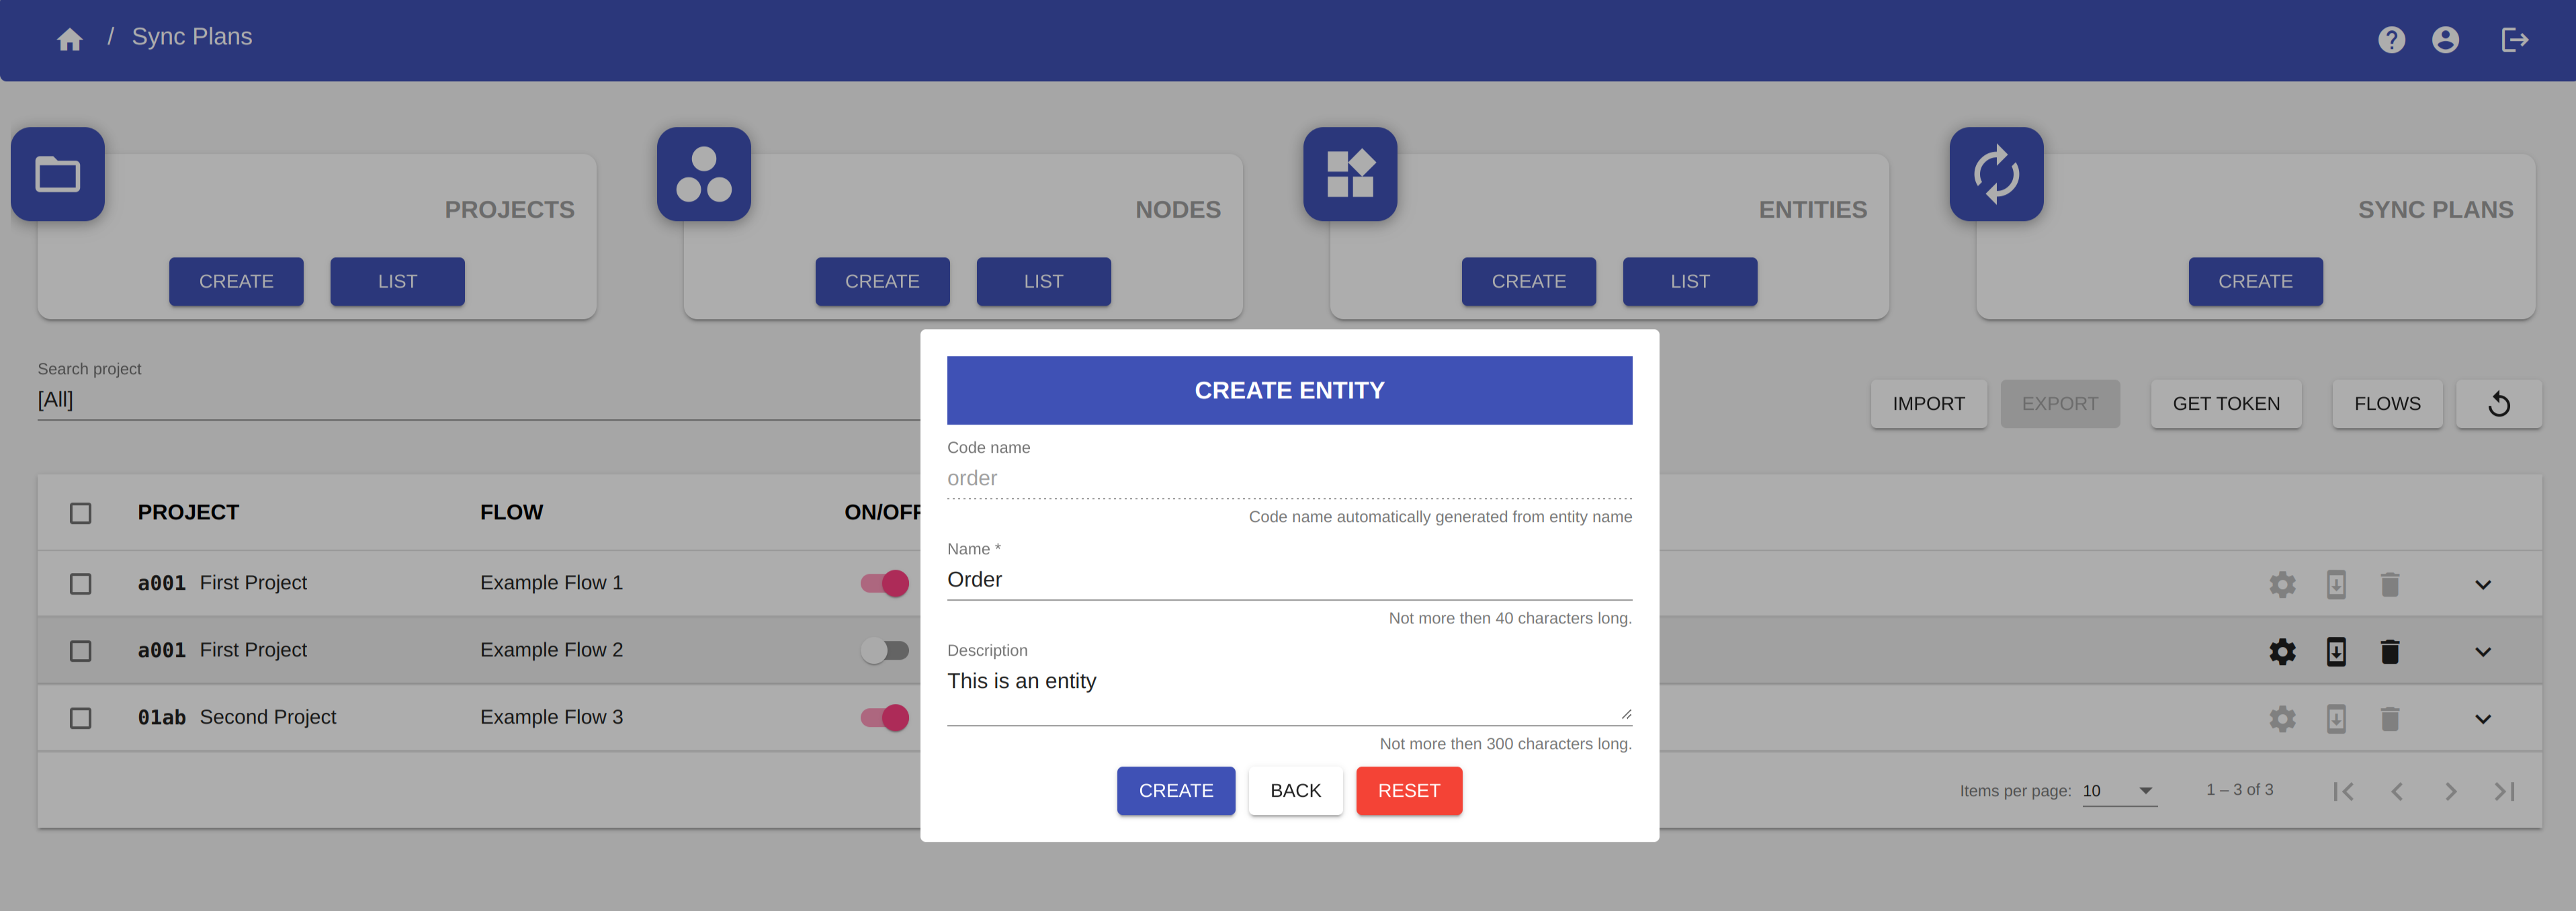
You have to fill in the following fields:
- Name: the name of the entity.
- Description: an optional description of the entity.
You don't have to fill in the Code name field. This is a field automatically generated from the Name field and it is used to uniquely identifies the entity.
WARNING
The Name of the entity must be unique.
NOTE
The Name of the entity:
- cannot start with numbers.
- spaces are not allowed at the beginning or at the end of the name.
- special characters are not allowed.
- underscore character is not allowed.
Click on the BACK button to close the Entity creation dialog without creating the entity.
Click on the RESET button to reset the form.
Click on the CREATE button to create the entity.
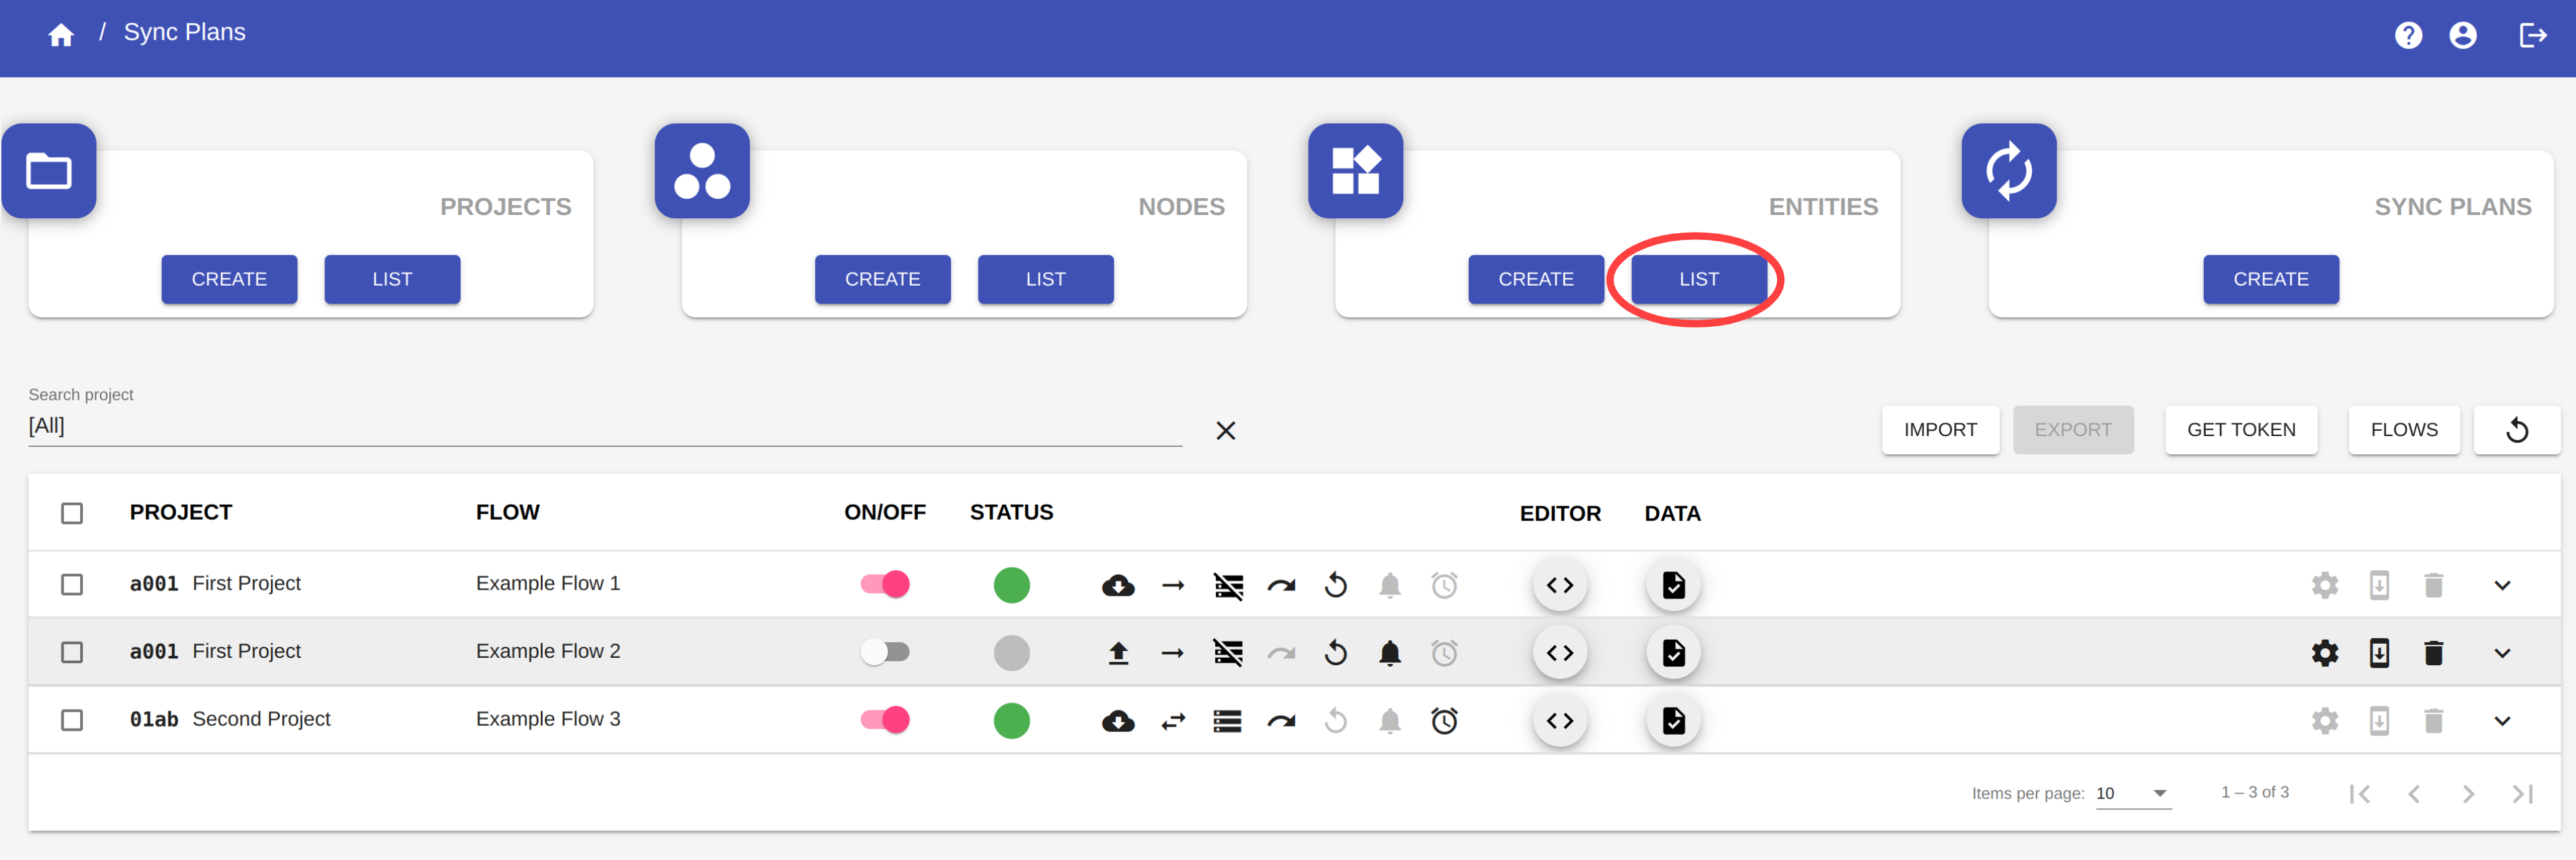
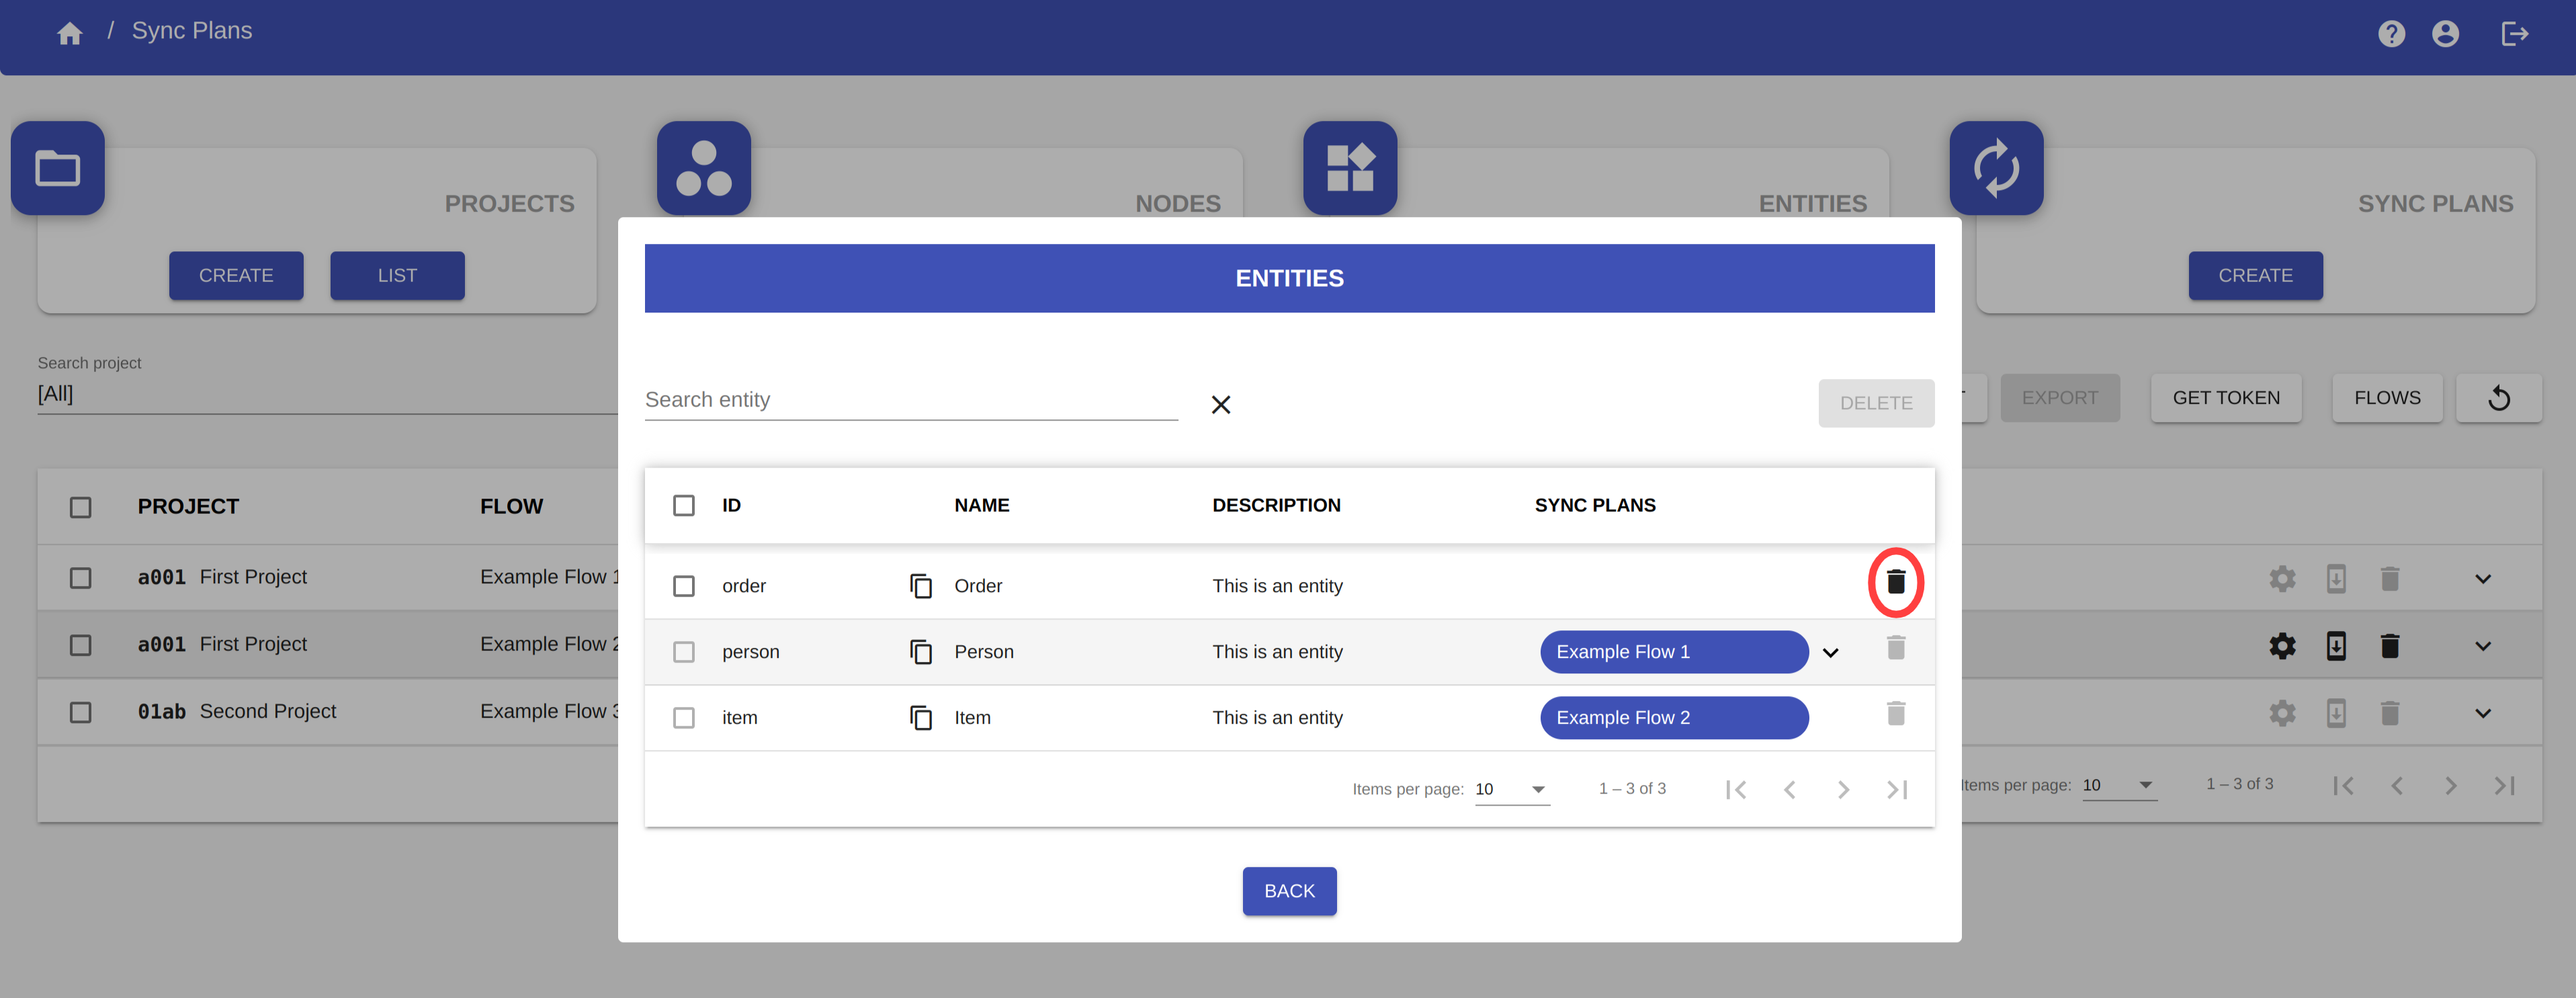
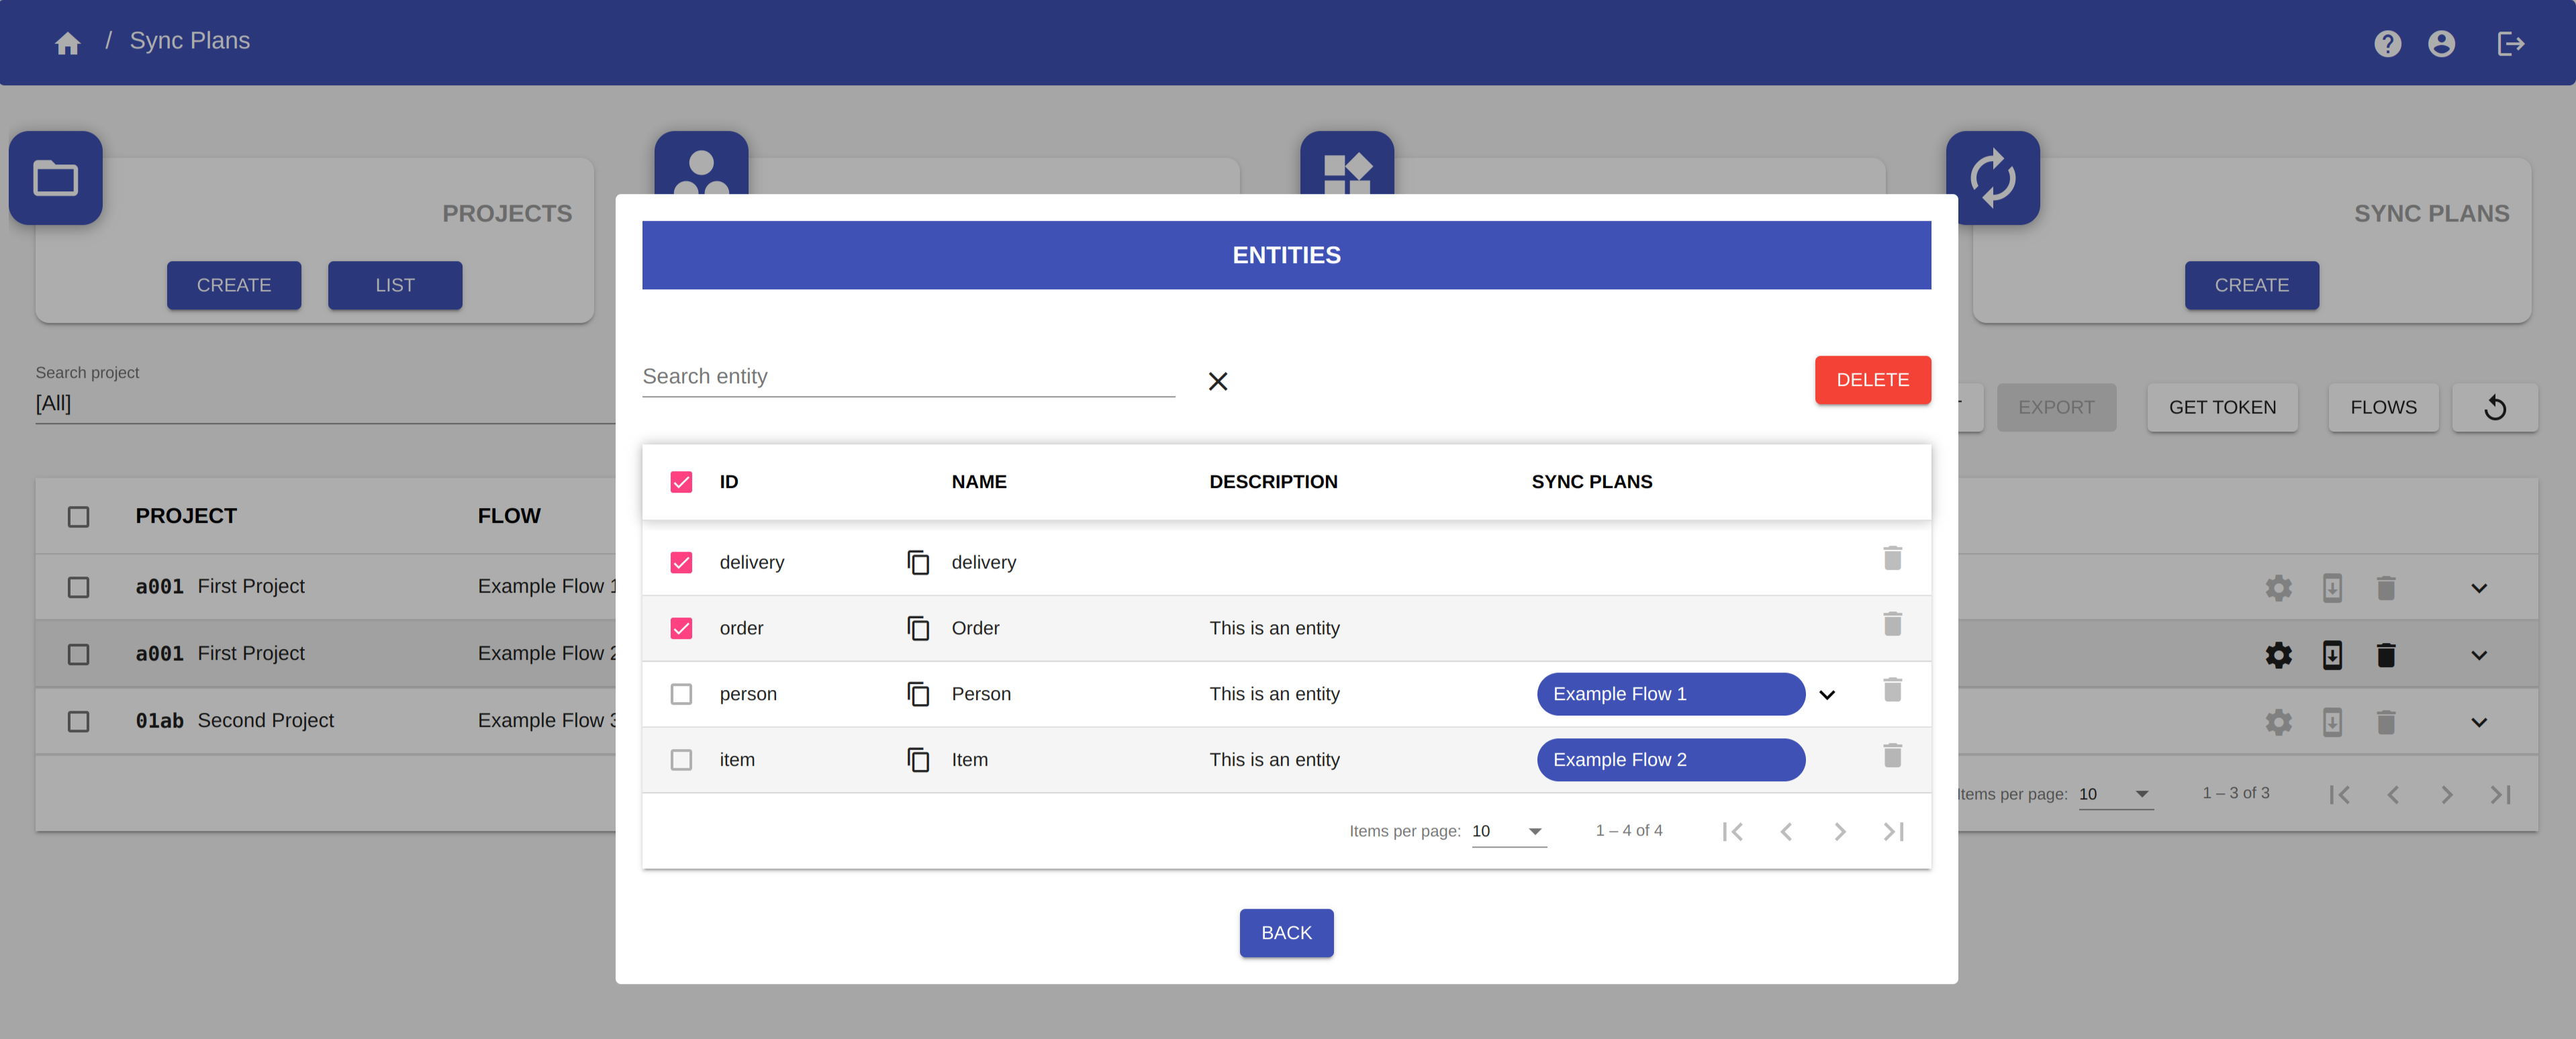
Delete an entity
By clicking on the button LIST in the Entity section, you can access the Entity List dialog.
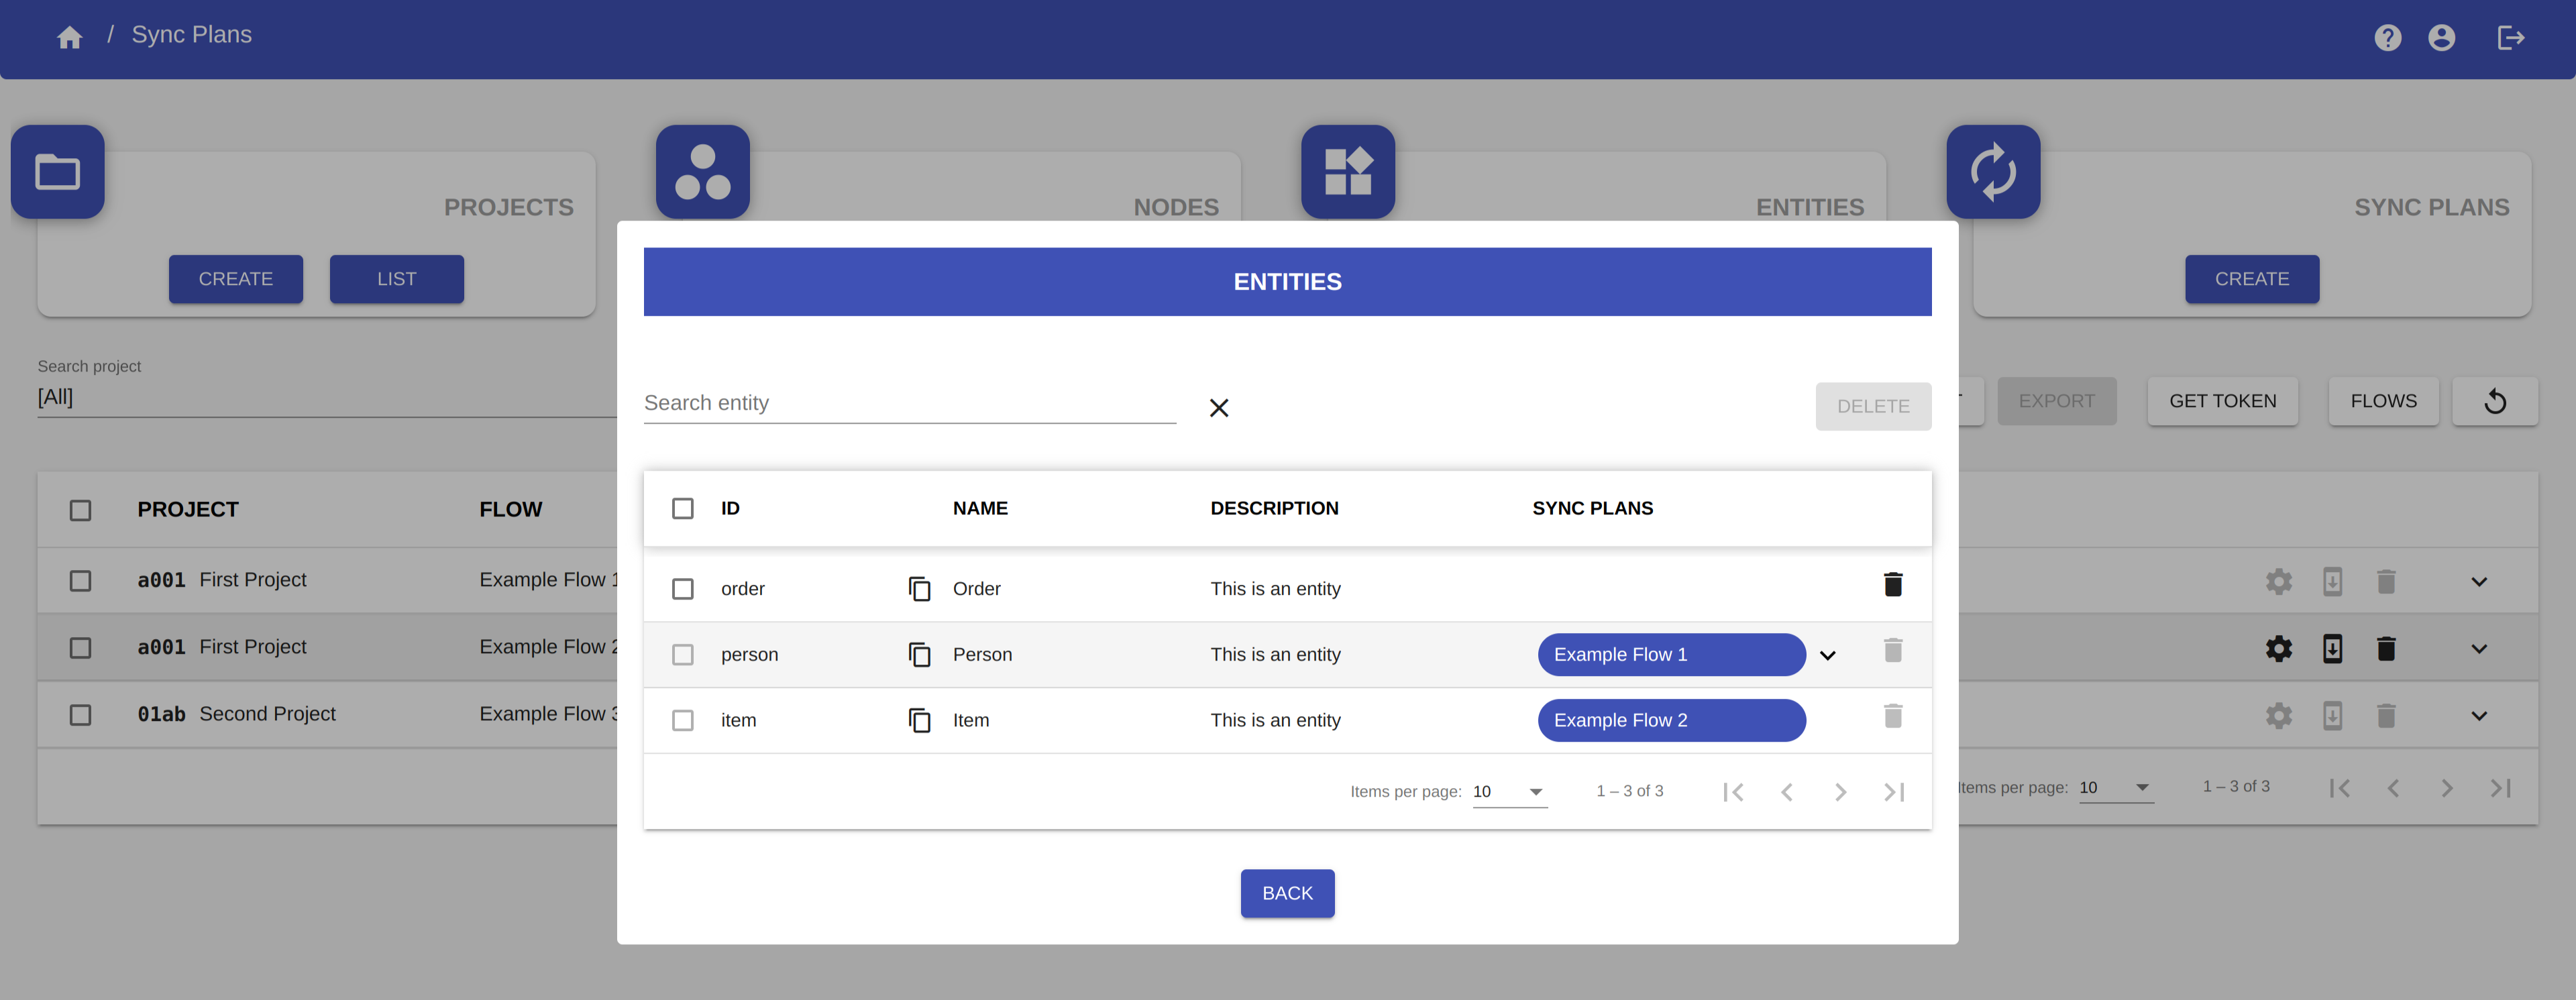
Here you can visualize the list of all the entities you have created.
The column ID shows the id of the entity, which is automatically created by the platform based on the entity name entered by the user. The id is used to call the YouSolution.Cloud APIs (see the section Node-RED).
By clicking the button ![]() you can quickly copy the id of the entity.
you can quickly copy the id of the entity.
The column SYNC PLANS shows in which sync plans is used the entity.
WARNING
You cannot delete an entity if it is used in a sync plan.
You can search an entity by using the Search entity filter.
To delete an entity, click on the button ![]() in the row corresponding to the entity you want to delete.
in the row corresponding to the entity you want to delete.
NOTE
The button ![]() is disabled for the entities that cannot be deleted.
is disabled for the entities that cannot be deleted.
You can delete more than one entity at a time, by selecting the entities and then clicking on the button DELETE.
NOTE
When you select an entity the button ![]() in the row will be disabled. Use the button DELETE to delete the entity.
in the row will be disabled. Use the button DELETE to delete the entity.
Click on the button BACK to close the dialog.
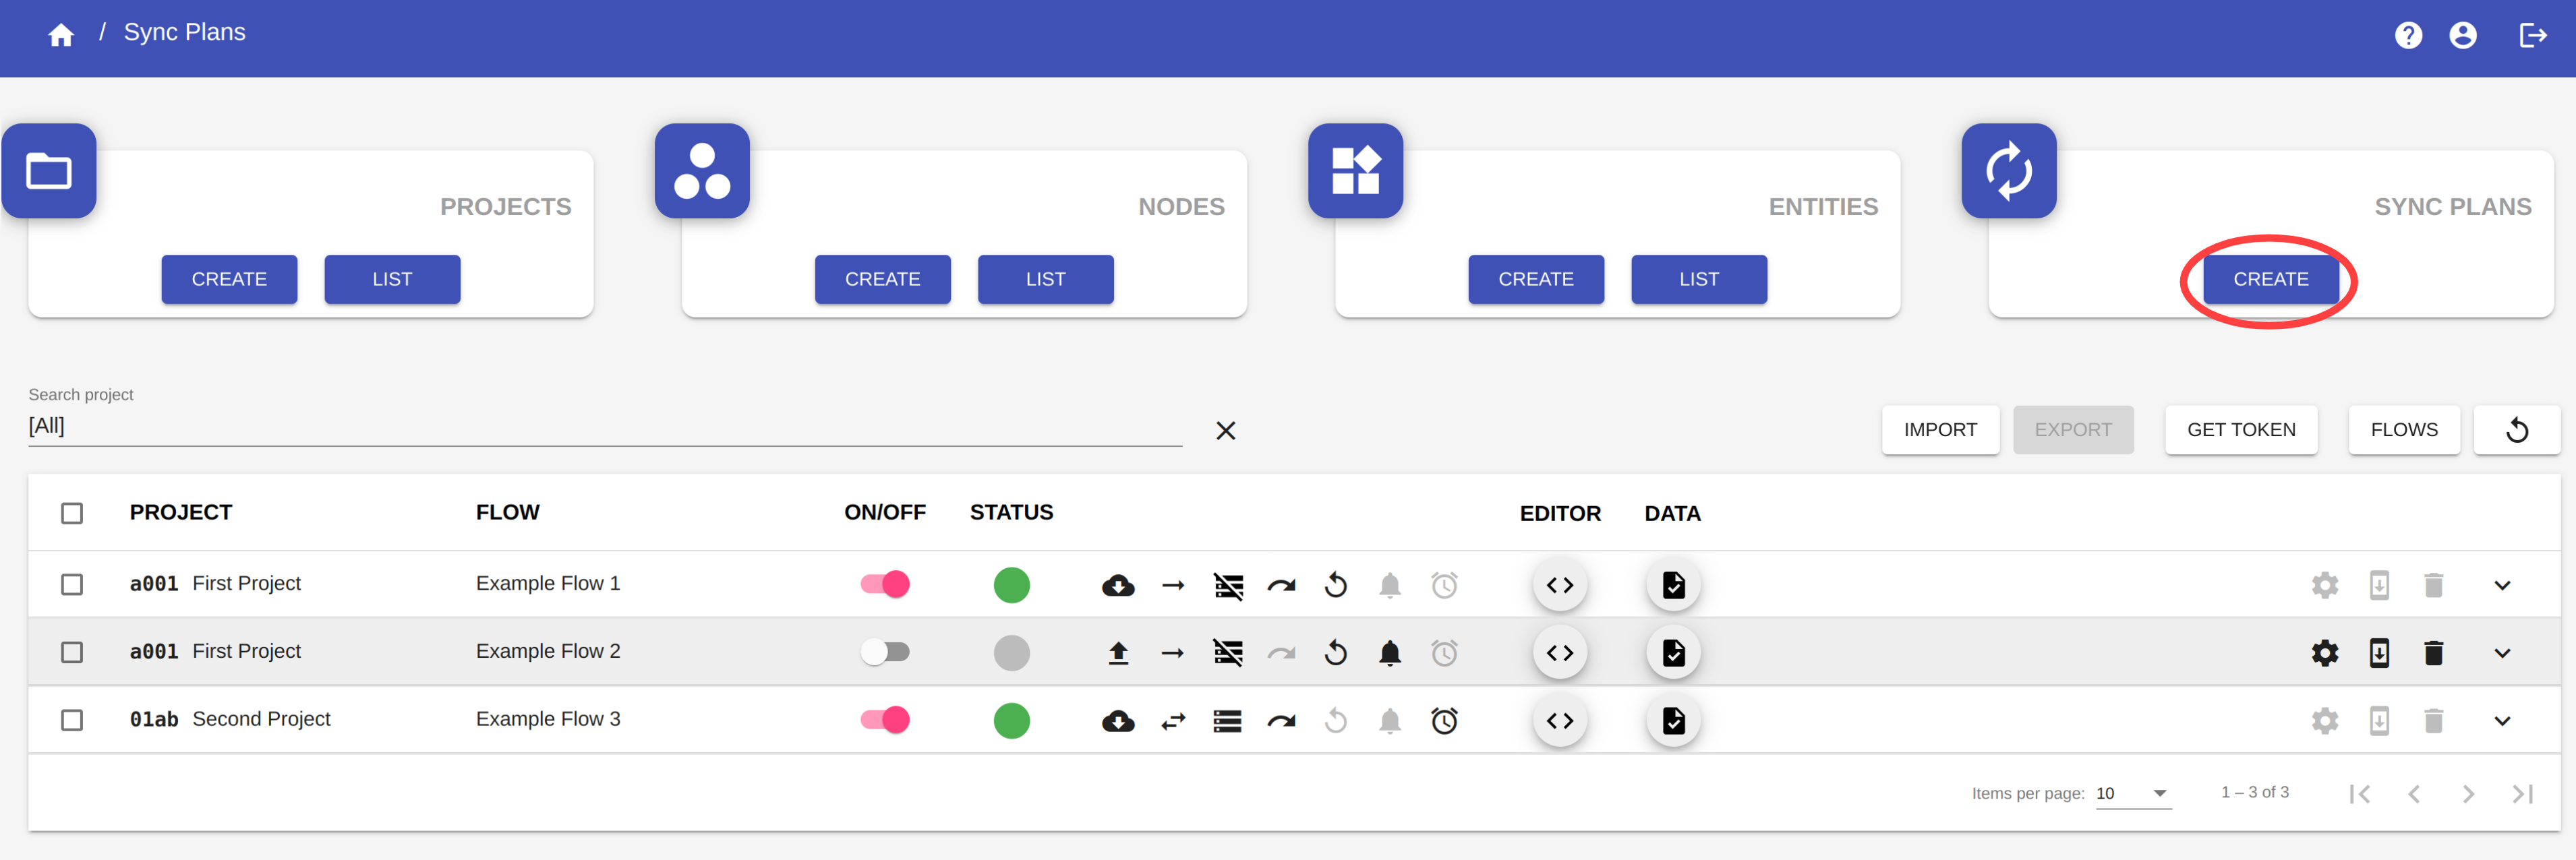
Create a sync plan
To create a sync plan, click on the button CREATE in the Sync Plans section to open the Sync Plan creation dialog.
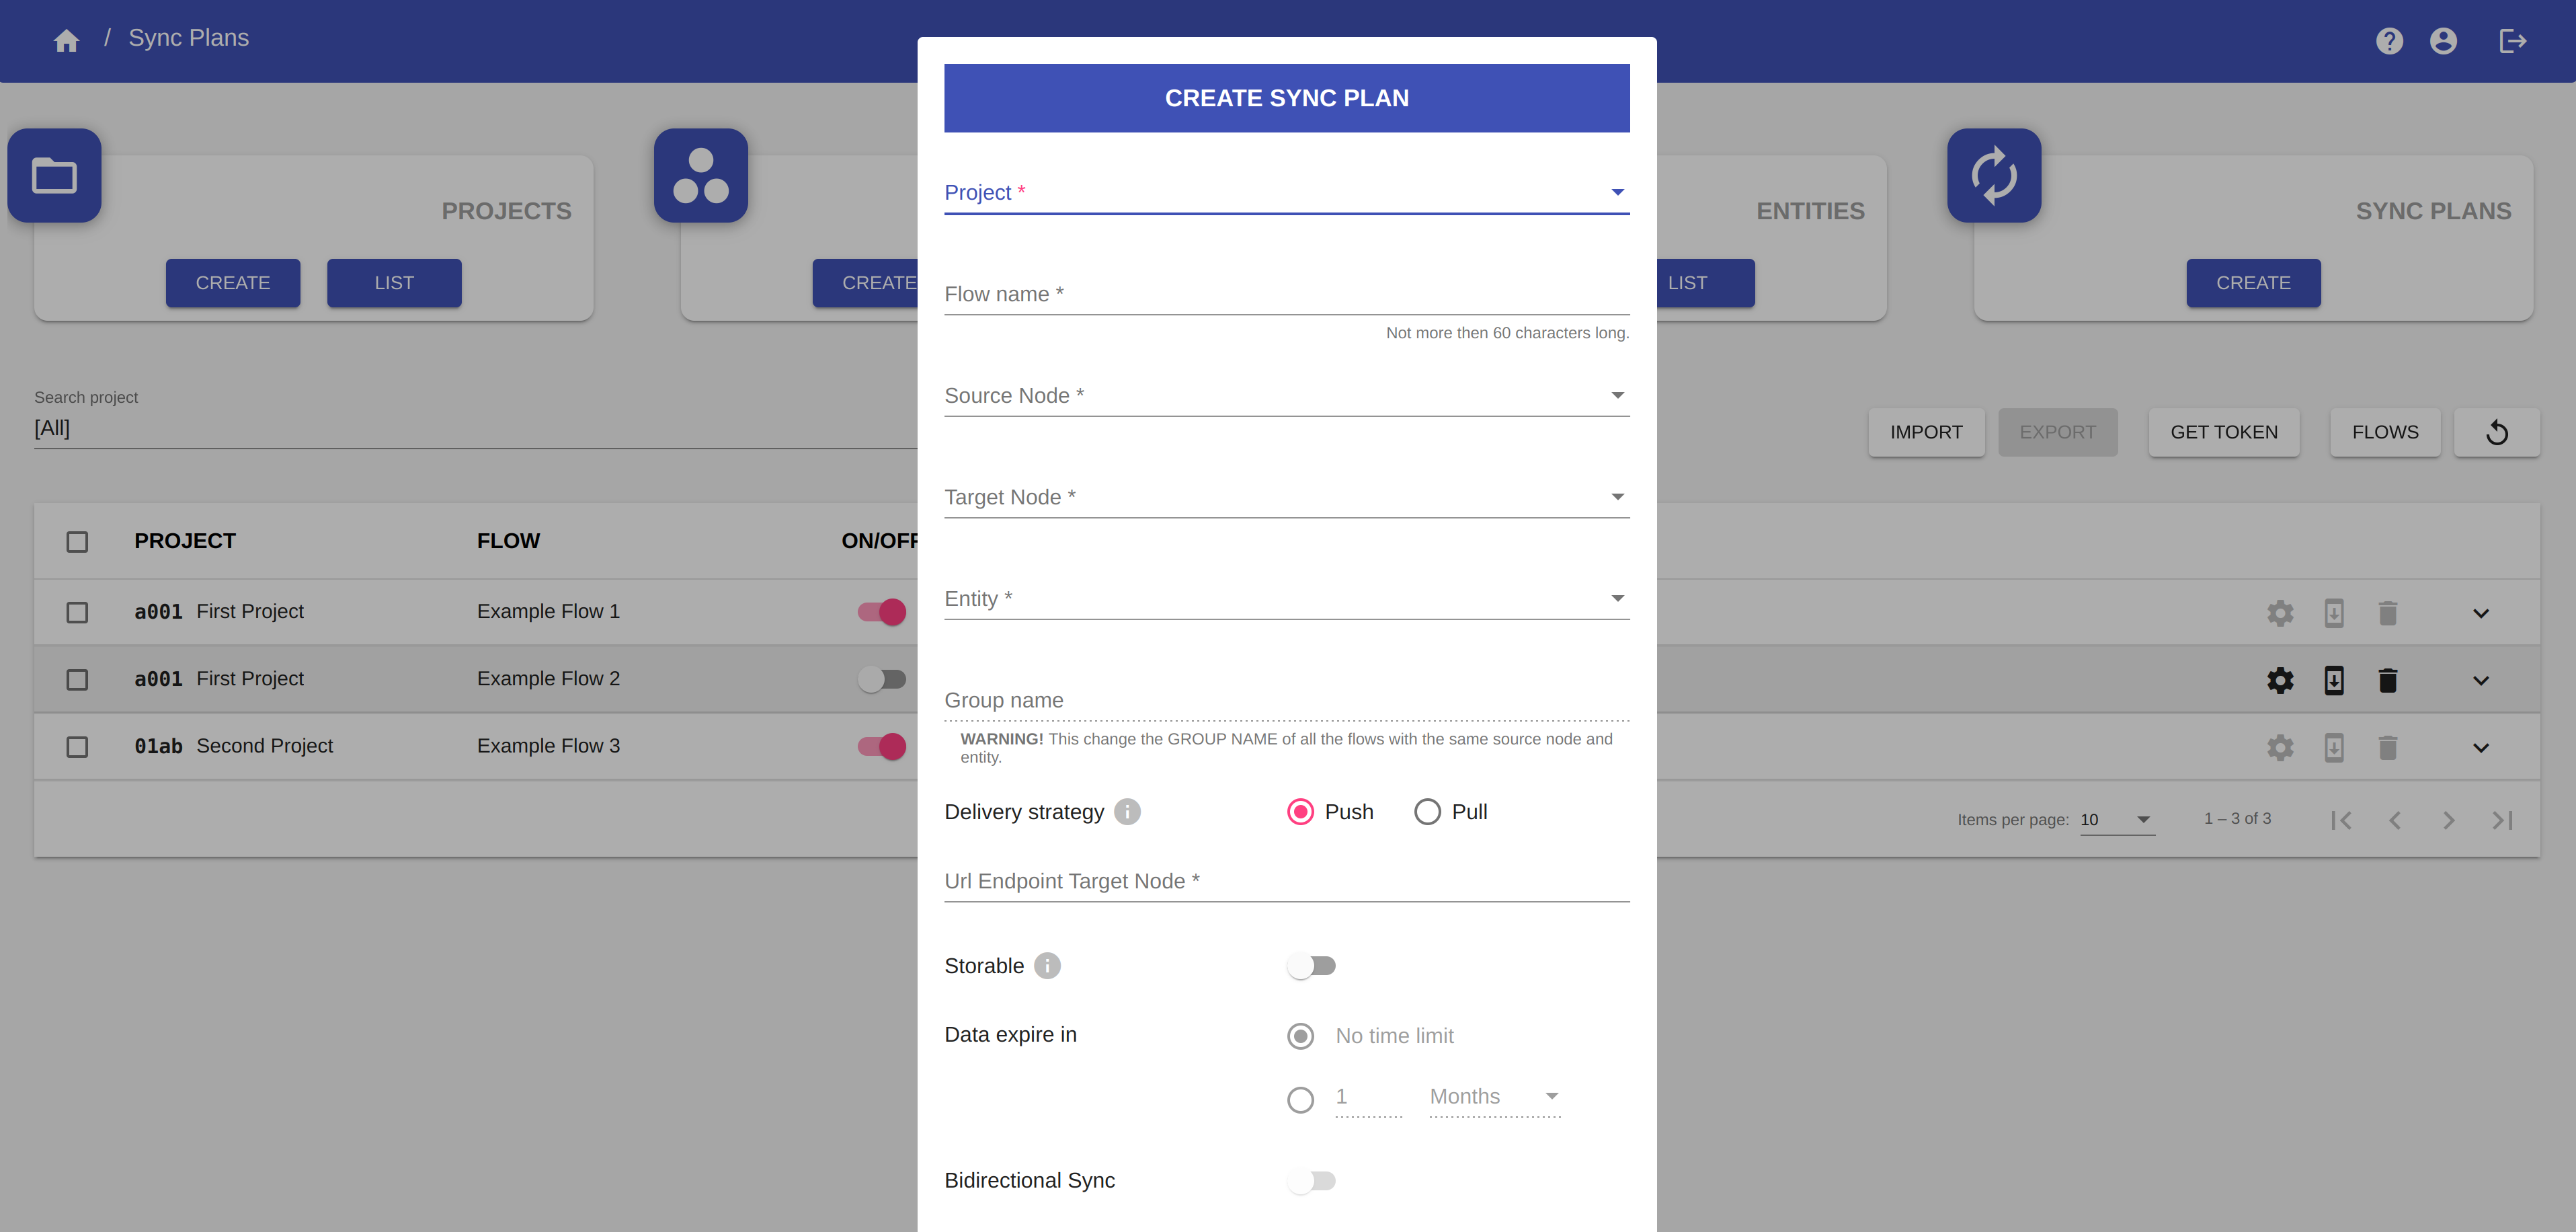
You have to fill in the following fields:
- Project: select the project in which to insert the sync plan from the list of created projects or select the option NEW from the list to create new one.
- Flow name: the name of the sync plan.
- Source node: select a source node from the list of created nodes or select the option NEW from the list to create new one.
- Target node: select a target node from the list of created nodes or select the option NEW from the list to create new one.
- Entity: select an entity from the list of created entities or select the option NEW from the list to create new one.
- Group name: the name of the group (enabled only if there are at least two sync plans belonging to the group).
- Delivery strategy: set the delivery strategy of the flow.
- Url endpoint target node: the url of the Node-RED consumer of the target node (see Node-RED).
- Storable: check this option if you want to create a storable flow.
- Data expire in: for a storable flow, you can set the period of time to storage data.
- Bidirectional sync: check this option if you want to set a bidirectional sync for this sync plan.
- Url endpoint source node: only if the bidirectional sync option is selected, insert the url of the Node-RED consumer of the source node.
- Node-RED tabs: insert the name of the Node-RED tabs you want associate to this flow (see Node-RED and also Node-RED tabs).
- Flow description: an optional description of the sync plan.
WARNING
- The Source node - Entity combination must be unique.
- The Target node - Entity combination must be unique.
- The Source node - Target node - Entity combination must be unique.
Example
If you have created the following sync plan:
System A - System B - My Entity
you cannot create the following:
System B - System A - My Entity
because the combination of source node / target node / entity already exists. You have to set up bidirectional sync = ON in the first sync plan.
WARNING
The following options cannot be modified once the flow has been created.
- Project
- Source node
- Target node
- Entity
- Delivery Strategy
- Storable
- Bidirectional sync
Click on the BACK button to close the Sync Plan creation dialog without creating the sync plan.
Click on the RESET button to reset the form.
Click on the CREATE button to create the sync plan.
NOTE
When you create a sync plan, it will appear in the sync plan list with the status icon ![]() which means that the sync plan is not compiled. See the Code editor section to know what to do to write and compile the sync plan code.
which means that the sync plan is not compiled. See the Code editor section to know what to do to write and compile the sync plan code.
Create a group of sync plans (one-to-many synchronization)
Suppose you have a sync plan like the following:
| SOURCE NODE | TARGET NODE | ENTITY |
|---|---|---|
| System A | System B | Person |
If you want to create a new sync plan and put it in a group with the first sync plan, you just have to select System A as the source node and Person as the entity. So the group will be composed by the following flows:
| SOURCE NODE | TARGET NODE | ENTITY |
|---|---|---|
| System A | System B | Person |
| System A | System C | Person |
WARNING
When you add a sync plan in a group, you will be proposed as the group name the name of the group of the others sync plans which have the same source node and the same entity of the flow you are creating.
If you insert a new group name, the name of the group will be changed for all the sync plans of the group.
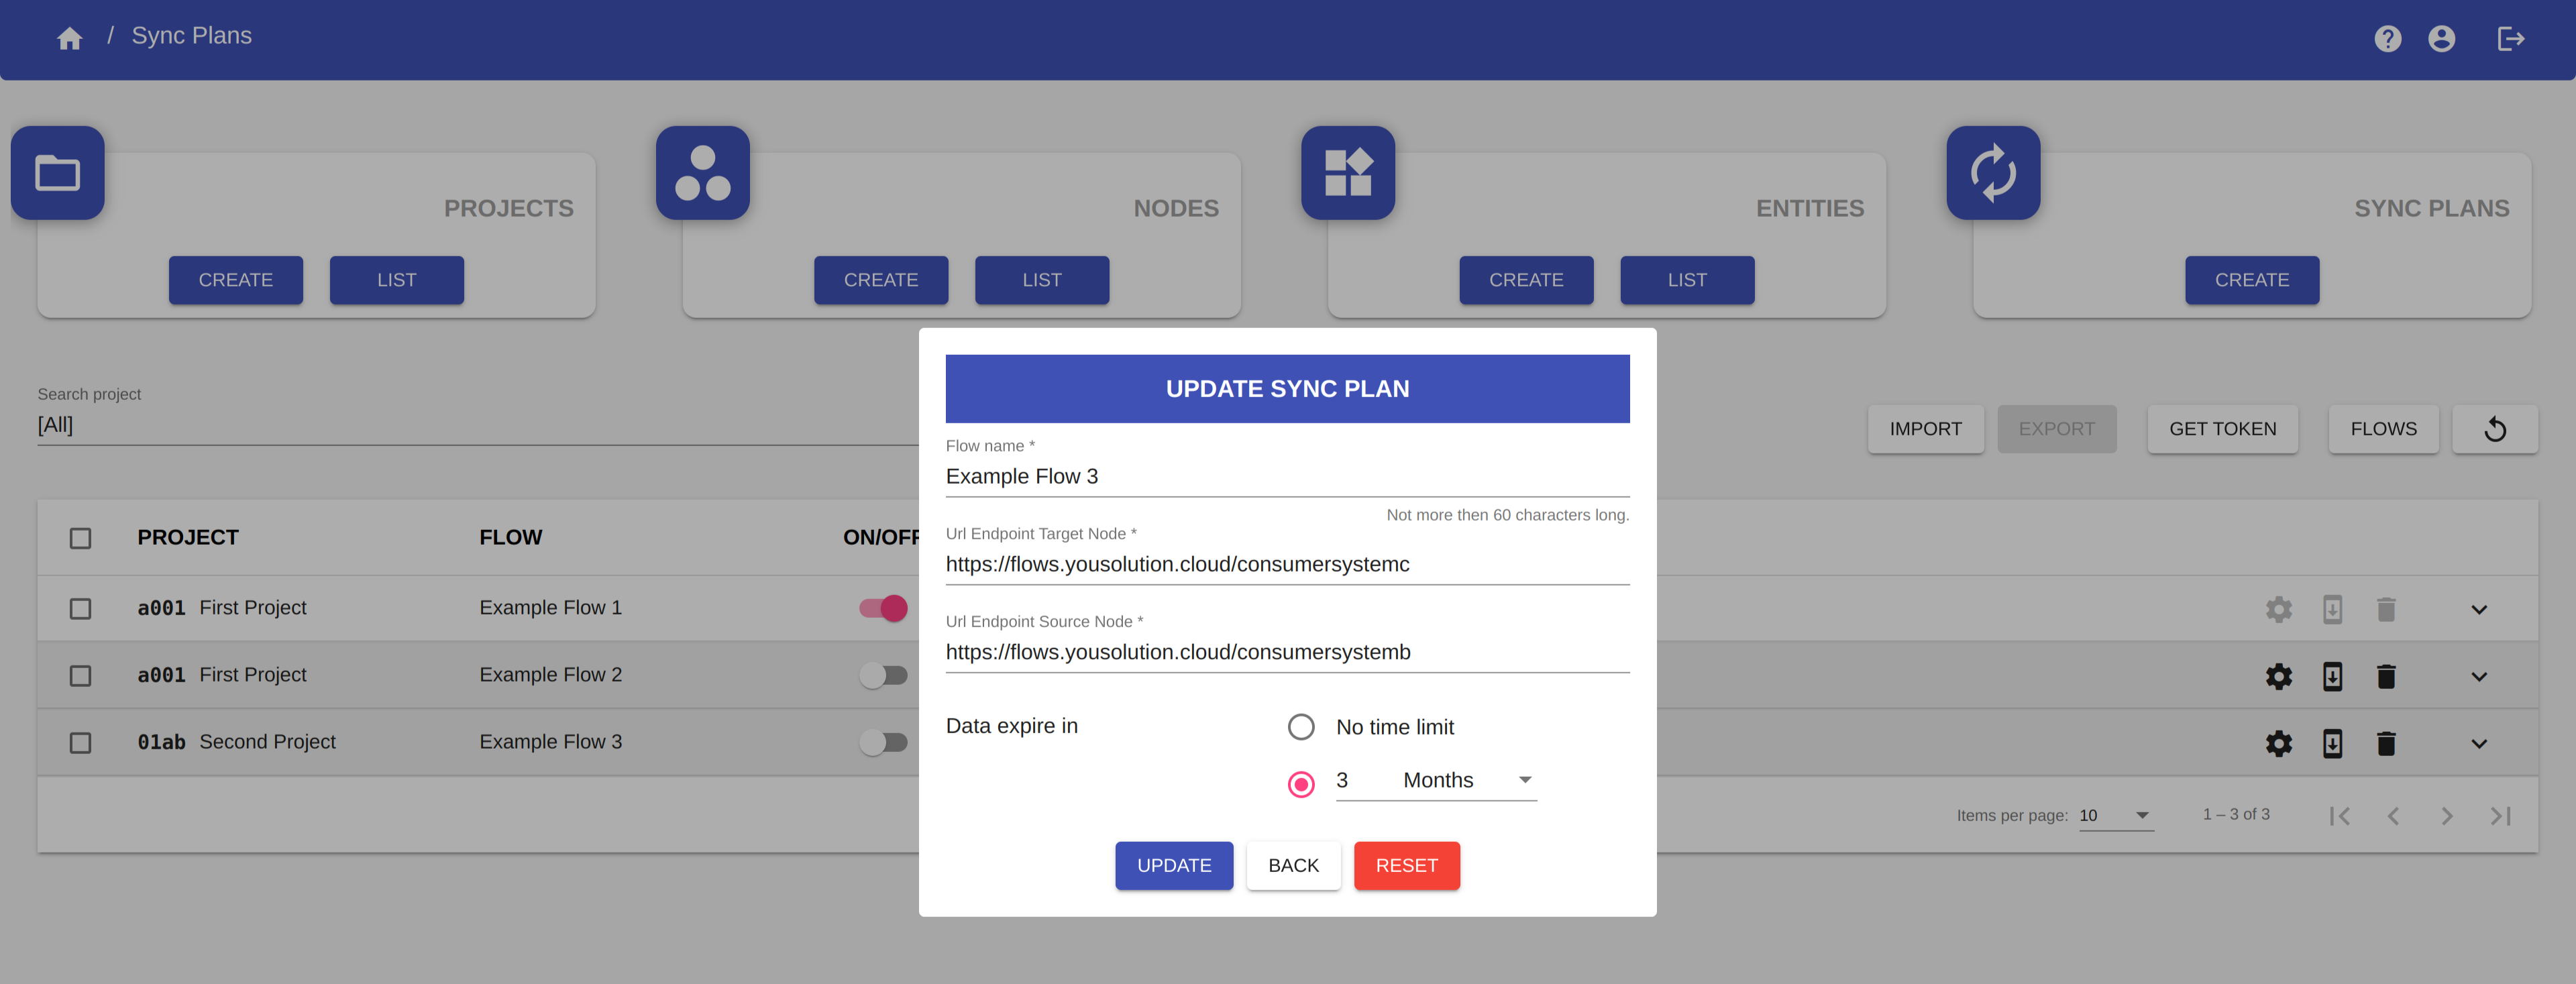
Update a sync plan
To update a sync plan, click on the button ![]() in the row of the table corresponding to the sync plan you want to update, to open the Sync Plan update dialog.
in the row of the table corresponding to the sync plan you want to update, to open the Sync Plan update dialog.
WARNING
The synchronization must be off to update the sync plan.
You can modify the following fields:
- Flow name: the name of the sync plan.
- Group name: the name of the group (only for the sync plans belonging to a group).
- Url endpoint target node: the url of the consumer of the target node.
- Url endpoint source node: the url of the consumer of the source node (only if the sync plan is bidirectional).
- Data expire in: the period of time to storage data (only for a storable flow).
WARNING
You cannot update from a storable sync plan to a non-storable sync plan and vice versa.
You cannot update from a bidirectional sync plan to a non-bidirectional sync plan and vice versa.
Click on the BACK button to close the Sync plan update dialog without updating the sync plan.
Click on the RESET button to reset the form.
Click on the button UPDATE to update the sync plan.
Delete a sync plan
To delete a sync plan, click on the button ![]() in the row of the table corresponding to the sync plan you want to delete and confirm the operation.
in the row of the table corresponding to the sync plan you want to delete and confirm the operation.
WARNING
The synchronization must be off to delete the sync plan.
Sync plan settings
Click on the button ![]() in the row of the table corresponding to the sync plan to open its Sync plan settings dialog.
in the row of the table corresponding to the sync plan to open its Sync plan settings dialog.
WARNING
The synchronization must be off to update the sync plan settings.
You can modify these five following settings:
- Skip errors options
- Retry options
- Alert options
- Node-RED tabs
- Advanced options
Skip errors options
If Skip errors option is disabled, the synchronization process will stop when an error occurs in the sync plan queues. You have to remove the unsynchronized message from the queue before restarting the synchronization.
If Skip errors option is enabled, the synchronization won't stop when an error occurs. The unsynchronized document appears in the Unsynchronized tab in the Documents page (see Documents), but the sync plan queue will not be blocked and the synchronization process will continue with the next messages to be synchronized.
Switch the button to enable or disable the Skip errors option.
WARNING
The changes will not be applied until you click the SAVE button of the Sync Plan settings dialog.
Retry options
NOTE
This option is available only for sync plans with PUSH delivery strategy.
If Retry option is enabled, the synchronization process tries to resend a message when the first attempt was unsuccessful.
You can set how many times the process should retry.
If the data hasn't been synchronized correctly after the attempts were completed, the unsynchronized data will cause the queue block (if the Skip errors option is disabled), or will be skipped and the synchronization process will continue with the next messages to be synchronized (if the Skip errors option is enabled).
Switch the button to enable or disable the Retry option.
Set the number of attempts by entering the number in the Retries field.
Set the time interval (in seconds) between 2 attempts by entering the number in the Retries interval field.
WARNING
The changes will not be applied until you click the SAVE button of the Sync Plan settings dialog.
Alert options
There are two type of alert that you can enable:
- synchronization error alert
- flow inactivity alert
Synchronization error alert
If Synchronization error alert option is enabled, when an error occurs in one of the sync plan queues, an email will be sent to the email addresses indicated in the Emails to notify alert field.
Switch the button to enable or disable the Synchronization error alert option.
Set one or more email addresses to which notifications should be sent in the Emails to notify alert field.
WARNING
The changes will not be applied until you click the SAVE button of the Sync Plan settings dialog.
Flow inactivity alert
The Flow inactivity alert notifies you if your sync plan does not receive any new messages for a certain period of time that you can define. An email will be sent to the email addresses indicated in the Emails to notify alert field.
Switch the Flow inactivity alert button to enable the alert.
Click on the button ![]() to set how often you want the check to take place.
to set how often you want the check to take place.

Here you can define your checking dates.
WARNING
You cannot modify the options while the Flow inactivity alert is enabled. Stop the alert to make changes.
Choose one of the predefined rules by clicking on the selection menu and the set the time of the check. When you select a rule, you can see below the list of the upcoming dates when the check will take place.
You will receive a notification email if no new message comes to the platform between two checks.
Click on the OK button to set the rule.
Click on the BACK button to close the dialog without saving the changes.
WARNING
The changes will not be applied until you click the SAVE button of the Sync Plan settings dialog.
Node-RED tabs
Here you can associate to the sync plan one or more Node-RED tabs. These tabs are used to create the producer and the consumer to send data from the source node to the target node. See the section Node-RED for more info.
NOTE
If you export the sync plan, the Node-RED tabs will be automatically exported with the sync plan.
The tabs you add in this field will be automatically created in Node-RED when you click the SAVE button of the Sync Plan settings dialog.
WARNING
If you delete a tab from Node-RED tabs field, the corresponding tab in Node-RED will not be removed. You have to manually delete it.
If you delete a tab from Node-RED, the corresponding tab in Node-RED tabs field will not be removed. You have to manually delete it.
WARNING
The changes will not be applied until you click the SAVE button of the Sync Plan settings dialog.
Advanced options
In the Advanced options you can set the Sync plan queues retention period (see Sync plan queues). This is the maximum amount of time that messages are stored in the queues before being deleted.
WARNING
Do not confuse the "Sync plan queues retention period" with the "Storable period" of the synchronized messages.
The Sync plan queues retention period is the time that messages are stored in the queues before being synchronized.
The Storable period is the time that synchronized messages are stored in the YouSolution-Cloud platform before being deleted.
Set the retention period by entering the number of seconds in the Queues retention period field.
The default value is 604800 (i.e. 7 days), that is also the maximum value.
WARNING
The changes will not be applied until you click the SAVE button of the Sync Plan settings dialog.
Code editor
Click on the button ![]() in the EDITOR column of the sync plans table to access the editor.
in the EDITOR column of the sync plans table to access the editor.
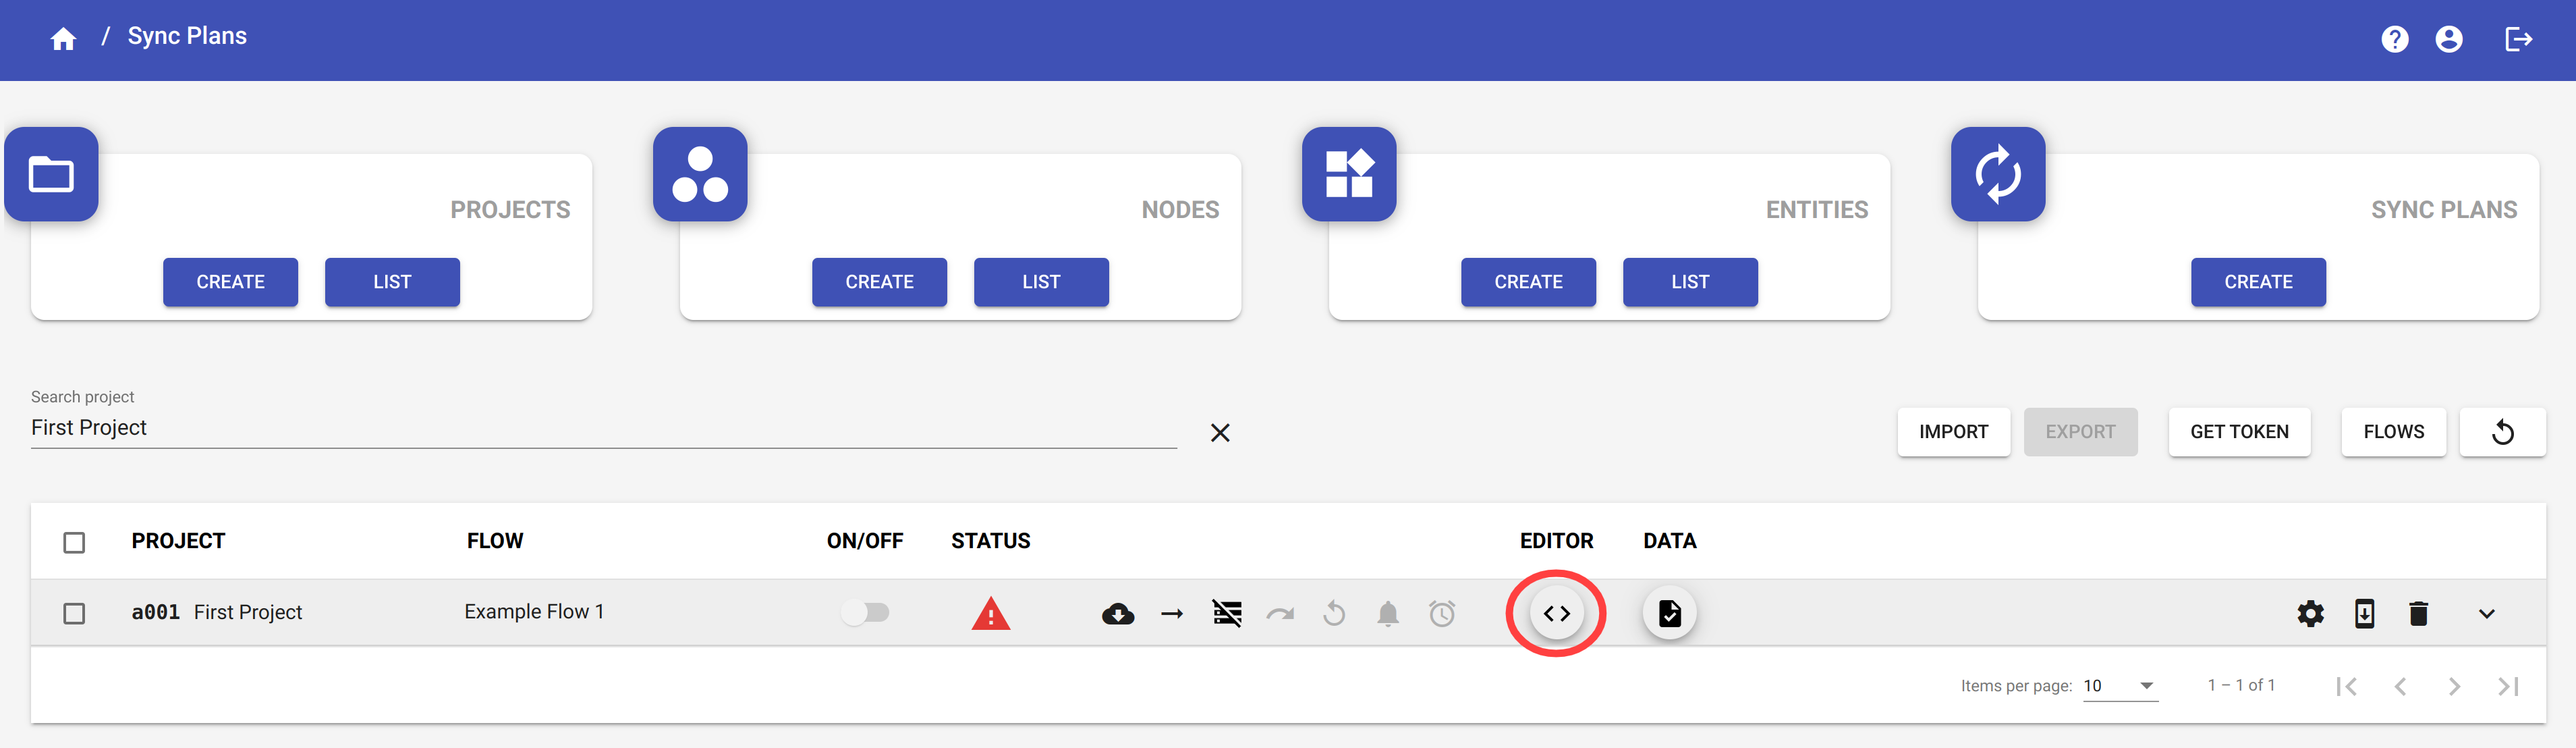
Here you can add or modify the typescript code of the sync plan.
The editor is divided into five sections:
- Editor JSON Schema: define the format of the data.
- Editor Code Source Trasform From: extract the keys and the shared data from source node.
- Editor Code Target Trasform From: extract the keys and the shared data from target node.
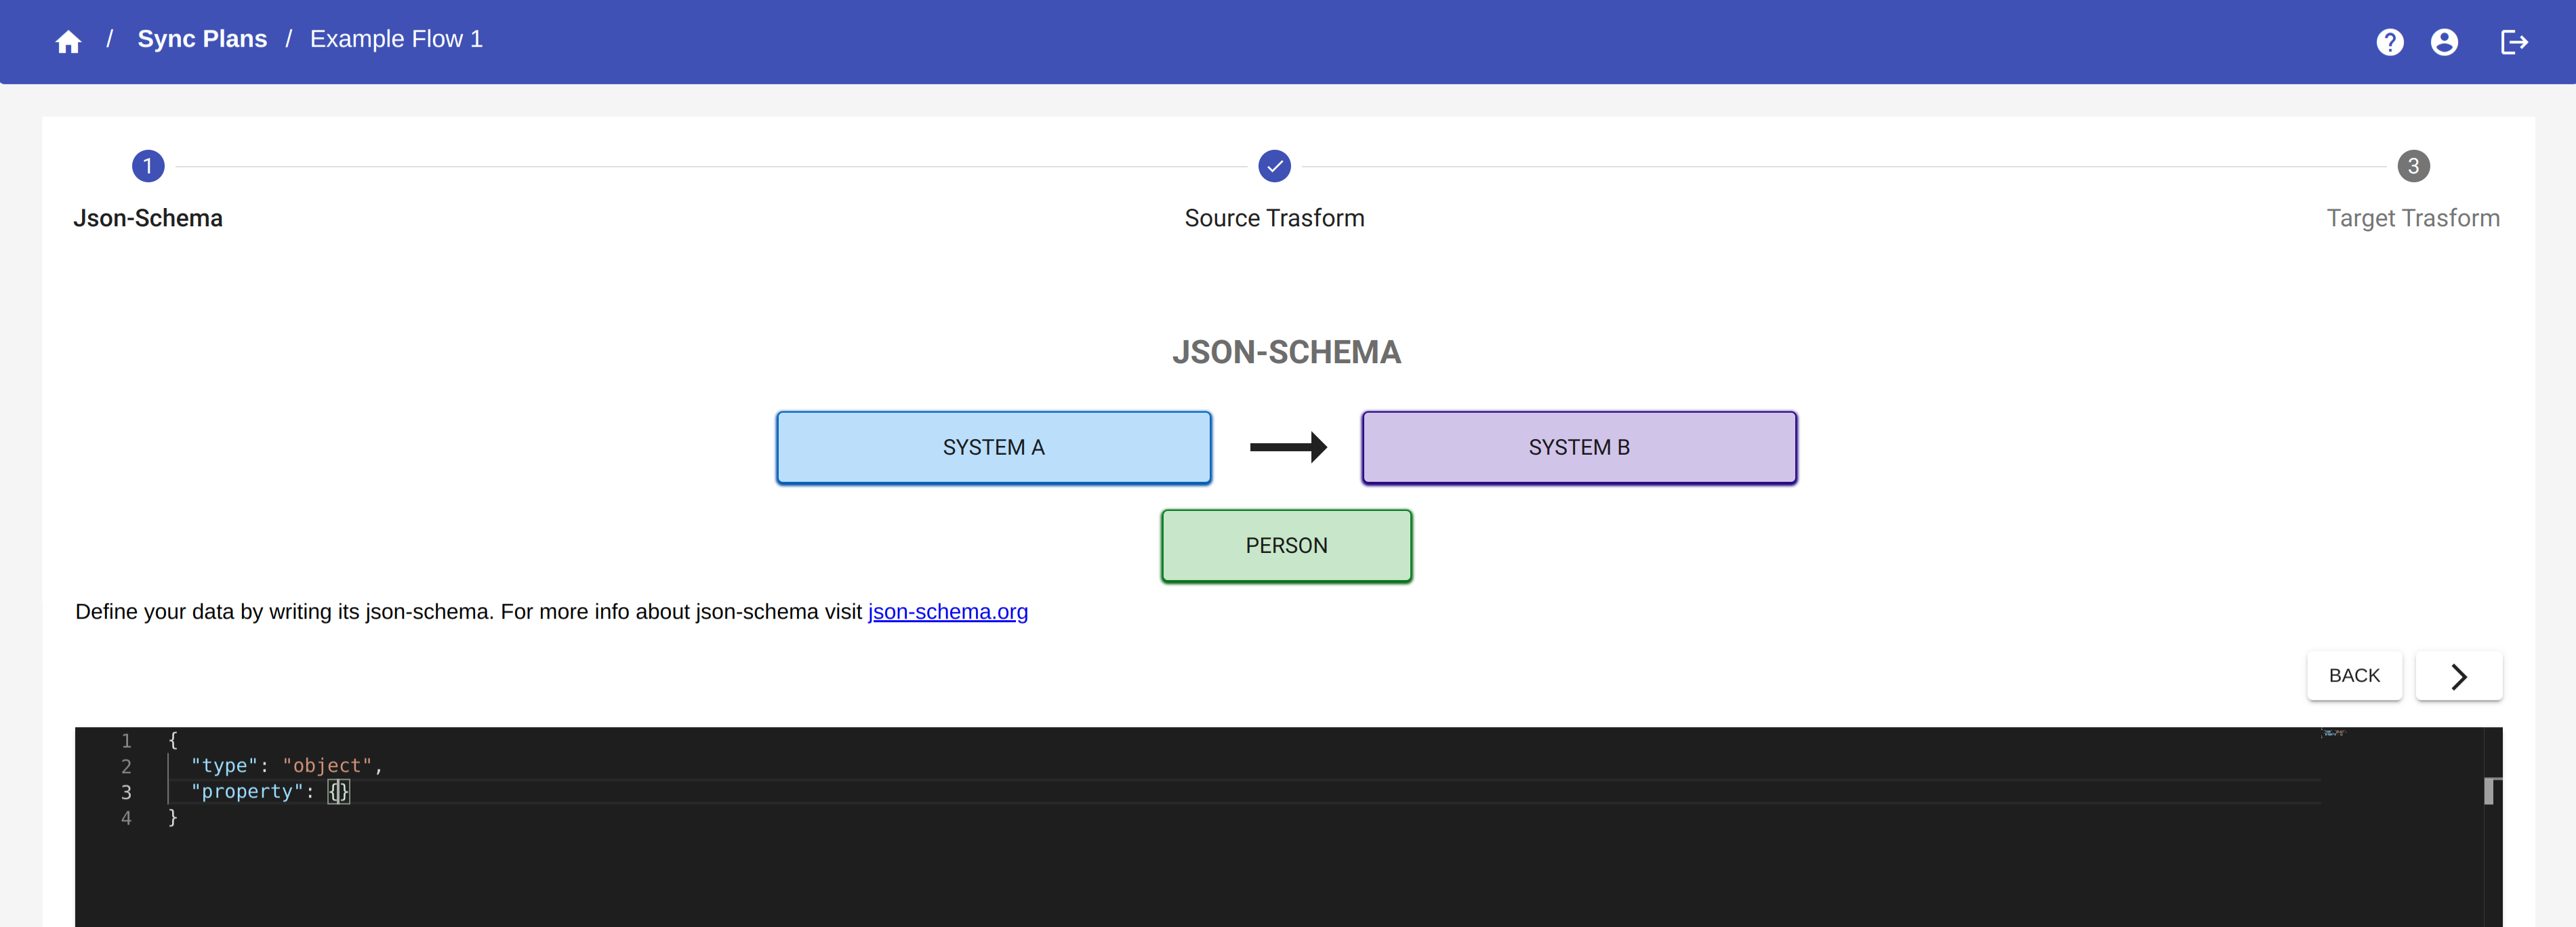
JSON Schema
JSON Schema is an IETF standard providing a format for what JSON data is required for a given application and how to interact with it. It allows you to validate JSON documents.
For more info about JSON Schema visit json-schema.org
In this editor, you have to define the format of the data which come from the source node.
This is an example of JSON Schema:
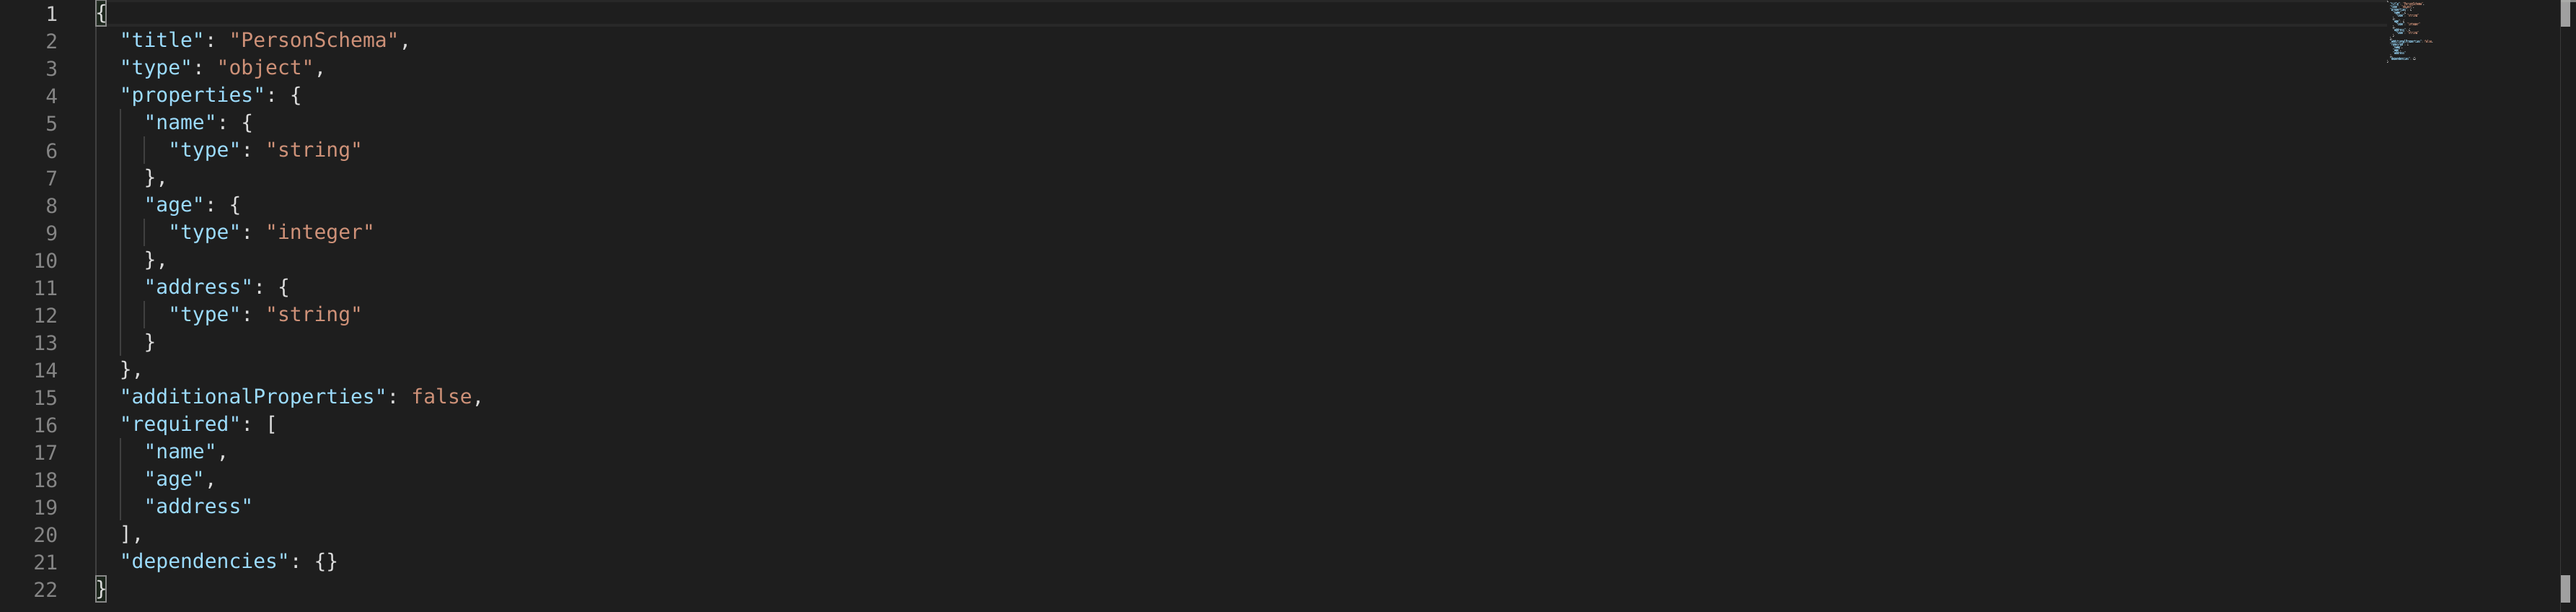
In our example, the data has four properties (id, name, email and age) of which 2 are required (name and email).
Click on the button  to go on the next section of editor.
Click on the button  to exit from editor. You will be asked if you want to save the changes.
Code source transform from
The Code Source Transform From class is used to extrapolate the key fields from the source node and the data that you want to share and synchronize.
![]()
The method extractKeys returns an array of key fields. The parameter sourceData is the data sent from the source node to the YouSolution.Cloud platform, whose format has been previously defined with JSON Schema.
The method extractData returns an object whose properties are the data of the source node you want to share and syncronize with the target node.
This is an example of Code Source Transform From:
![]()
In our example, we return the field "id" as the key of System A and the fields name and email as the data we want to synchronize.
Click on the button to go on the next section of editor.
Click on the button  to return to the previous section of editor.
Click on the button to exit from editor. You will be asked if you want to save the changes.
Code target transform from
The Code Code Target Transform From class is used to extrapolate the key fields from the target node and the data that you want to share and synchronize.
![]()
The method extractKeys returns an array of key fields. The parameter sourceData is the data sent from the target node to the YouSolution.Cloud platform.
The method extractData returns an object whose properties are the data of the target node you want to share and syncronize with the source node.
This is an example of Code Target Transform From:
![]()
In our example, we return the field "retid" as the key of System B and we extract all the fields of System B.
When you have finished editing the code, click on the button  . The code will be saved and compiled. Any compilation errors will be shown and, after correcting them, it will be possible to click again on the button to recompile the code.
Click on the button to return to the previous section of editor.
Click on the button to exit from editor. You will be asked if you want to save the changes.
In the Sync Plans page, if the code has been successfully compiled, you can see that the status icon has changed and turned grey.
Node-RED
To create your producers and consumers for sending and receiving data from the YouSolution.Cloud platform, you can use the integrated Node-RED tool.
Node-RED is a low-code programming tool for wiring together hardware devices, APIs and online services in new and interesting ways. It provides a browser-based editor that makes it easy to wire together flows using the wide range of nodes in the palette that can be deployed to its runtime in a single-click.
For more info about Node-RED visit nodered.org
Click on the button FLOWS to access Node-RED page.
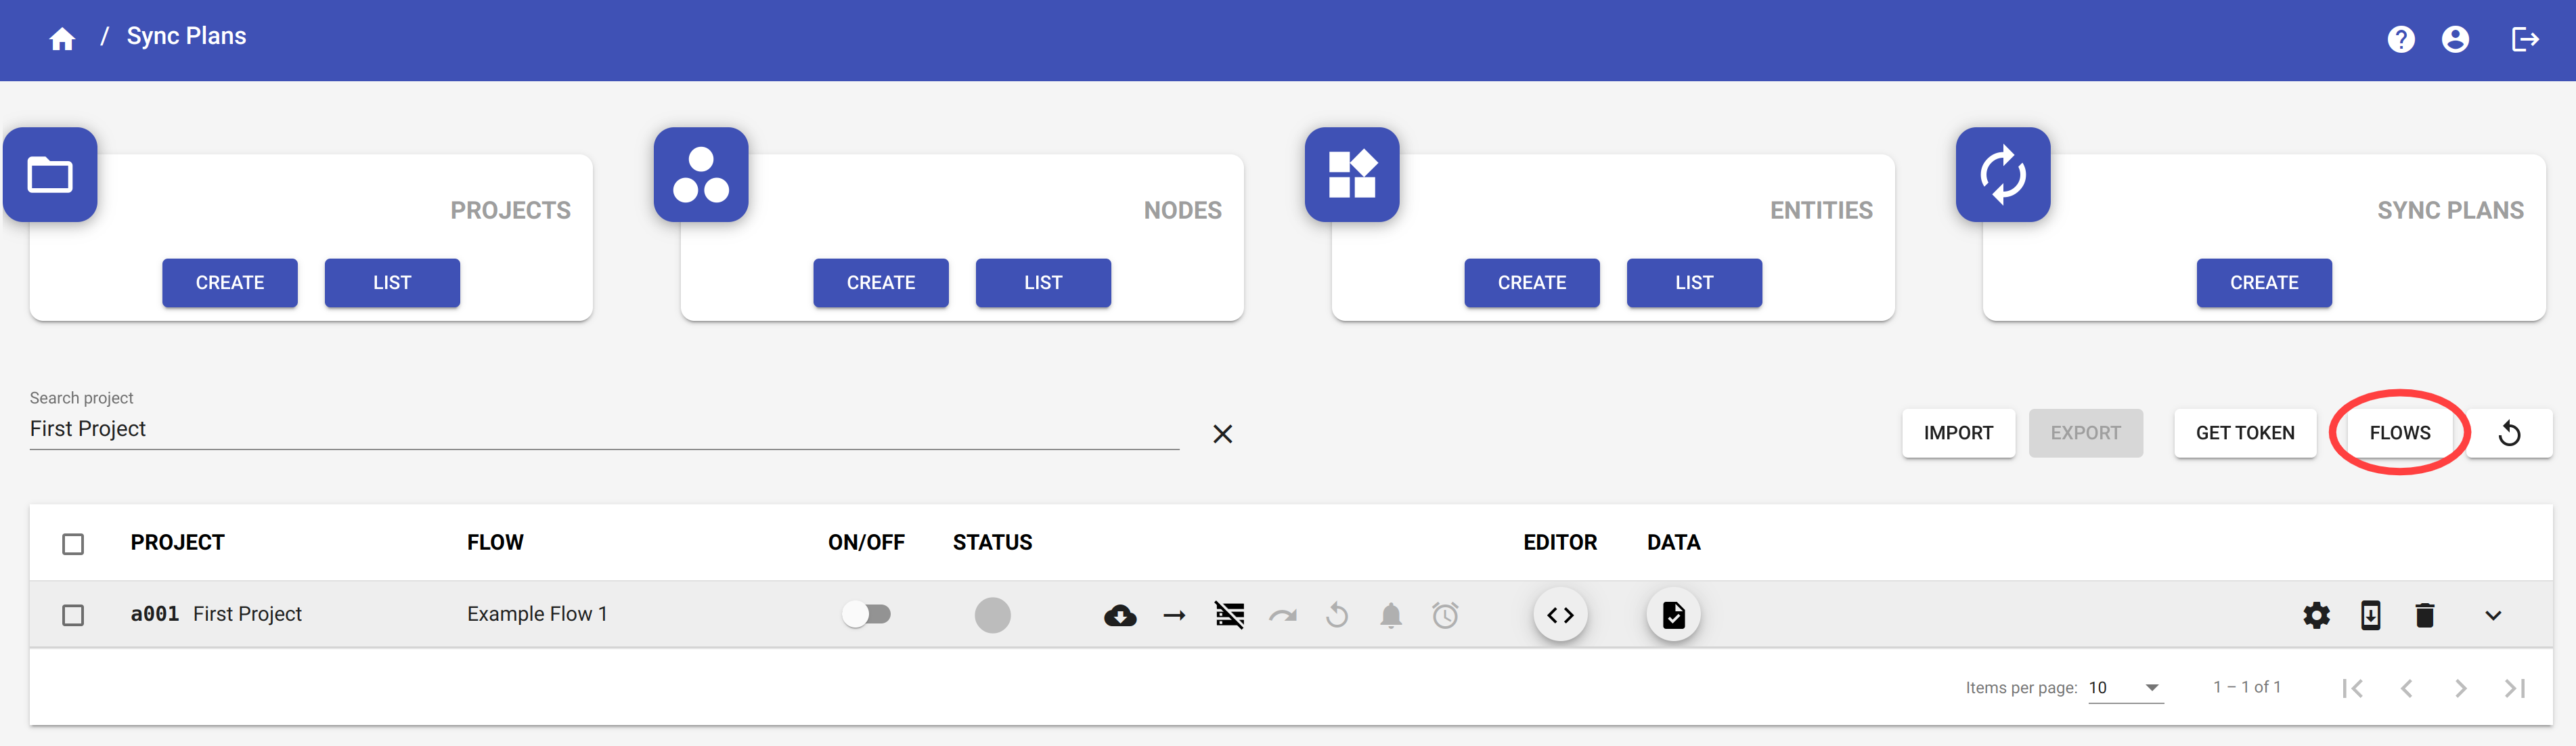
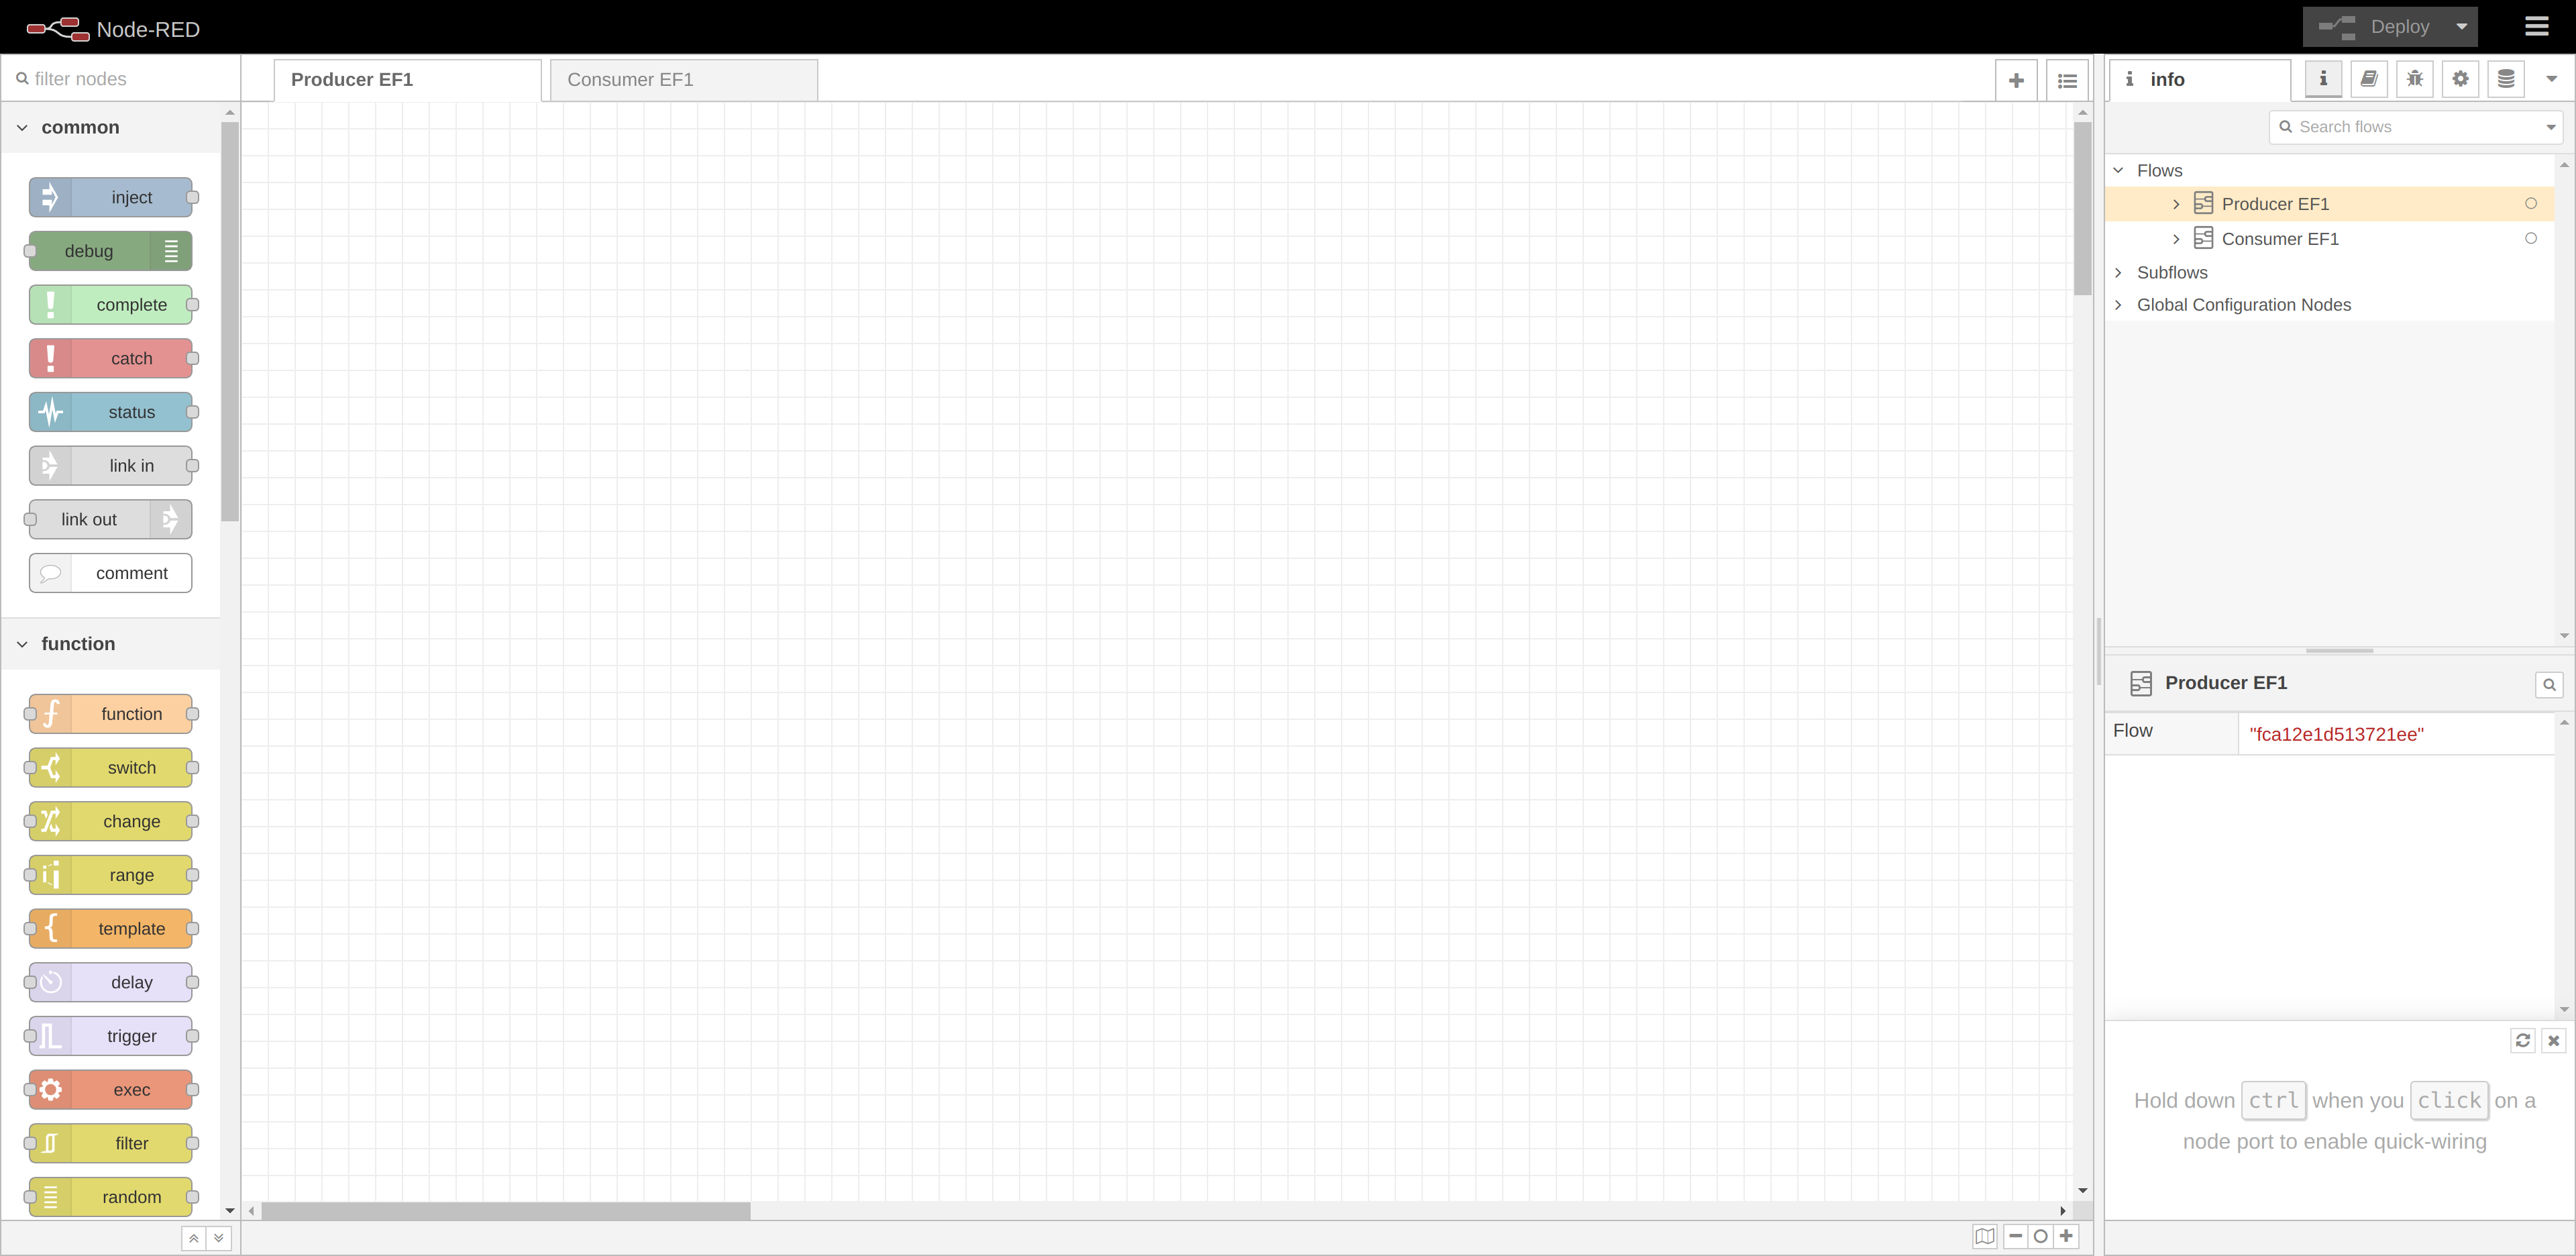
When you access the Node-RED page, you will find the tabs that have been created during the creation of the sync plan, or you can add new tabs directly from the Node-RED workspace.
WARNING
When you add new tabs from the Node-RED workspace, these tabs will not be linked to the sync plan. This means that, when you export the sync plan, these tabs will not be exported.
To add the tabs and link them with the sync plan, first add the tabs in the Node-RED tabs of the sync plan settings and then use these tabs in the Node-RED workspace.
Producer
With Node-RED, you can create a producer that sends data from the source node to the YouSolution.Cloud platform. You need a Node-RED node to make an http request to the following address:
http://api.yousolution.cloud/messages?sourceNode=systemA&entity=person
In our example, "system A" is the source node and "person" is the entity.
IMPORTANT
You need an authentication token to authorize your producer to send data to YouSolution.Cloud platform. See the section Authentication token.
For a complete example of a producer created with Node-RED, please visit Node-RED - producer.
Consumer
With Node-RED, you can also create a consumer that read data from the platform and send them to the target node. In the consumer, you have to use the Url endpoint target node property, defined during the creation of the sync plan, to send data from the platform to the consumer, and then make an http request to send data from the consumer to the target node.
For a complete example of a consumer created with Node-RED, please visit Node-RED - consumer.
NOTE
YouSolution.Cloud provides a library called @yousolution/node-red-contrib-you-yousolution.cloud with the nodes producer and consumer.
You can install the library in Node-RED and use the producer node and the consumer node to easily send data to the platform and read data from the platform.
Authentication token
To authorize your producer to send messages to YouSolution.Cloud platform, you need an authentication token. To obtain it, click on the button GET TOKEN in the Sync Plan page.
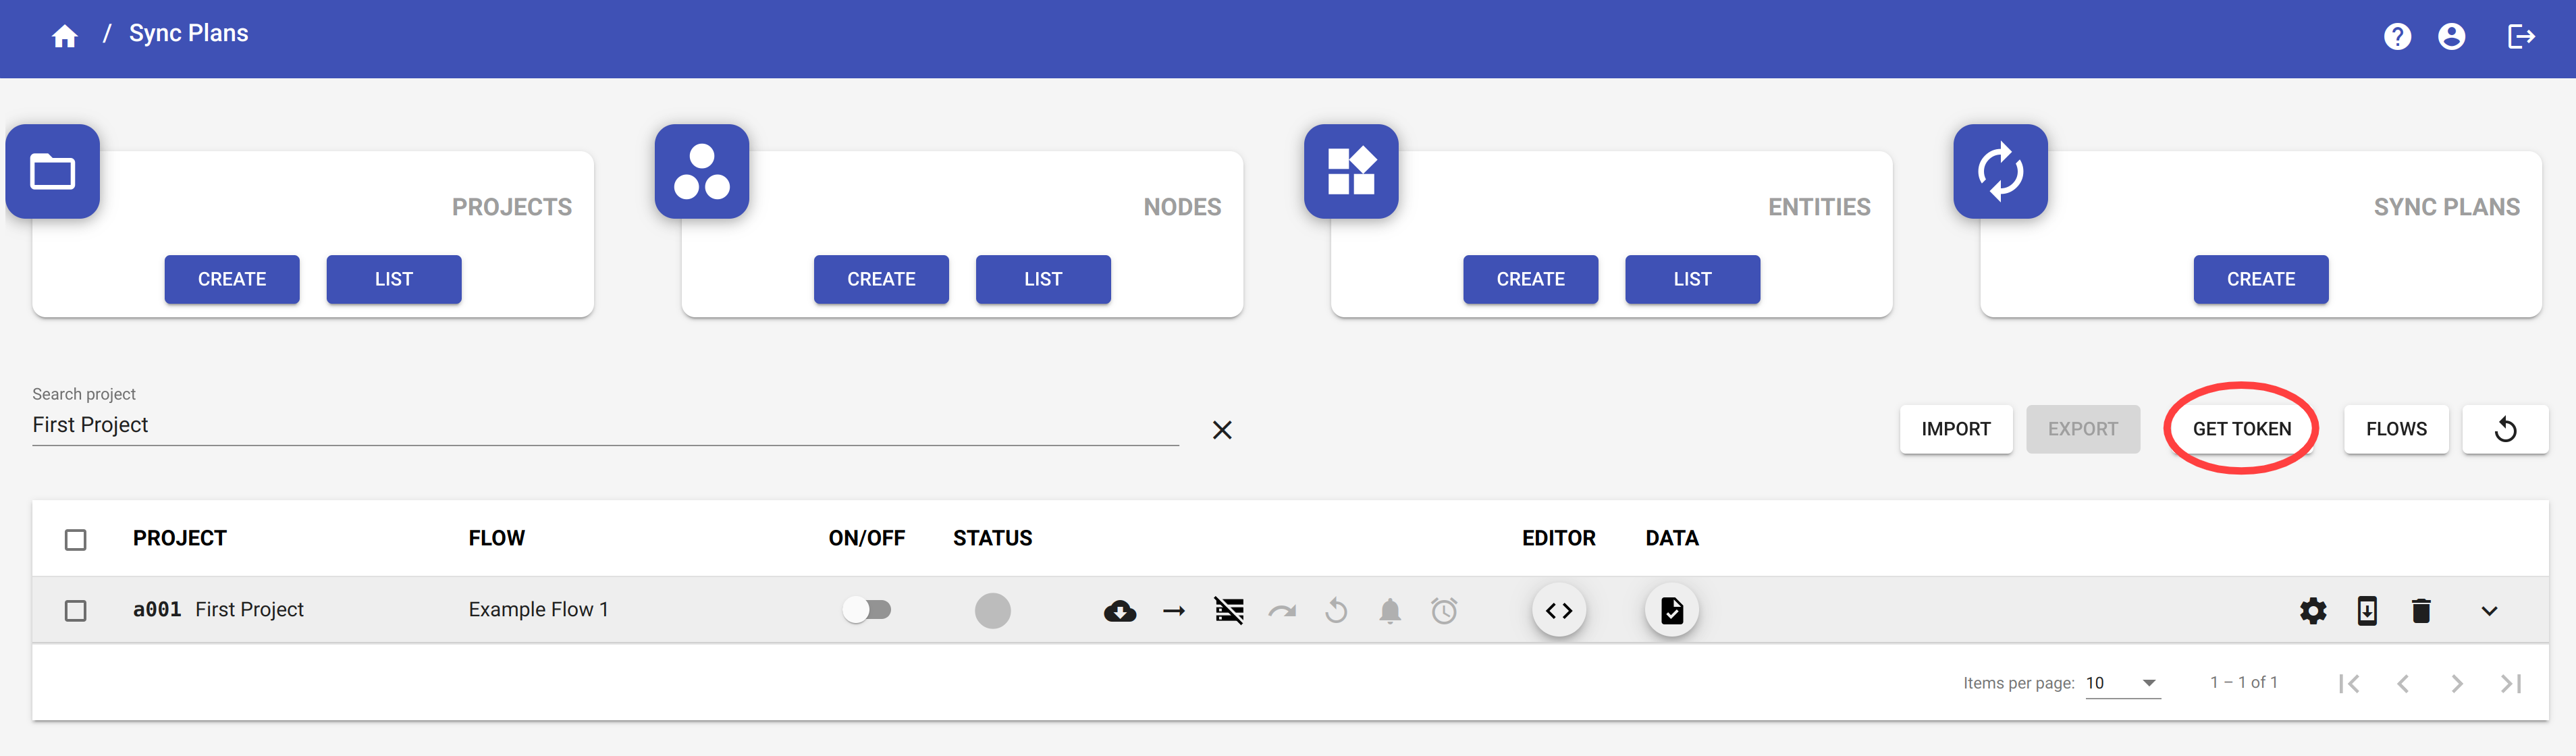
Click on the button COPY to copy the token. You have to paste it in your producer.
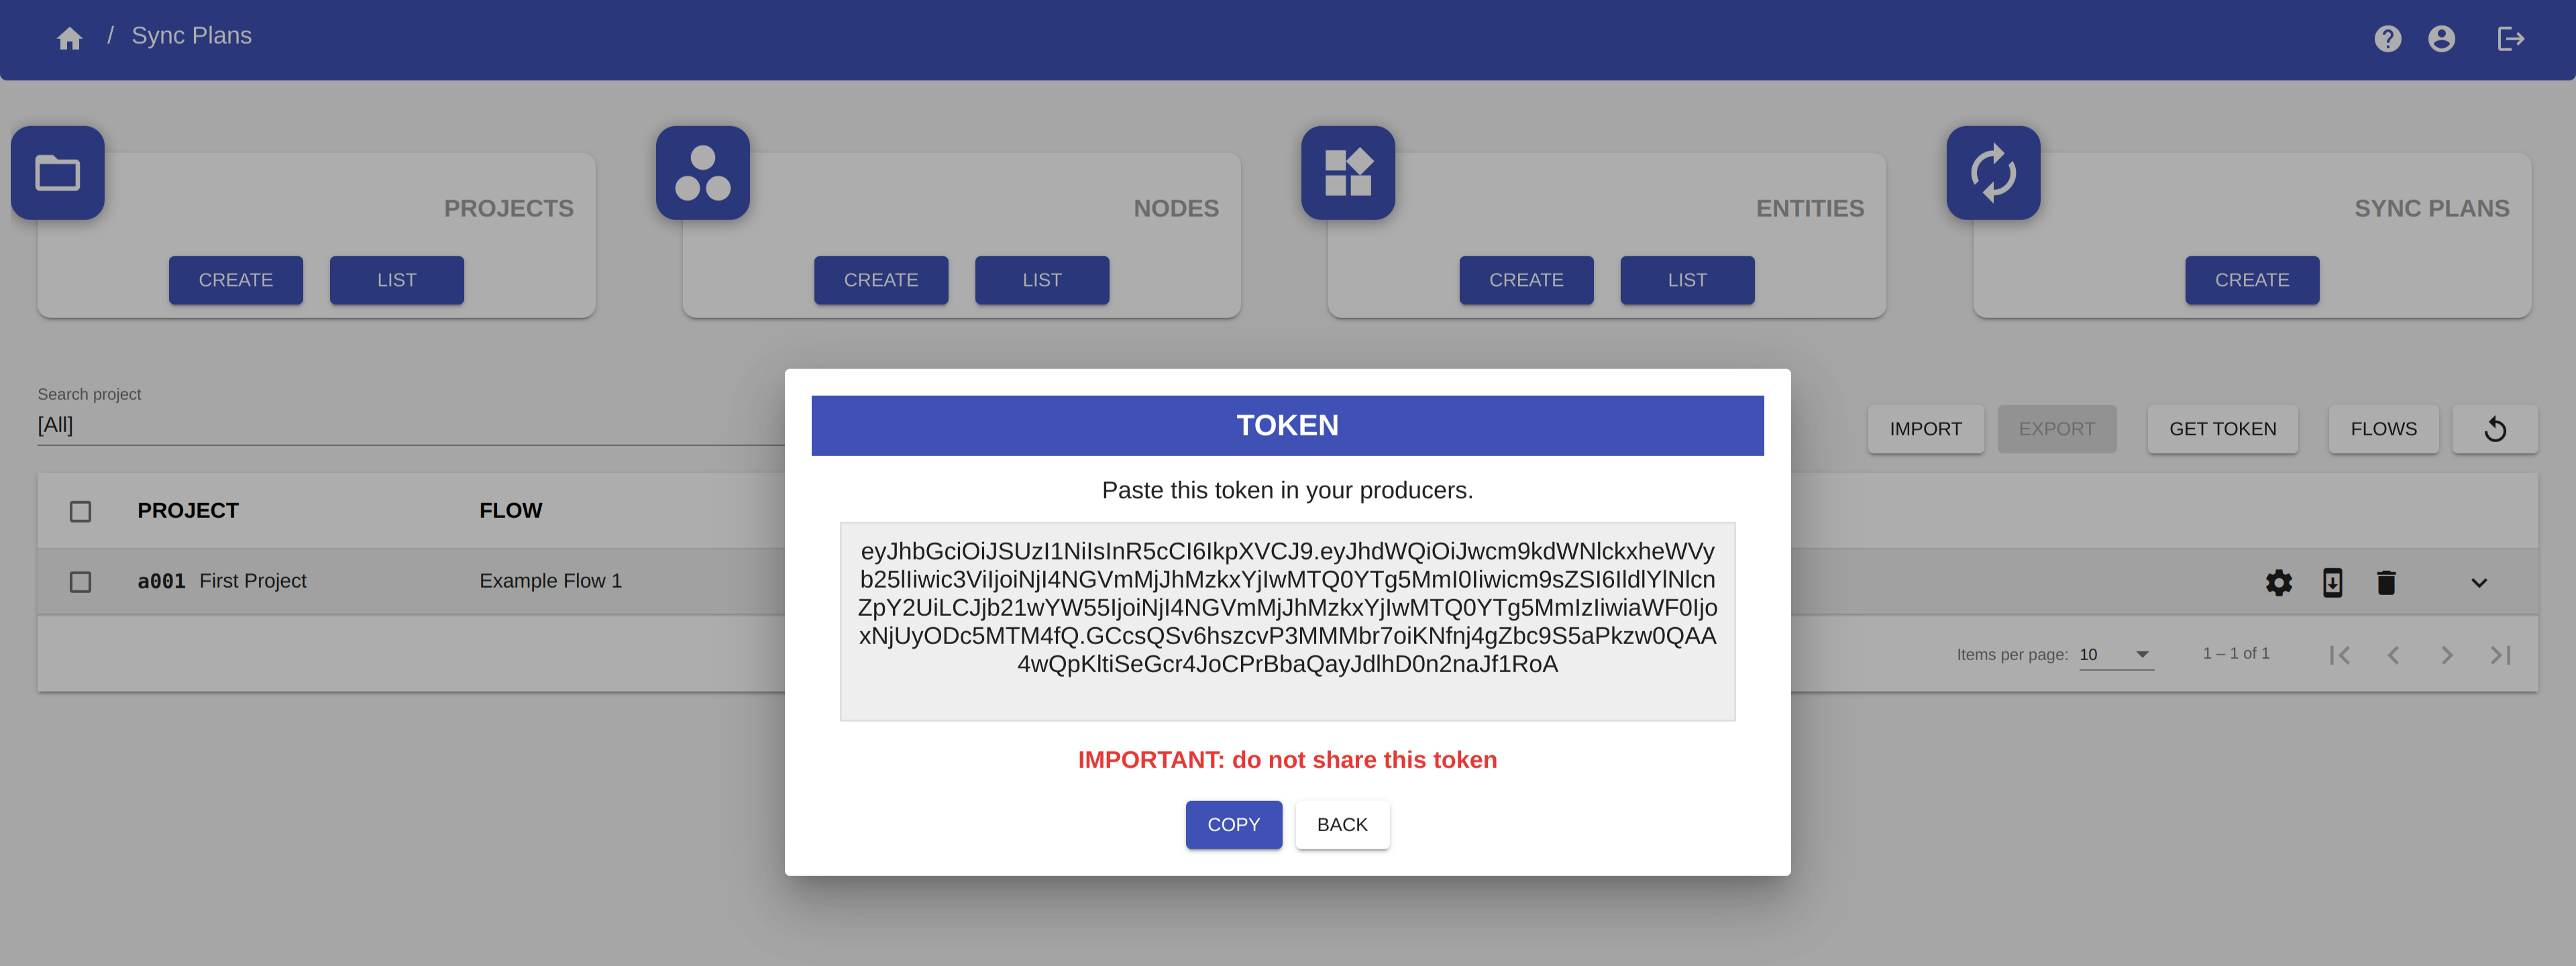
IMPORTANT
Do not share the token with anyone.
Start/Stop synchronization
Before starting a synchronization make sure you have done the following steps:
- You have created the sync plan and written its typescript code.
- You have successfully compiled the sync plan code.
- You have created your producer, copied the authentication token and pasted it inside the producer.
- You have created your consumer.
If you made these steps correctly, you should be in this situation:
The grey icon indicates that the synchronization is off and there are no errors, so it is ready to be enabled.
To start the syncronization, switch on the ON/OFF button.
The green icon indicates that the synchronization is on and there are no errors. Now your producer can start sending messages to the platform.
To stop the synchronization, switch off the ON/OFF button.
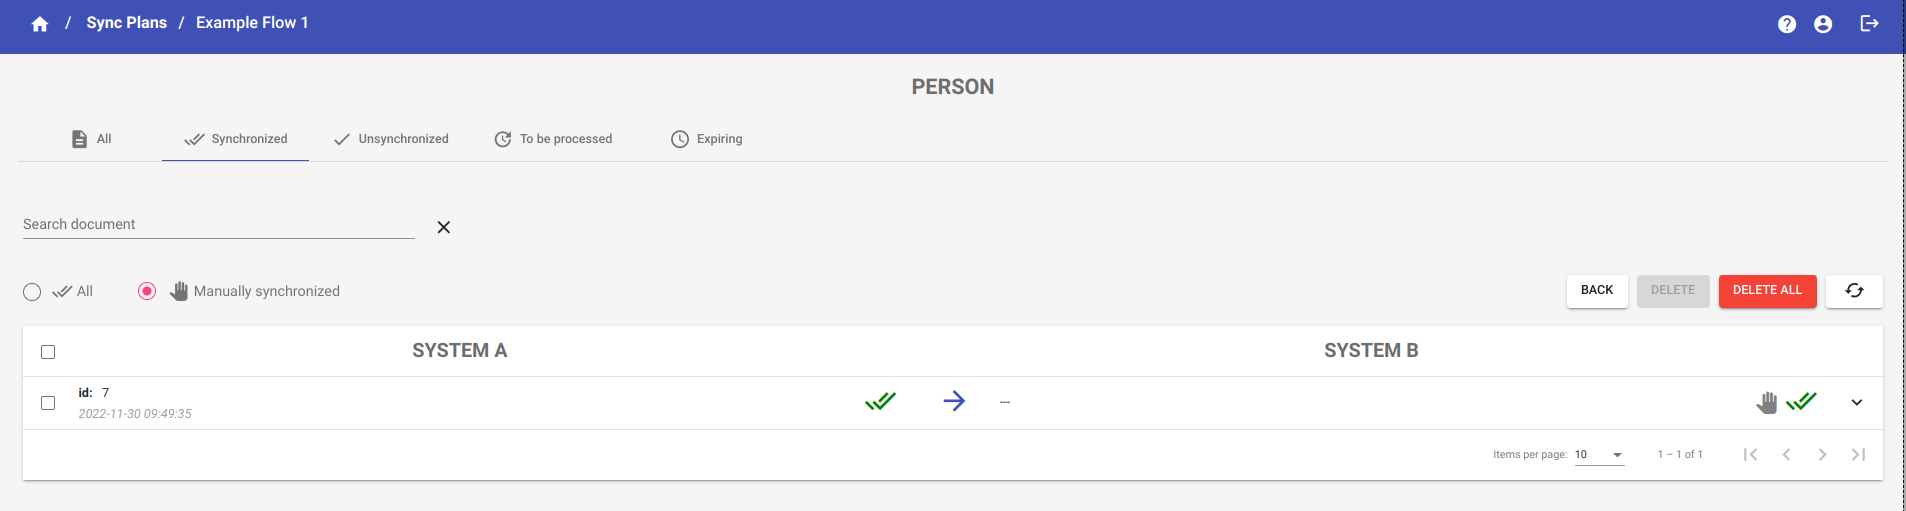
Documents
From the Sync Plan page, click on the button DATA in the row corresponding to a sync plan to access the Documents page of that flow.

The Documents section of a sync plan contains the list of all the messages exchanged by the sync plan.
This section is composed by four tabs:
- All
- Synchronized
- Unsynchronized
- Expiring
All
In the All tab, you can visualize all the documents sent to the platform during the synchronization, both those successfully synchronized and those unsynchronized ones.
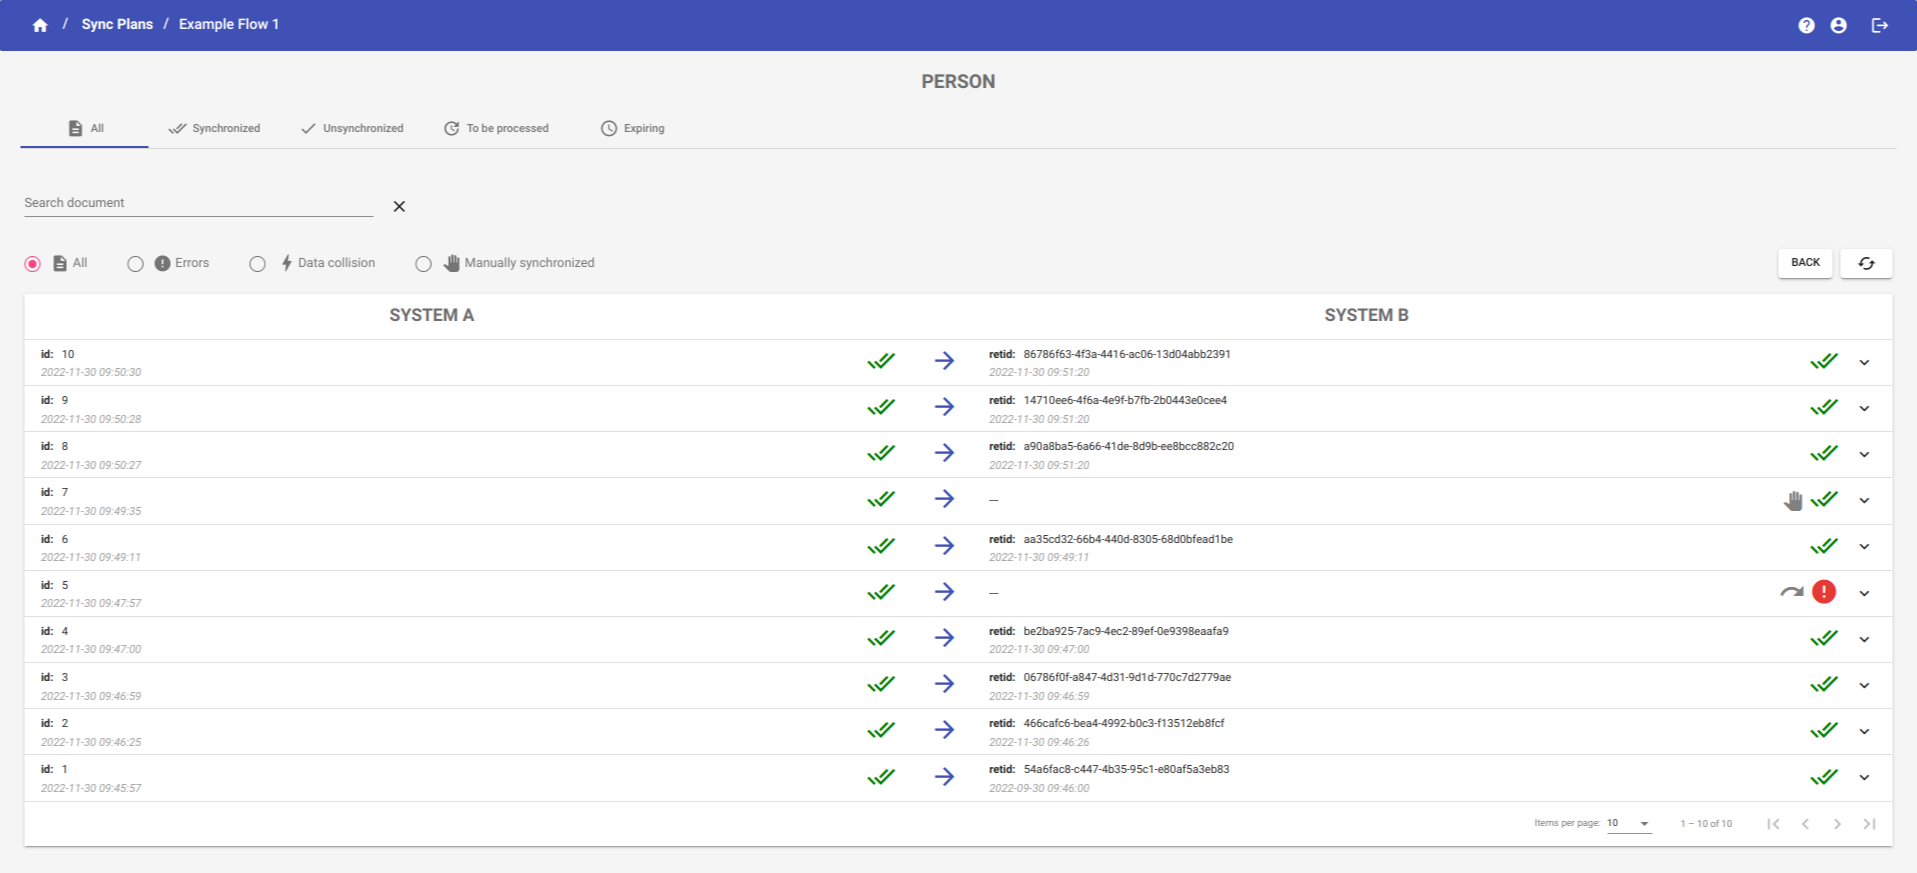
By clicking on a row of the table, you can expand the row and see the content of the document.
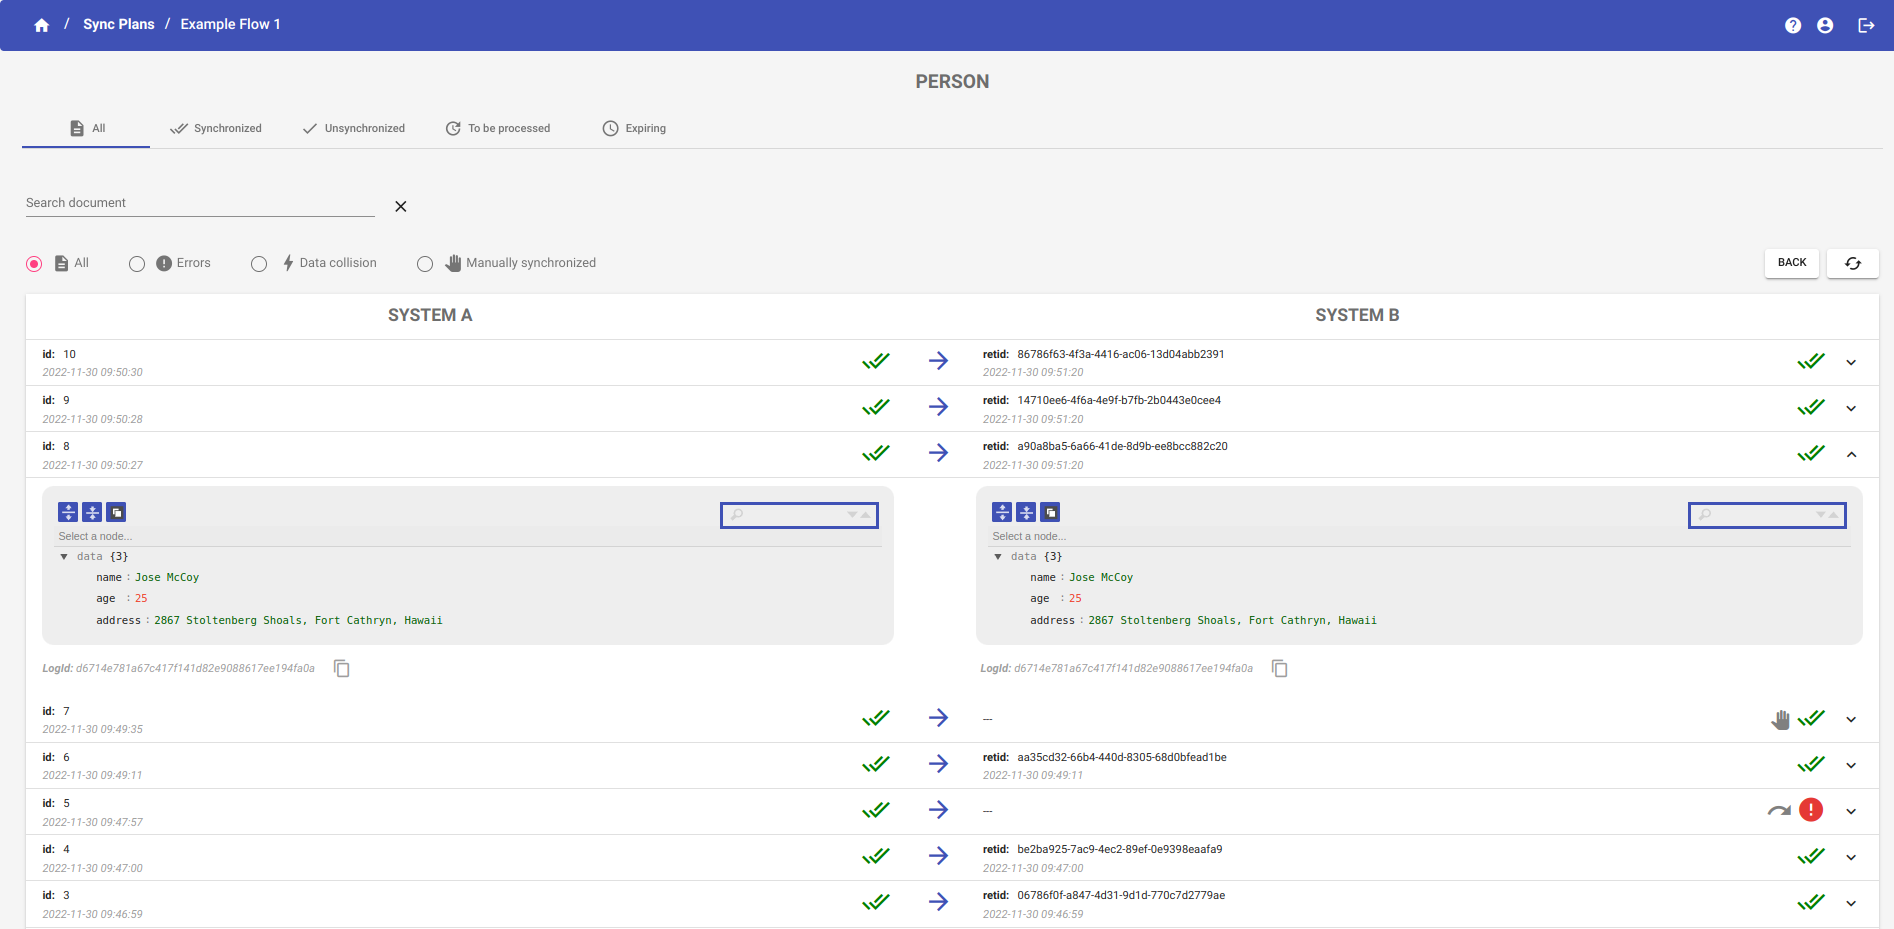
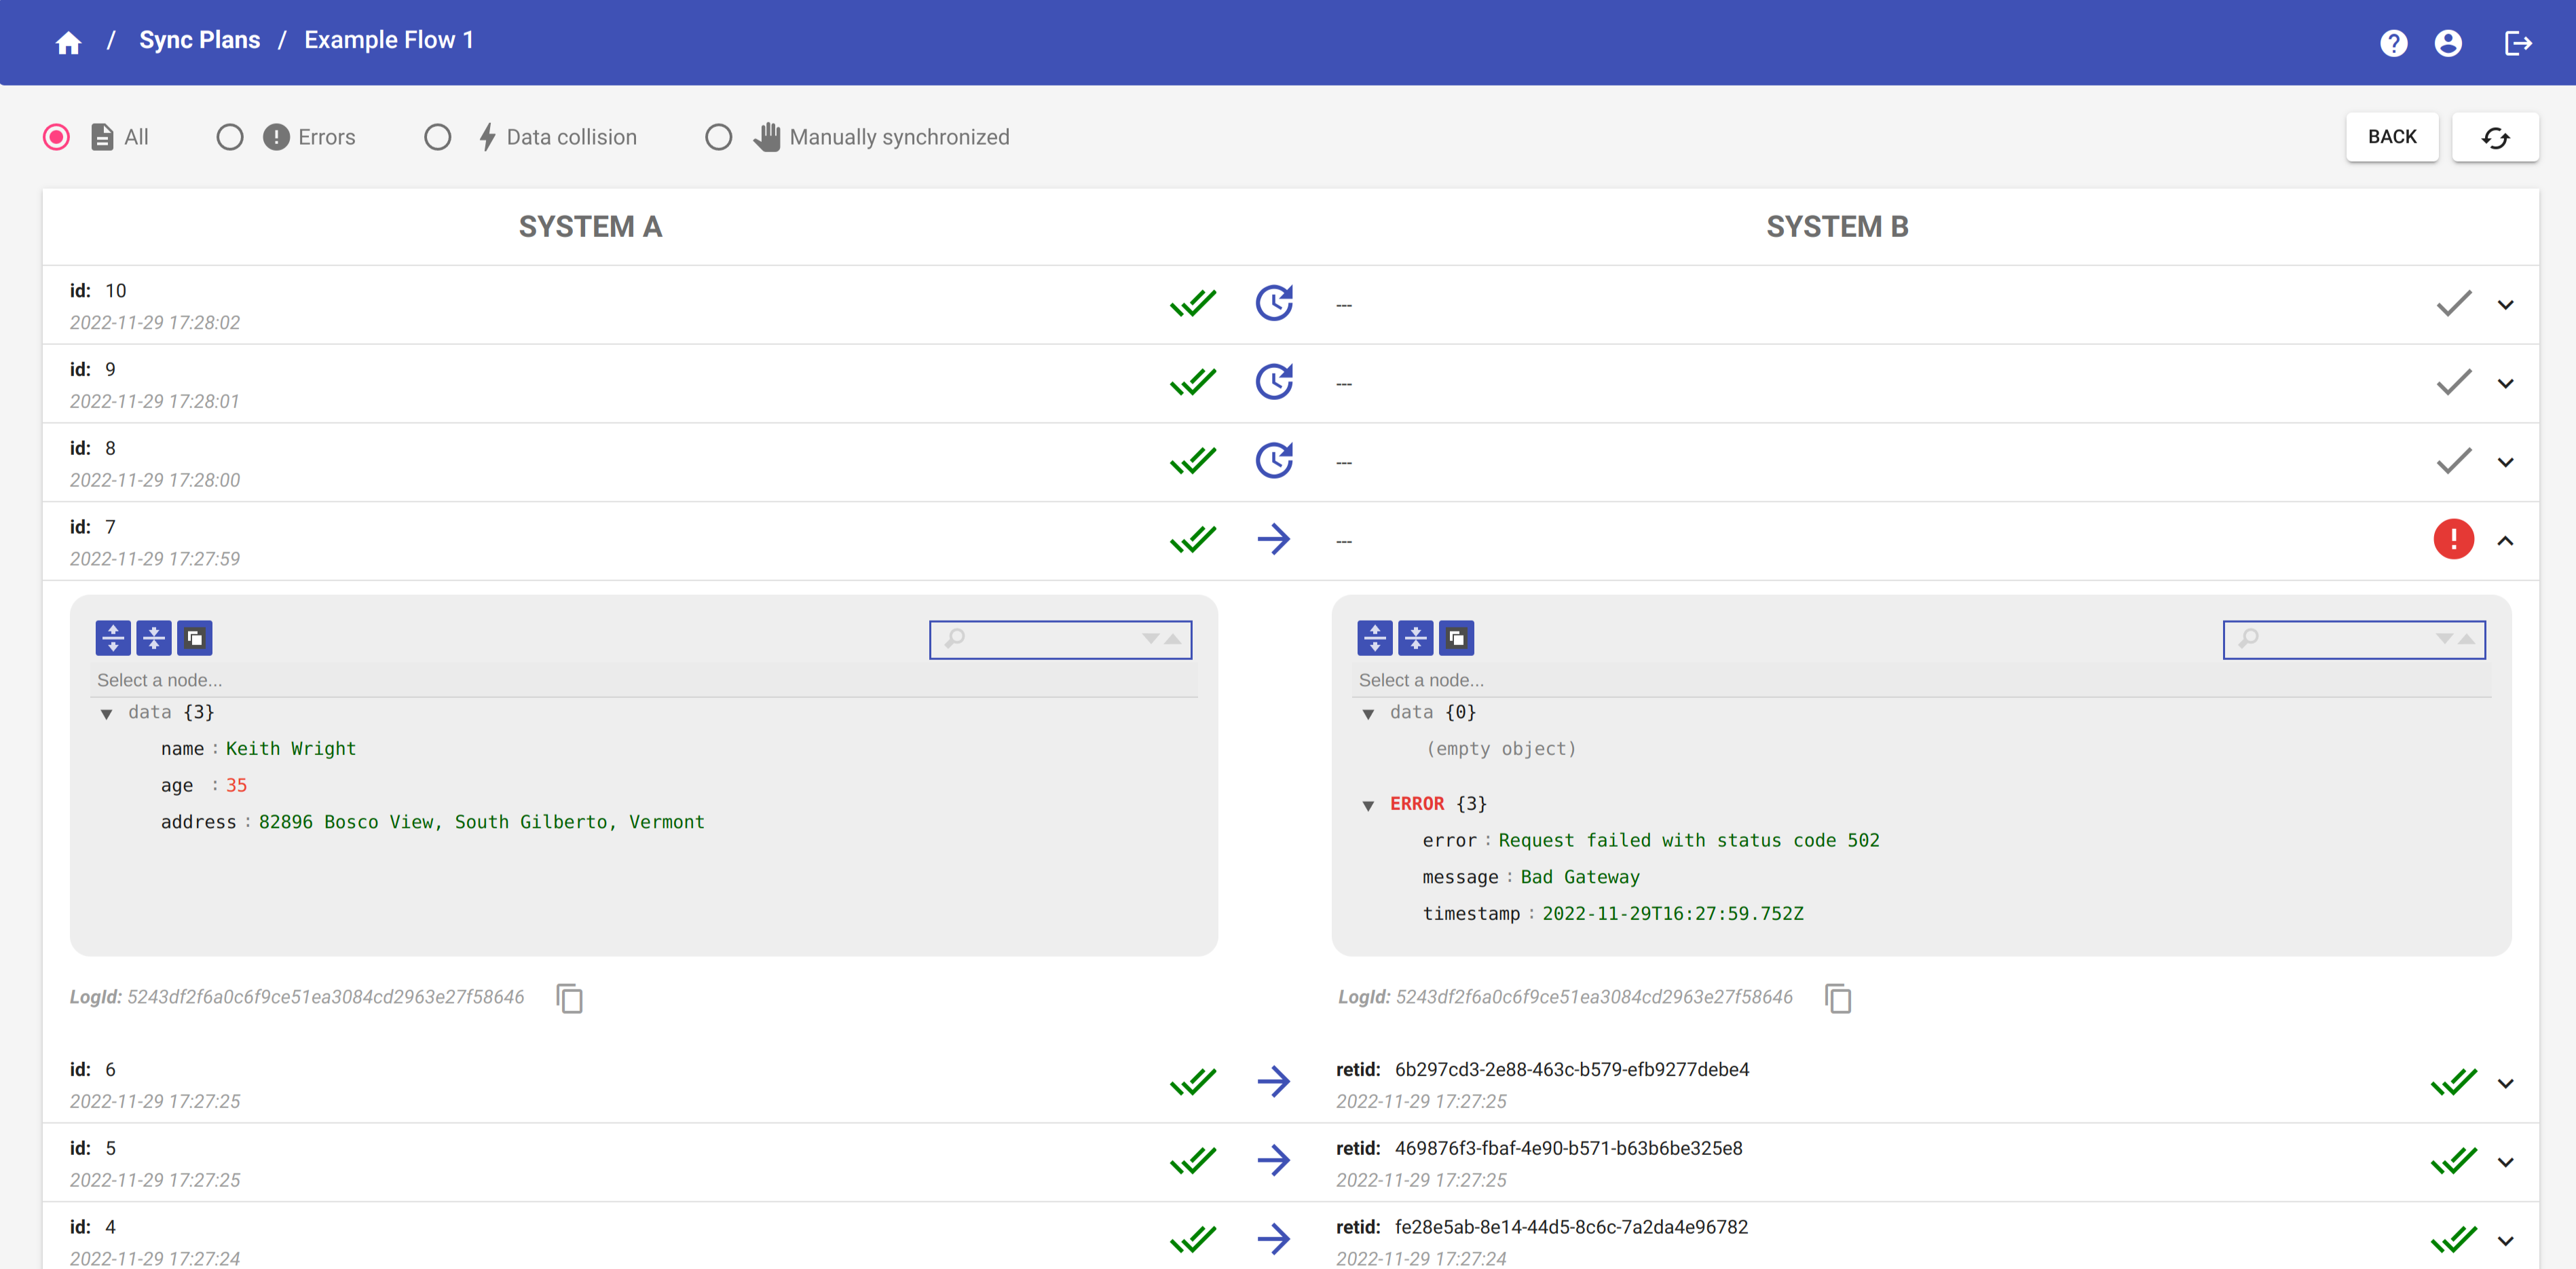
NOTE
The logId field is an id automatically generated when processing the message that uniquely identify the document in the platform. It is used for debugging and it might be requested by the Support user or the YouSolution.Cloud Team to resolve the synchronization errors.
Click on the button  to refresh data.
Click on the button to return to the Sync Plans page.
Click on Synchronized, Unsynchronized or Expiring tab to change tab.
Synchronized
In the Synchronized tab, you can visualize only the synchronized documents.
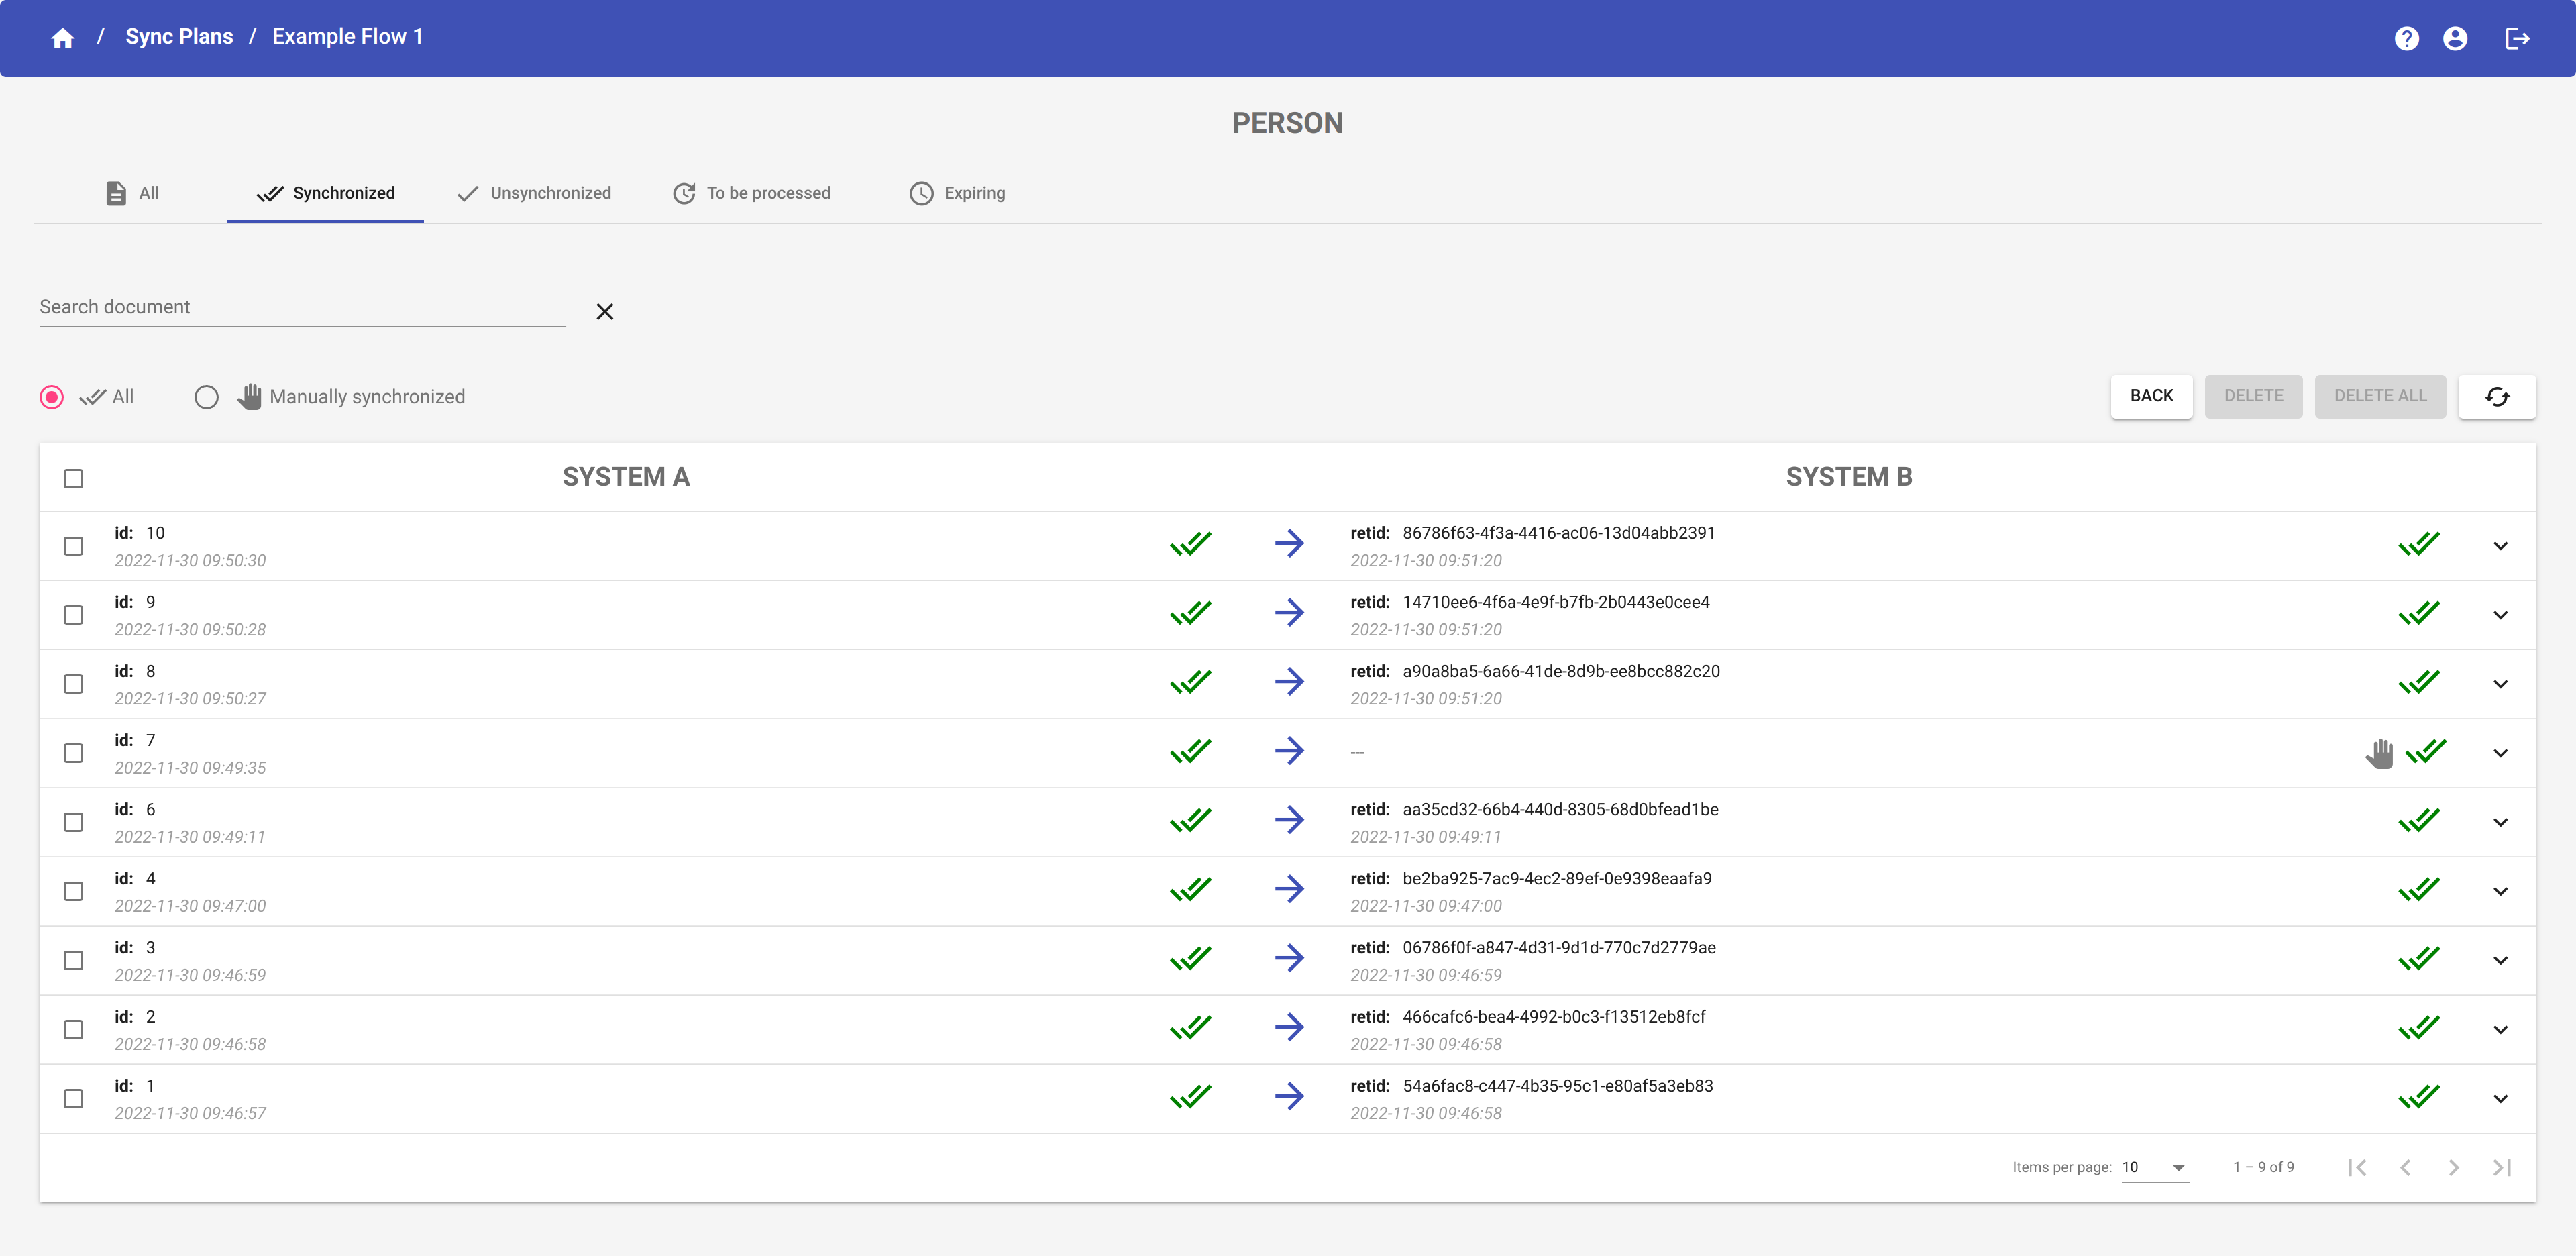
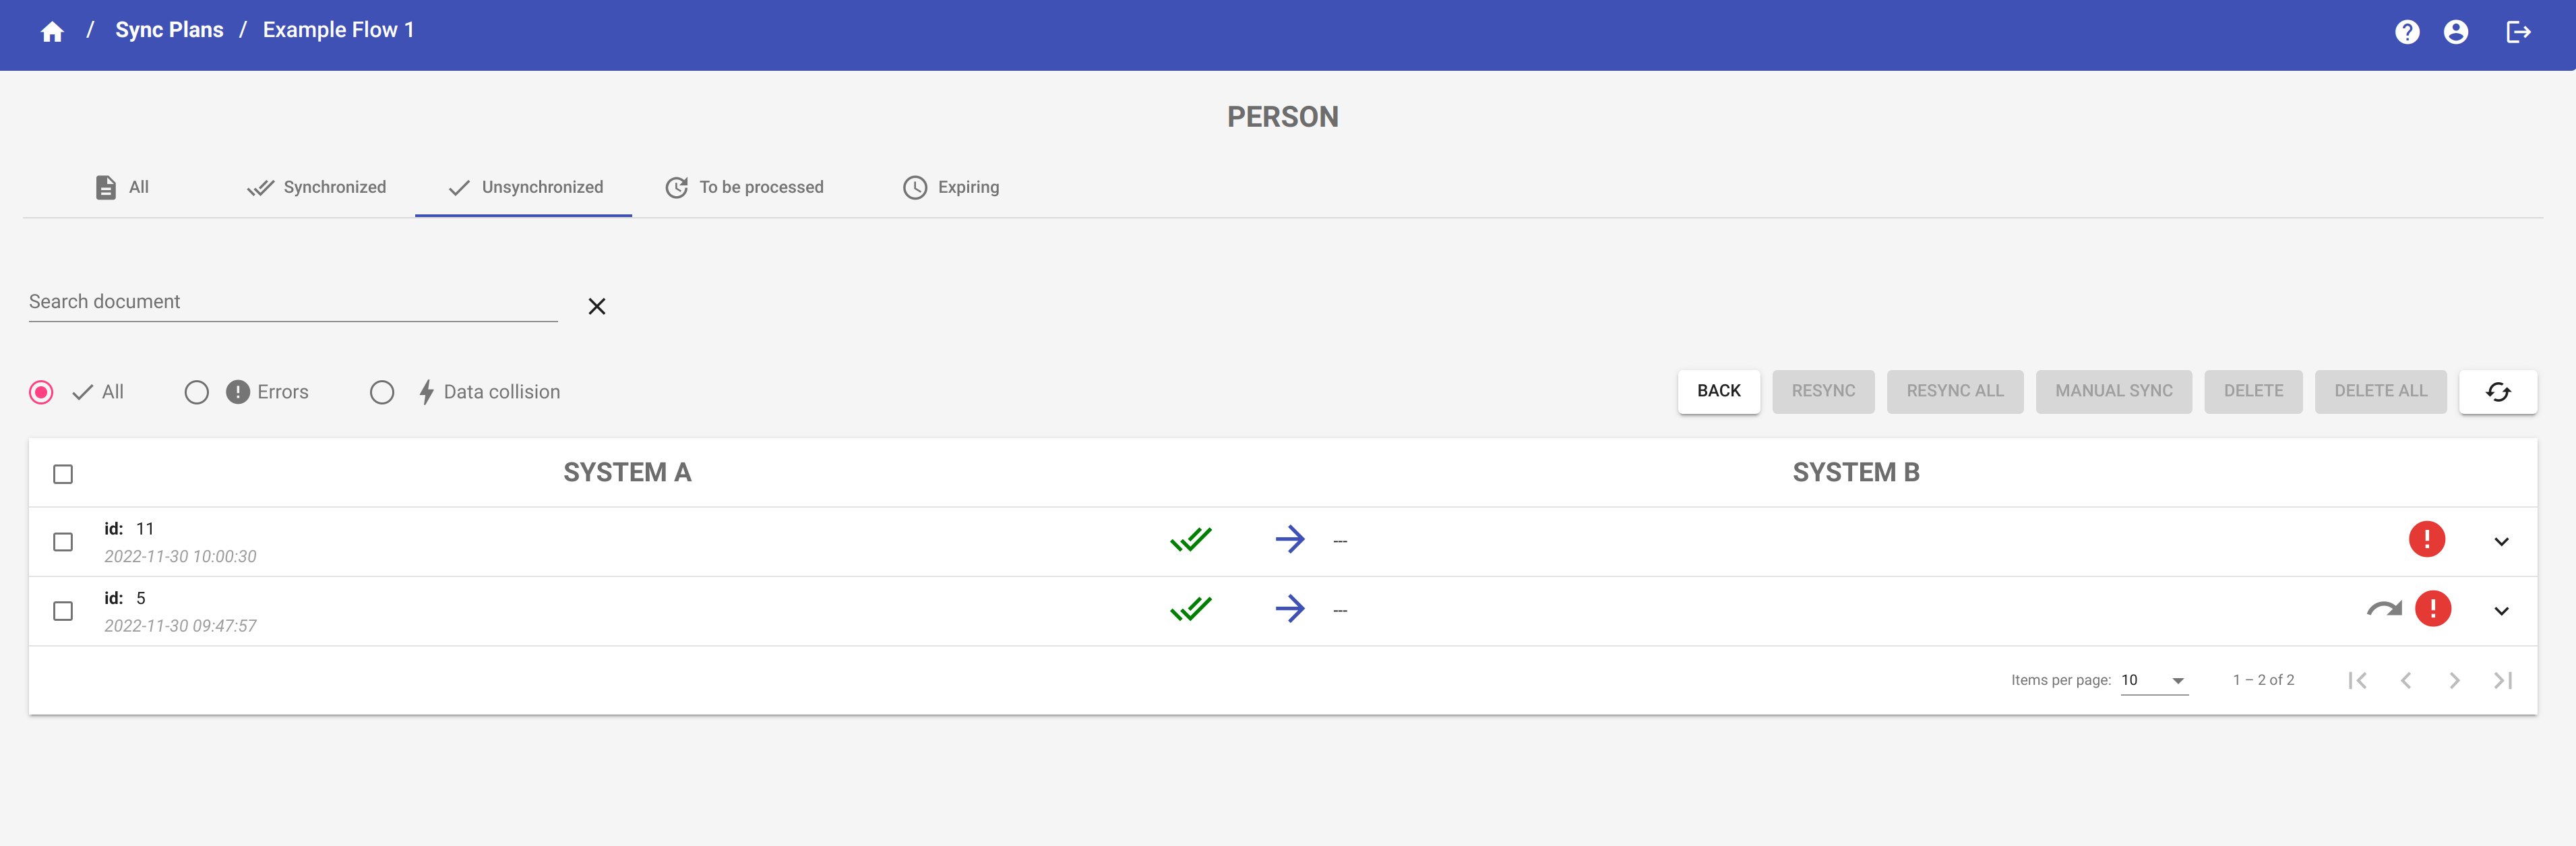
Unsynchronized
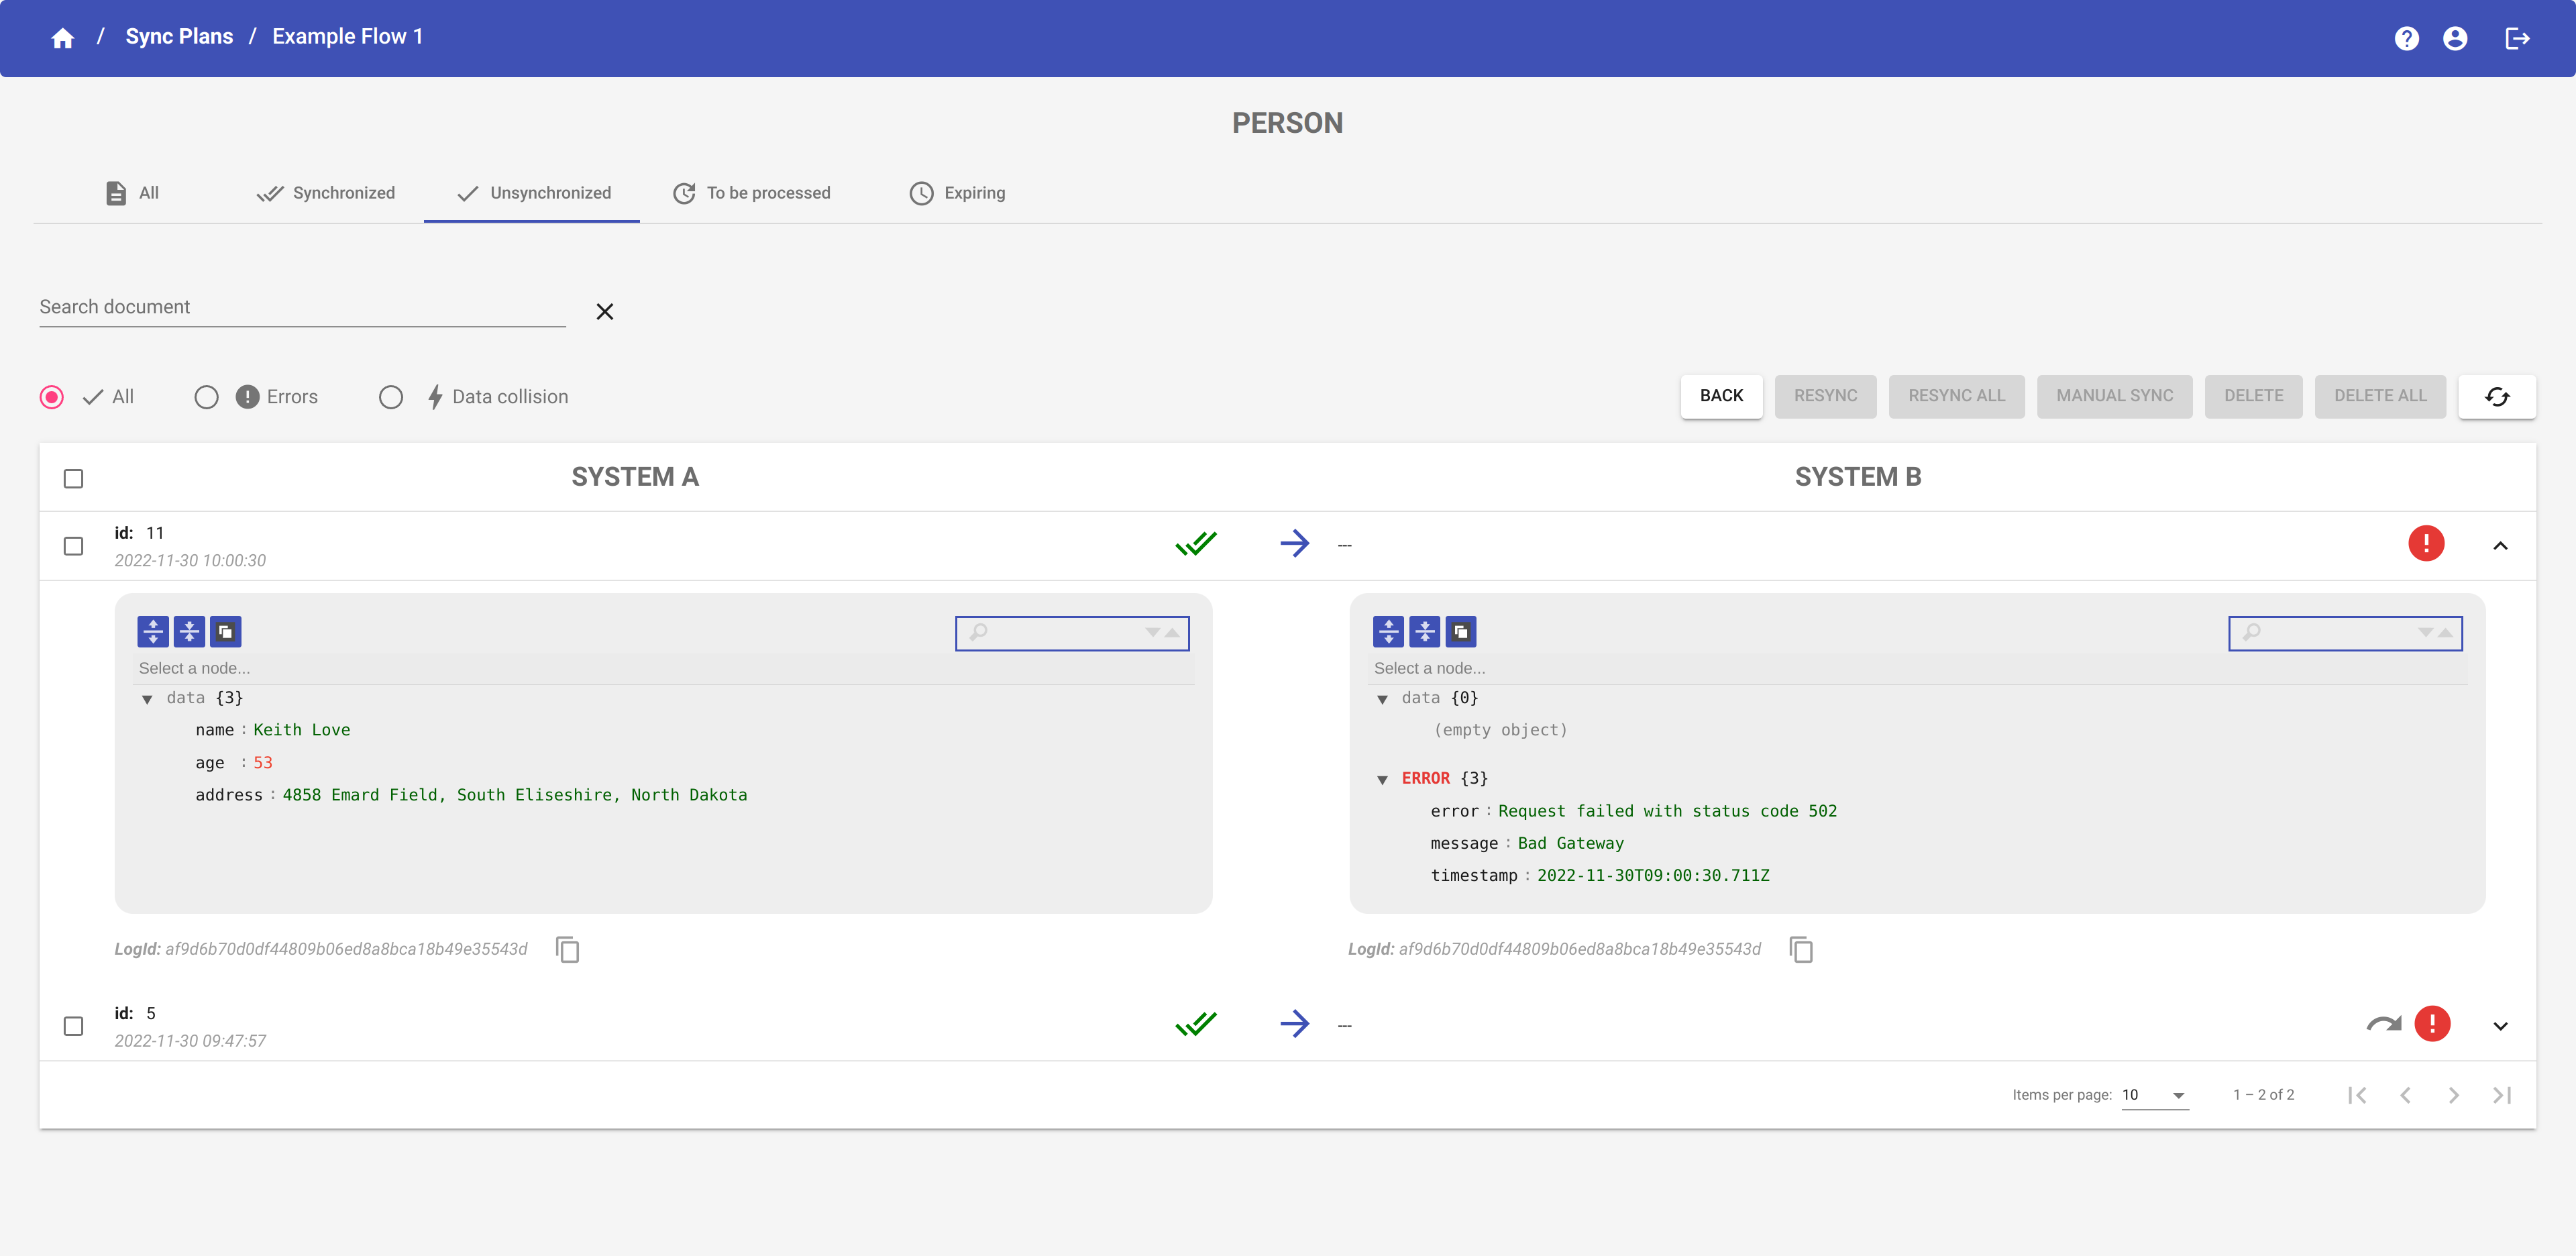
In the Unsynchronized tab, you can visualize only the unsynchronized documents.
By clicking on a row of the table, you can expand the row and see the synchronization error:
Expiring
When there are expiring documents, you can visualize them in the Expiring tab. If there aren't any expiring documents this tab is disabled.
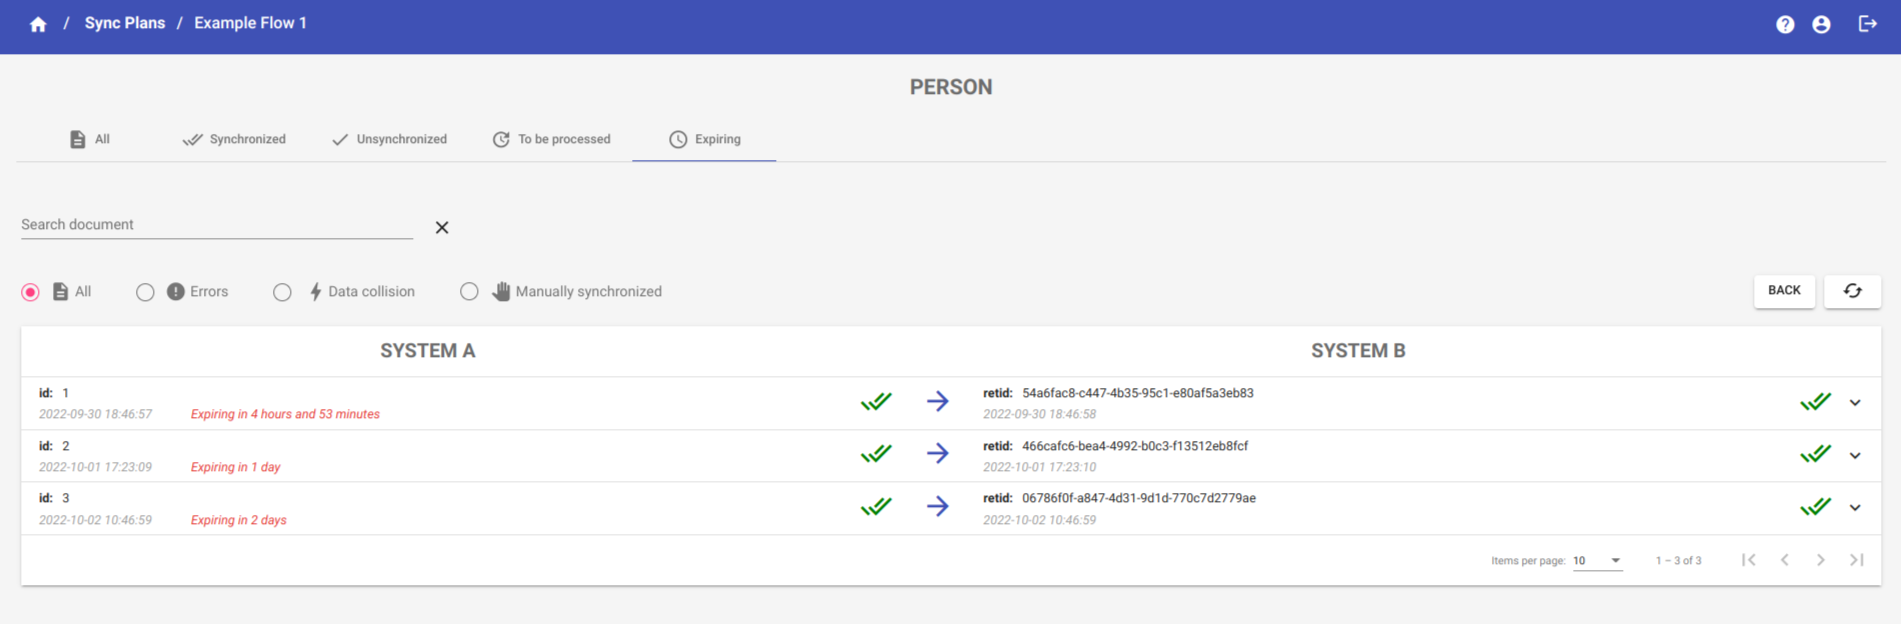
The expiring documents are documents which whose retention period is expired and are going to be automatically deleted from the platform.
NOTE
In the non-storable sync plans, the documents are stored for one months since the last update.
In the storable sync plan, the storable period can be set for each sync plan and ranges from a minimum of one month to a maximum of infinity.
When there are some expiring documents, the icon ![]() appears over the DATA button and indicates the presence of such documents.
appears over the DATA button and indicates the presence of such documents.
Document status
You can see the progress of the synchronization by viewing the status of the document. The status of the document is the sum of the states of the source node and the target node.
NOTE
-
The icon
 indicates that the data is successfully synchronized in the node.
 -
The icon
 indicates that the data is not successfully synchronized in the node.
 -
The icon
 indicates that there is a synchronization error in the node that blocks one of the queues.
 -
The icon
 indicates that the document has an error that has been skipped. Normally this icons is displayed together with the error icon
  .
. -
The icon
 indicates that the data is successfully synchronized in the node, but it contains also one or more errors occurred during the synchronization.
 -
The icon
 indicates that a data collision occurred. It means that the node has returned data that is different from the data sent by the platform to that node.
 -
The icon
 indicates that the synchronization of the document has not yet been completed.
 -
The icon
 indicates that the synchronization of the document has been completed. The direction of the arrow goes from the node that sent the data to the node that received it.
A document is successfully synchronized only when both source node and target node have been marked with the icon ![]() .
.
Filter documents
You can filter the documents of each tab by clicking on the status option you want to visualize.

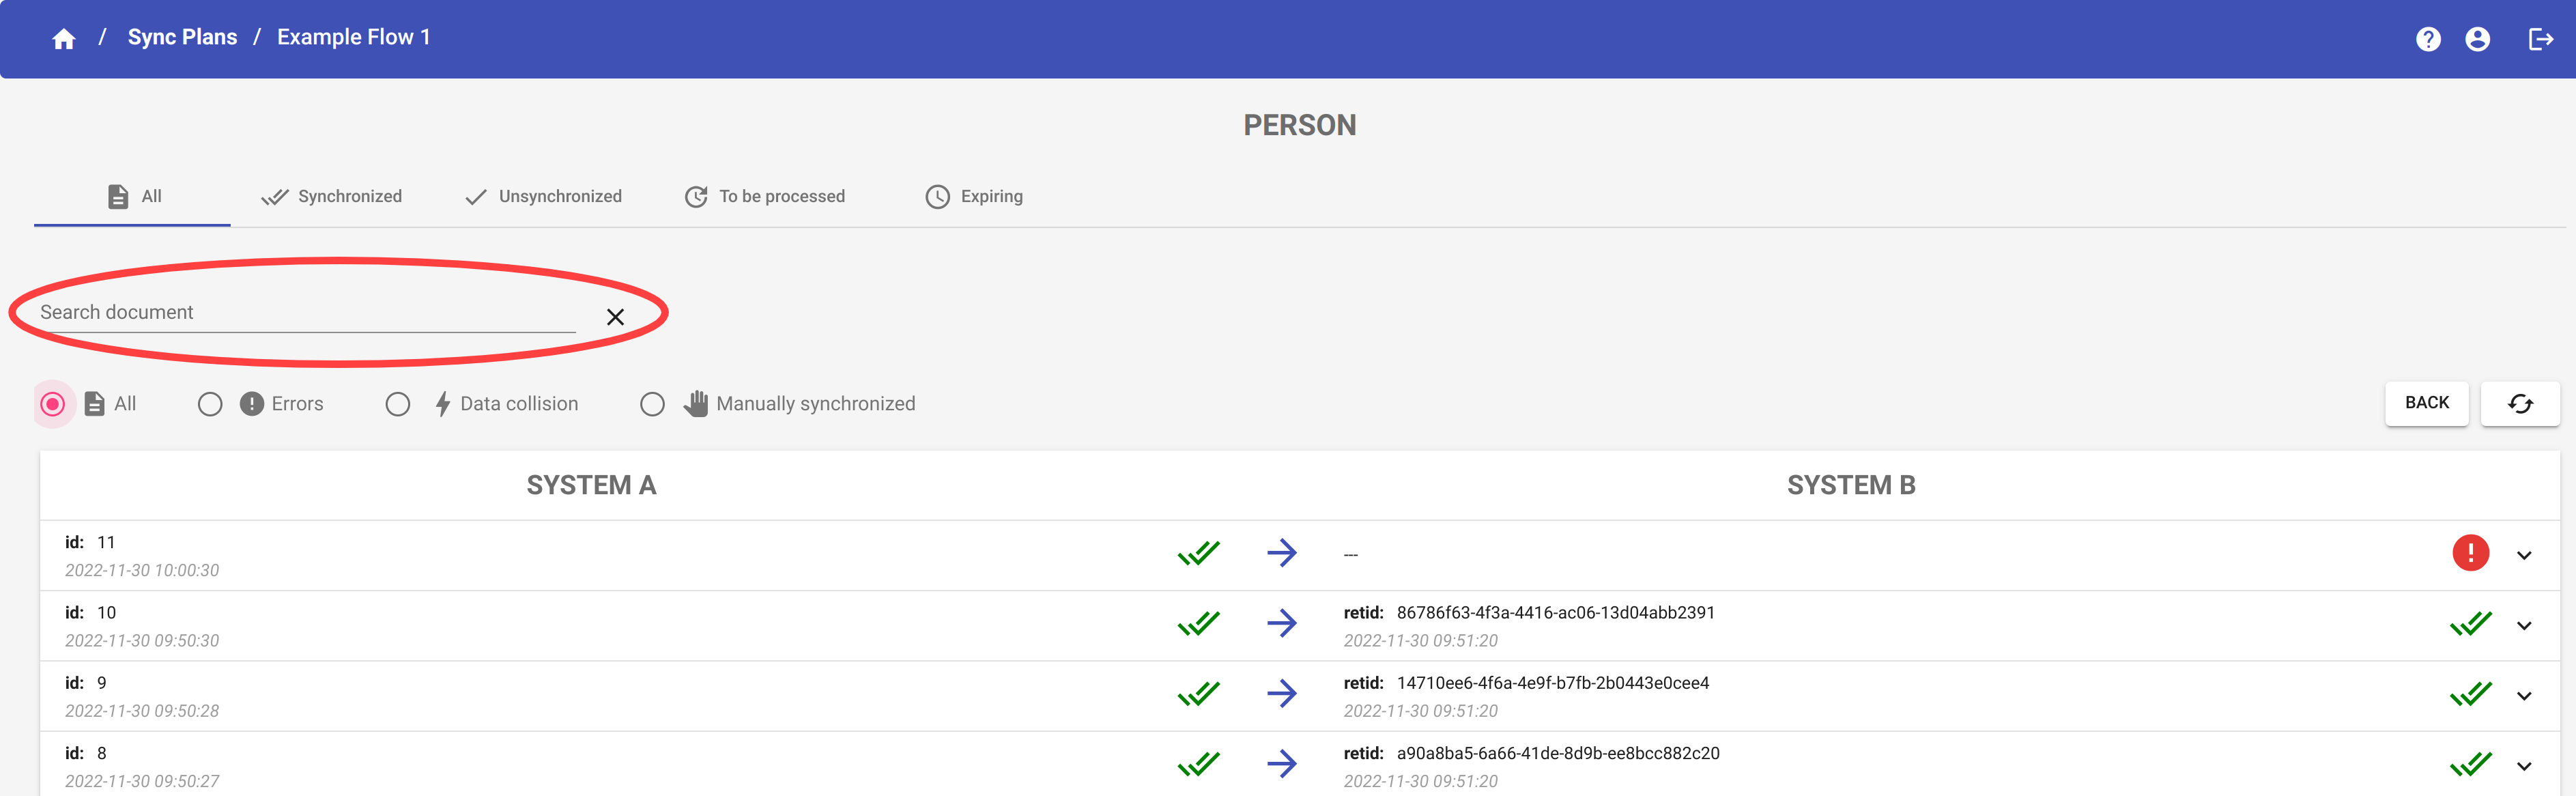
Search documents
You can search a specific document by id or logId. Use the Search document filter.
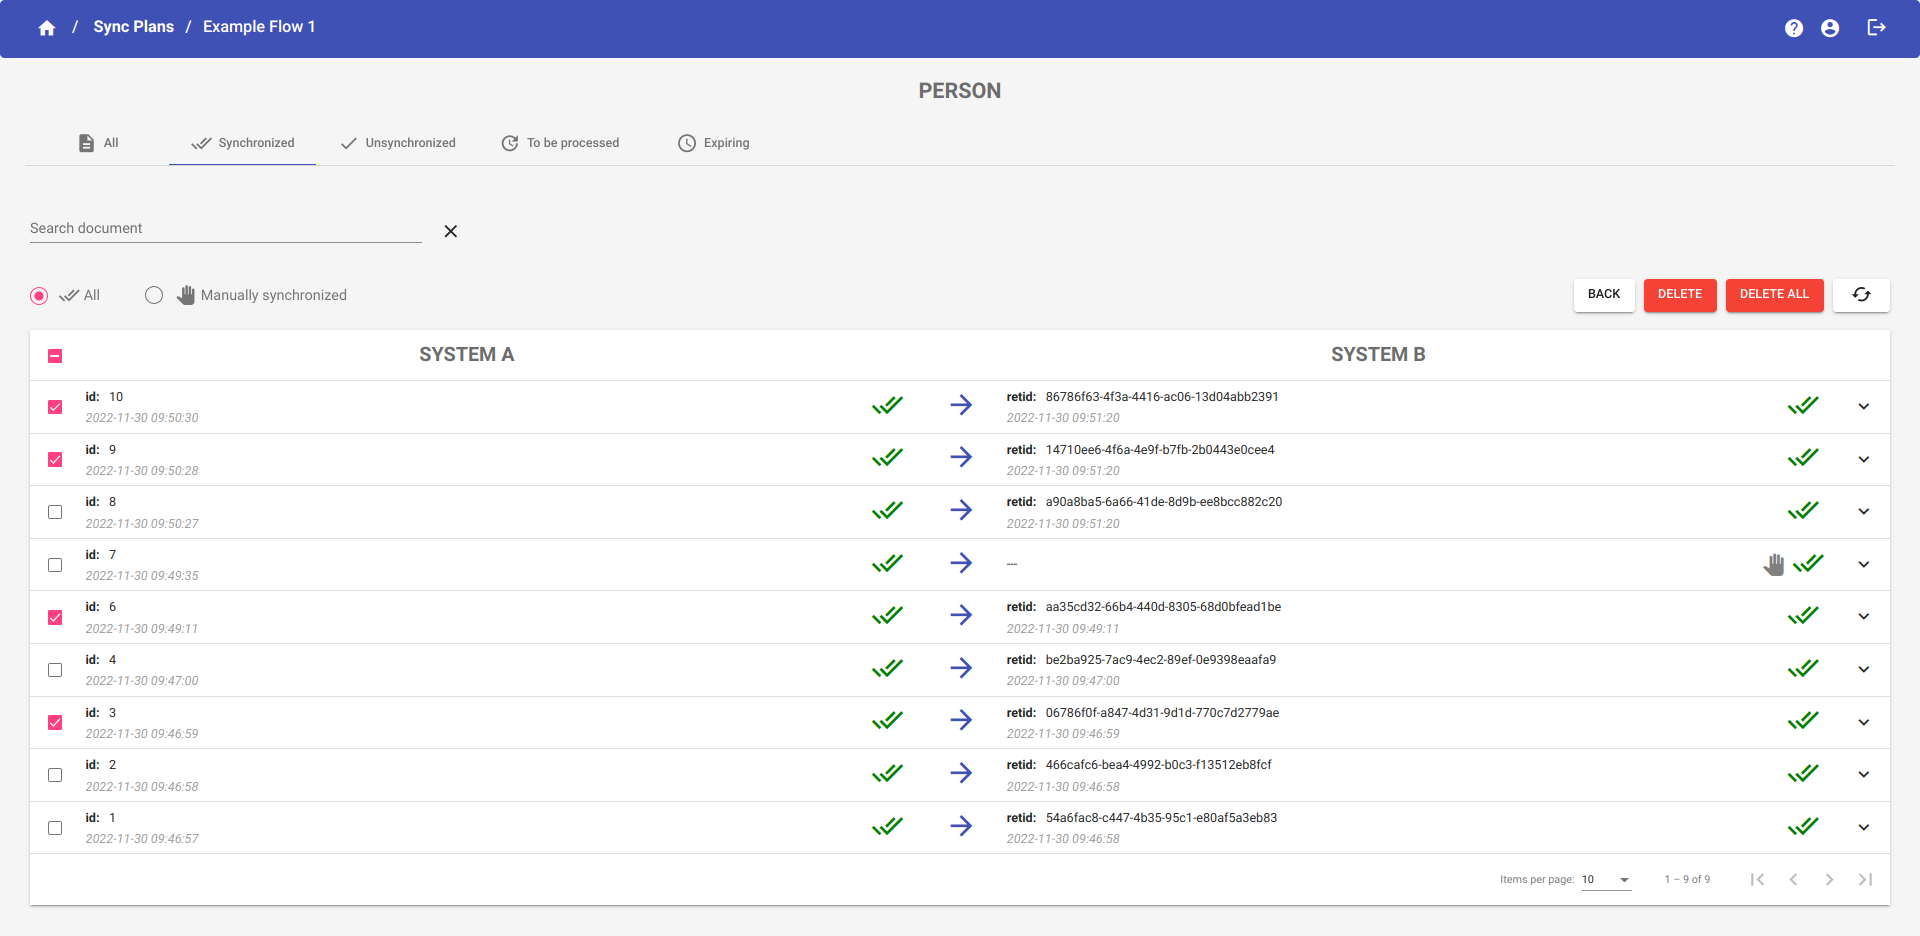
Delete documents
You can delete one or more documents from the Synchronized, Unsynchronized or To Be Processed tabs.
WARNING
You have to pause the synchronization before deleting documents.
The DELETE and DELETE ALL buttons are enabled only if the synchronization is off.
Select the documents you want to delete and click on the button  .
.
NOTE
The documents will be deleted from the YouSolution.Cloud platform, not from the source node or the target node.
WARNING
You can delete a document only in the Synchronized, Unsynchronized or To Be Processed tabs.
If you click on the select button, you can select all the documents visualized in the page (not all the documents).

The click on the button to delete them.
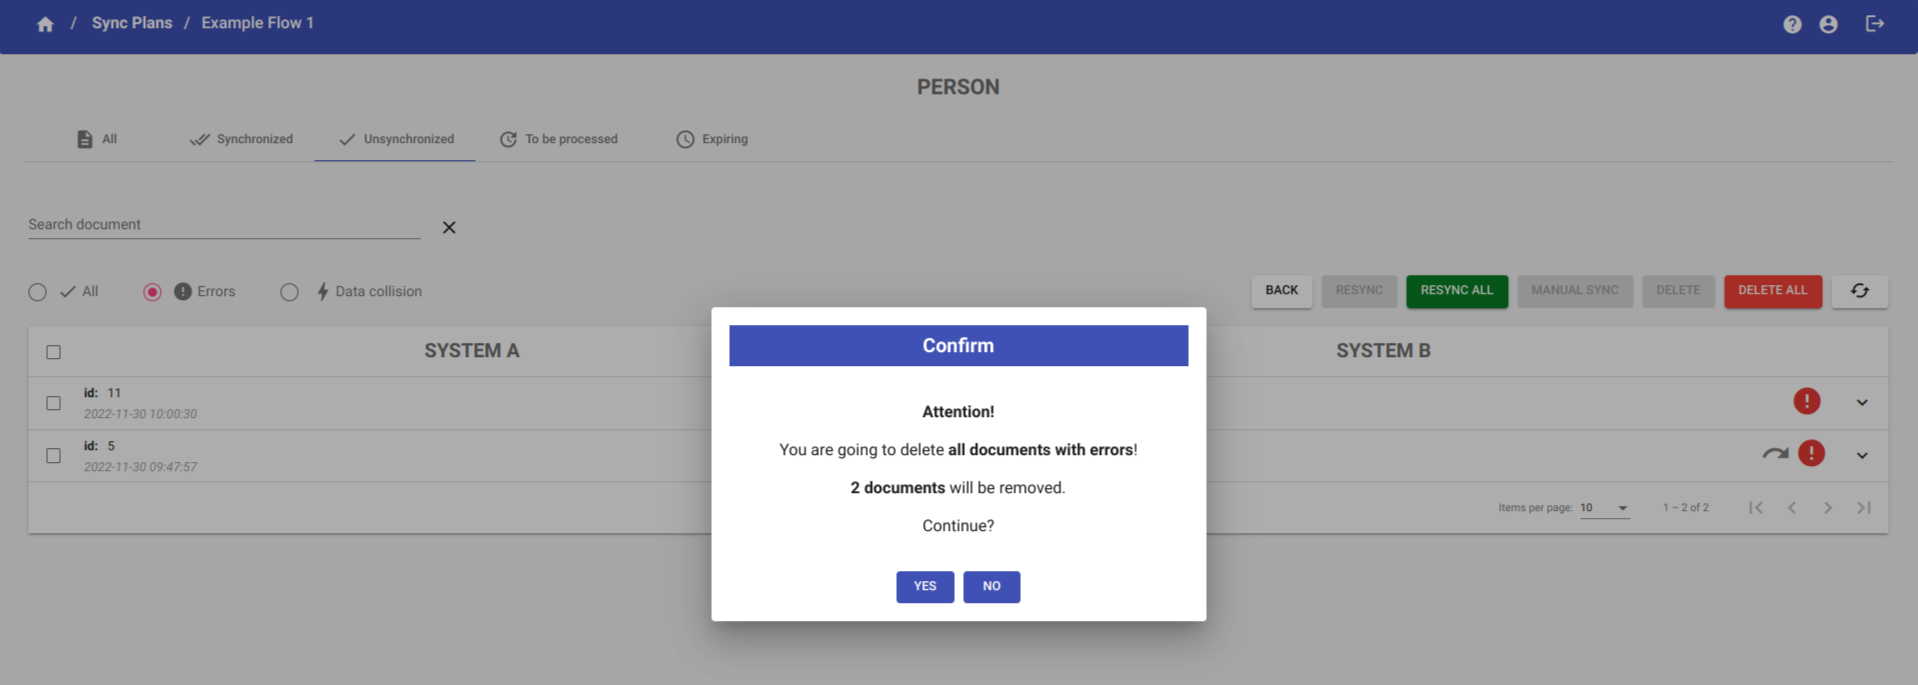
By clicking the button  , you delete all the documents of this sync plan according to:
- the tab you are in (Synchronized or Unsynchronized)
- the currently selected filter (All, Errors, Manually Synchronized, etc.)
. You don't need to select any documents before clicking the DELETE ALL button.
IMPORTANT
You are deleting only the documents of the current tab and of the current filter you've selected.
For example, if you click DELETE or DELETE ALL while you are in the Unsynchronized tab with the Errors filter selected, you are deleting only the unsynchronized documents with errors (including those with error skipped).
Resync documents
You can try to resynchronize one or more unsynchronized documents from the Unsynchronized tab.
WARNING
You have to pause the synchronization before resynchronising documents.
Select the documents you want to resynchronize and click on the button  .
.
When you restart the synchronization, the platform will try to resynchronize the documents.
As for Delete documents, if you click on the select button, you can select all the documents visualized in the page (not all the documents). Then click on the button to resynchronize them.
By clicking the button  instead you resynchronize all the unsynchronized documents of the sync plan, according to the currently selected filter (All, Errors, Manually Synchronized, etc.)
You don't need to select any documents before clicking the RESYNC ALL button.
WARNING
The RESYNC and RESYNC ALL buttons are enabled only if the synchronization is off.
Manual synchronization
From the Unsynchronized tab, you can try to do a manual synchronization of an unsynchronized document. This means that you have to manually synchronize the document and then you can mark it as manually synchronized.
To mark the documents as manually unsynchronized, select one or more unsynchronized documents and click on the button  .
.
WARNING
You can set a manual synchronization only if the synchronization is off.
If the manual synchronization is successful, all the documents manually synchronized will be marked with this symbol ![]() and the document will be moved in the tab Synchronized.
and the document will be moved in the tab Synchronized.
NOTE
After manual synchronization, you have to check the queues status.
If you do not want the data to be reprocessed, delete it from the queue.
Sync plan status
From the Sync Plans page, you can check the status of each sync plan. The status is indicated by the icon in the STATUS column of the table.
The possible states of a sync plan are:
Status ON  
The synchronization is on and there aren't any synchronization errors.
Status OFF  
The synchronization is off and there aren't any synchronization errors. When a sync plan is in this status, you can send messages to the YouSolution.Cloud platform, but these messages will not be synchronized. However, the messages will be stored in the sync plan's queues and, when the synchronization restarts, they will be synchronized.
Status WARNING  
There are some unsynchronized documents. The tooltip indicates the number of unsynchronized documents.
This is not a blocking error. You can continue to send messages to the platform and they will be synchronized.
If you want to see which messages are unsynchronized, click on the button DATA in the the sync plans table to access the Documents page and switch to the table Unsynchronized. Here you can see the unsynchronized documents and you can choose to delete them, to try to resynchronize them or to manually synchronize them.
Status ERROR  
There are some blocking errors in the sync plan's queues. This can happen whether the messages sent to the platform are in a wrong format or the target node is not reachable.
If the alert option is enabled, an email will be sent to the provided addresses to notify the presence of errors in the queues.
If there is one or more message blocked in queues, all the following messages sent to the plaftform will be stored in queues but they will not be synchronized until the error is solved.
When the cause of the error has been removed, you have 2 ways to restore synchronization:
- If the blocking messages have a wrong format, first you have to remove them from the sync plan's queues and then you can restart the synchronization.
- If the other cases, you can directly restart the synchronization.
Status NOT COMPILED  
The code of the sync plan has not yet been compiled or the compilation has been unsuccessful. When you are in this status, you cannot start the synchronization.
Open the code editor and try to recompile the code. If it is necessary, try to modify the code before compiling it.
Status COMPILING  
The code of the sync plan is being compiled. Enter in the code editor of the sync plan to see the results of the compilation process.
Status UNAVAILABLE  
The status can not be shown probabilly because the service is temporally down. Try again later, if the error persists please send a report to ticket@yousolution.cloud.
Sync plan queues
Each sync plan has four queues to allow data to get in and get out of the platform.
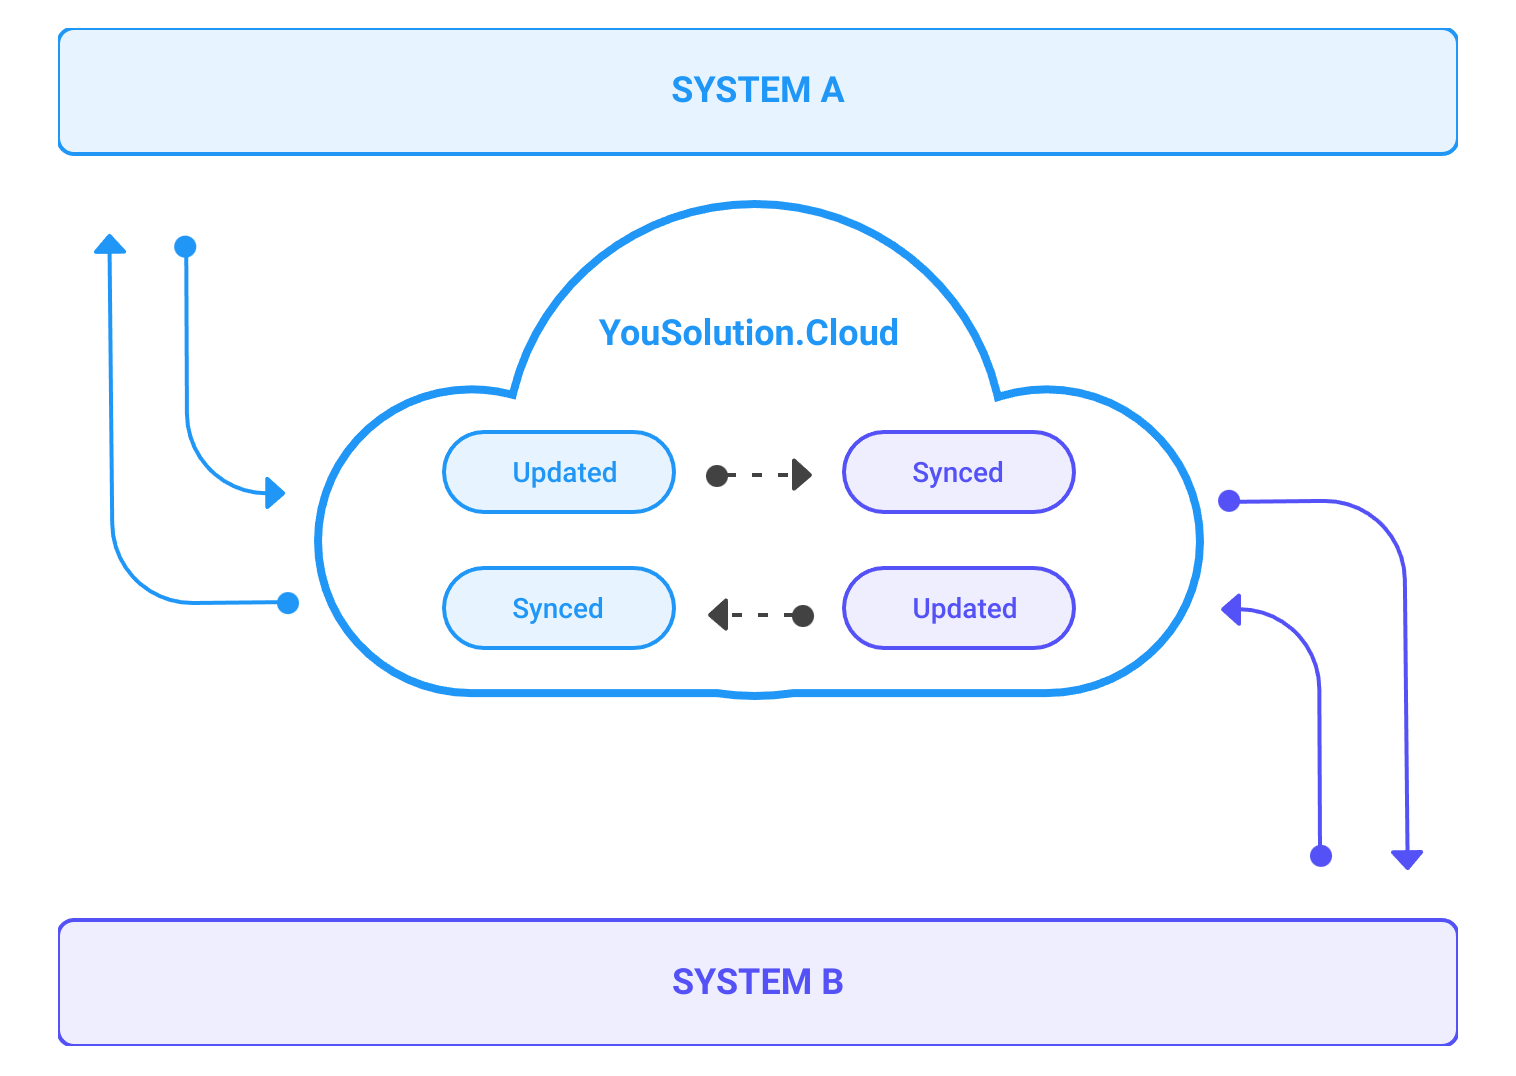
The source node and the target node both have two types of queues:
- Updated queue: receives the messages from the node and gets them into the platform.
- Synced queue: takes the messages from the platform and sends them to the node.
NOTE
In the unidirectional flows, there is no the synced queue of the source node (the blue queue synced in the above image), because the data goes only from the source node to the target node.
So the unidirectional flows have 3 queues, while the bidirectional flows have 4 queues.
When synchronization errors occur, the message will be blocked in one or more of these queues, and the synchronization will stop (unless the skip errors option is enabled).
To visualize the queues status, click on the icon STATUS in the Sync plan page:
The Sync plan queues status dialog will open and you can see the status of all the four queues.
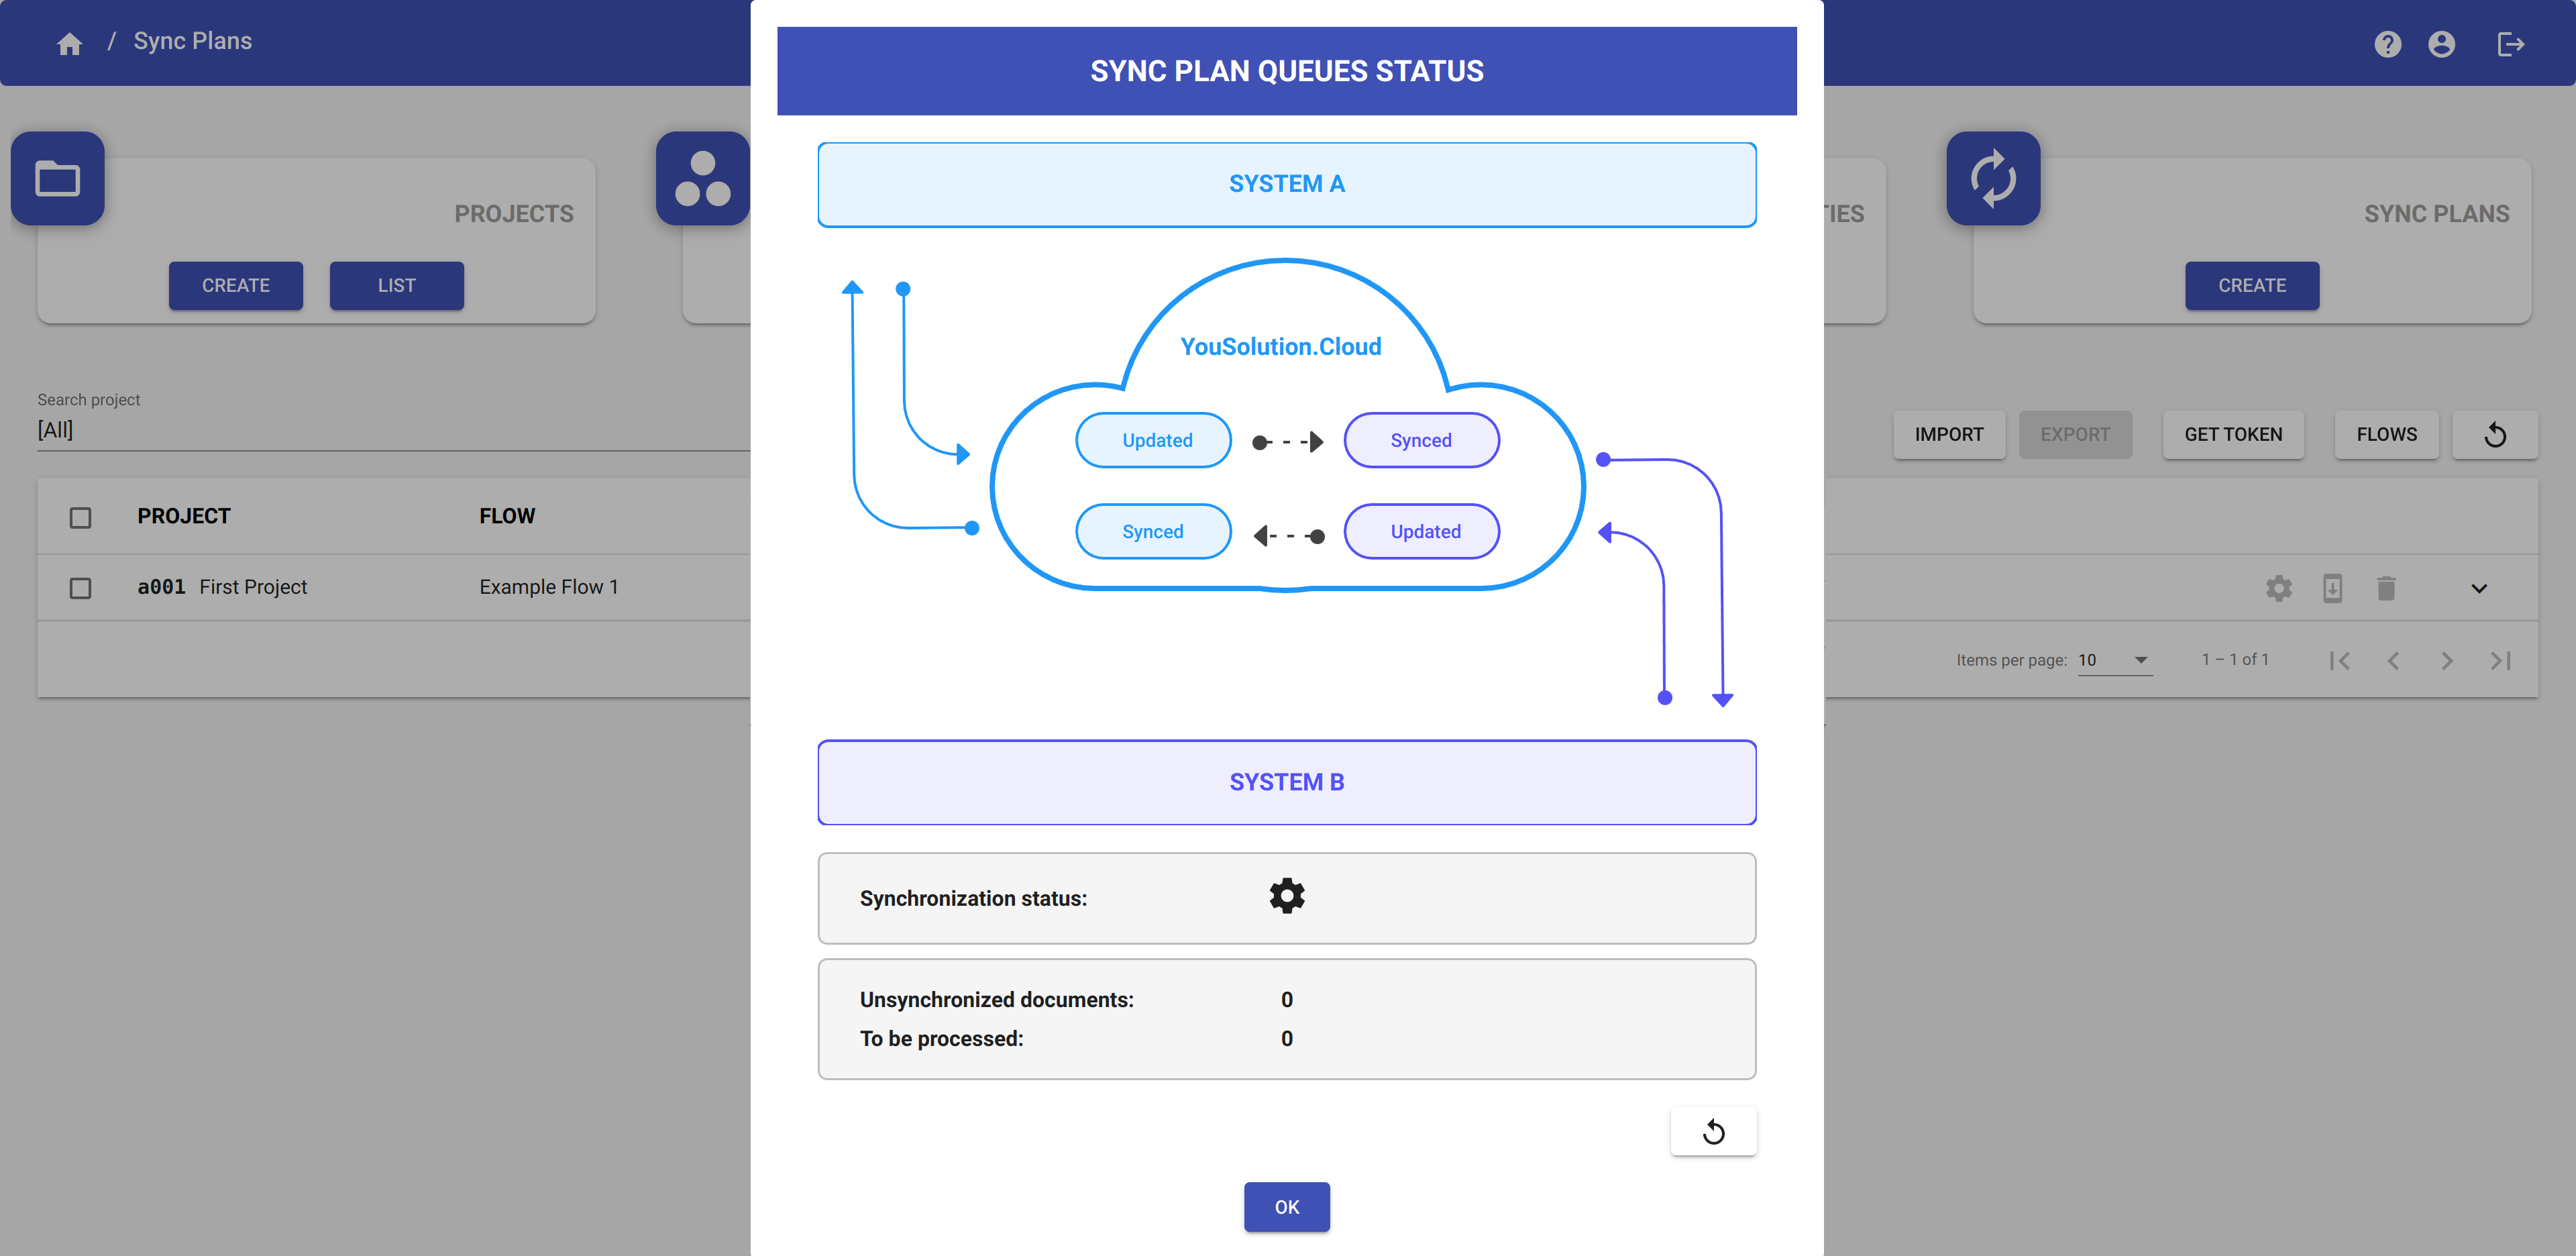
Click on the button  to refresh the queues.
NOTE
The messages stored in the queues have not been yet synchronized.
WARNING
Each queue has a retention period after which all the messages stored in the queue will be deleted.
The default value of the retention period is 7 days, which is also the maximum possible value. You can modify the retention period from the Sync plan settings dialog.
When there are synchronization errors, the icon of the STATUS is red.
Stop the synchronization and click on the STATUS icon to open the Sync plan queues status dialog:
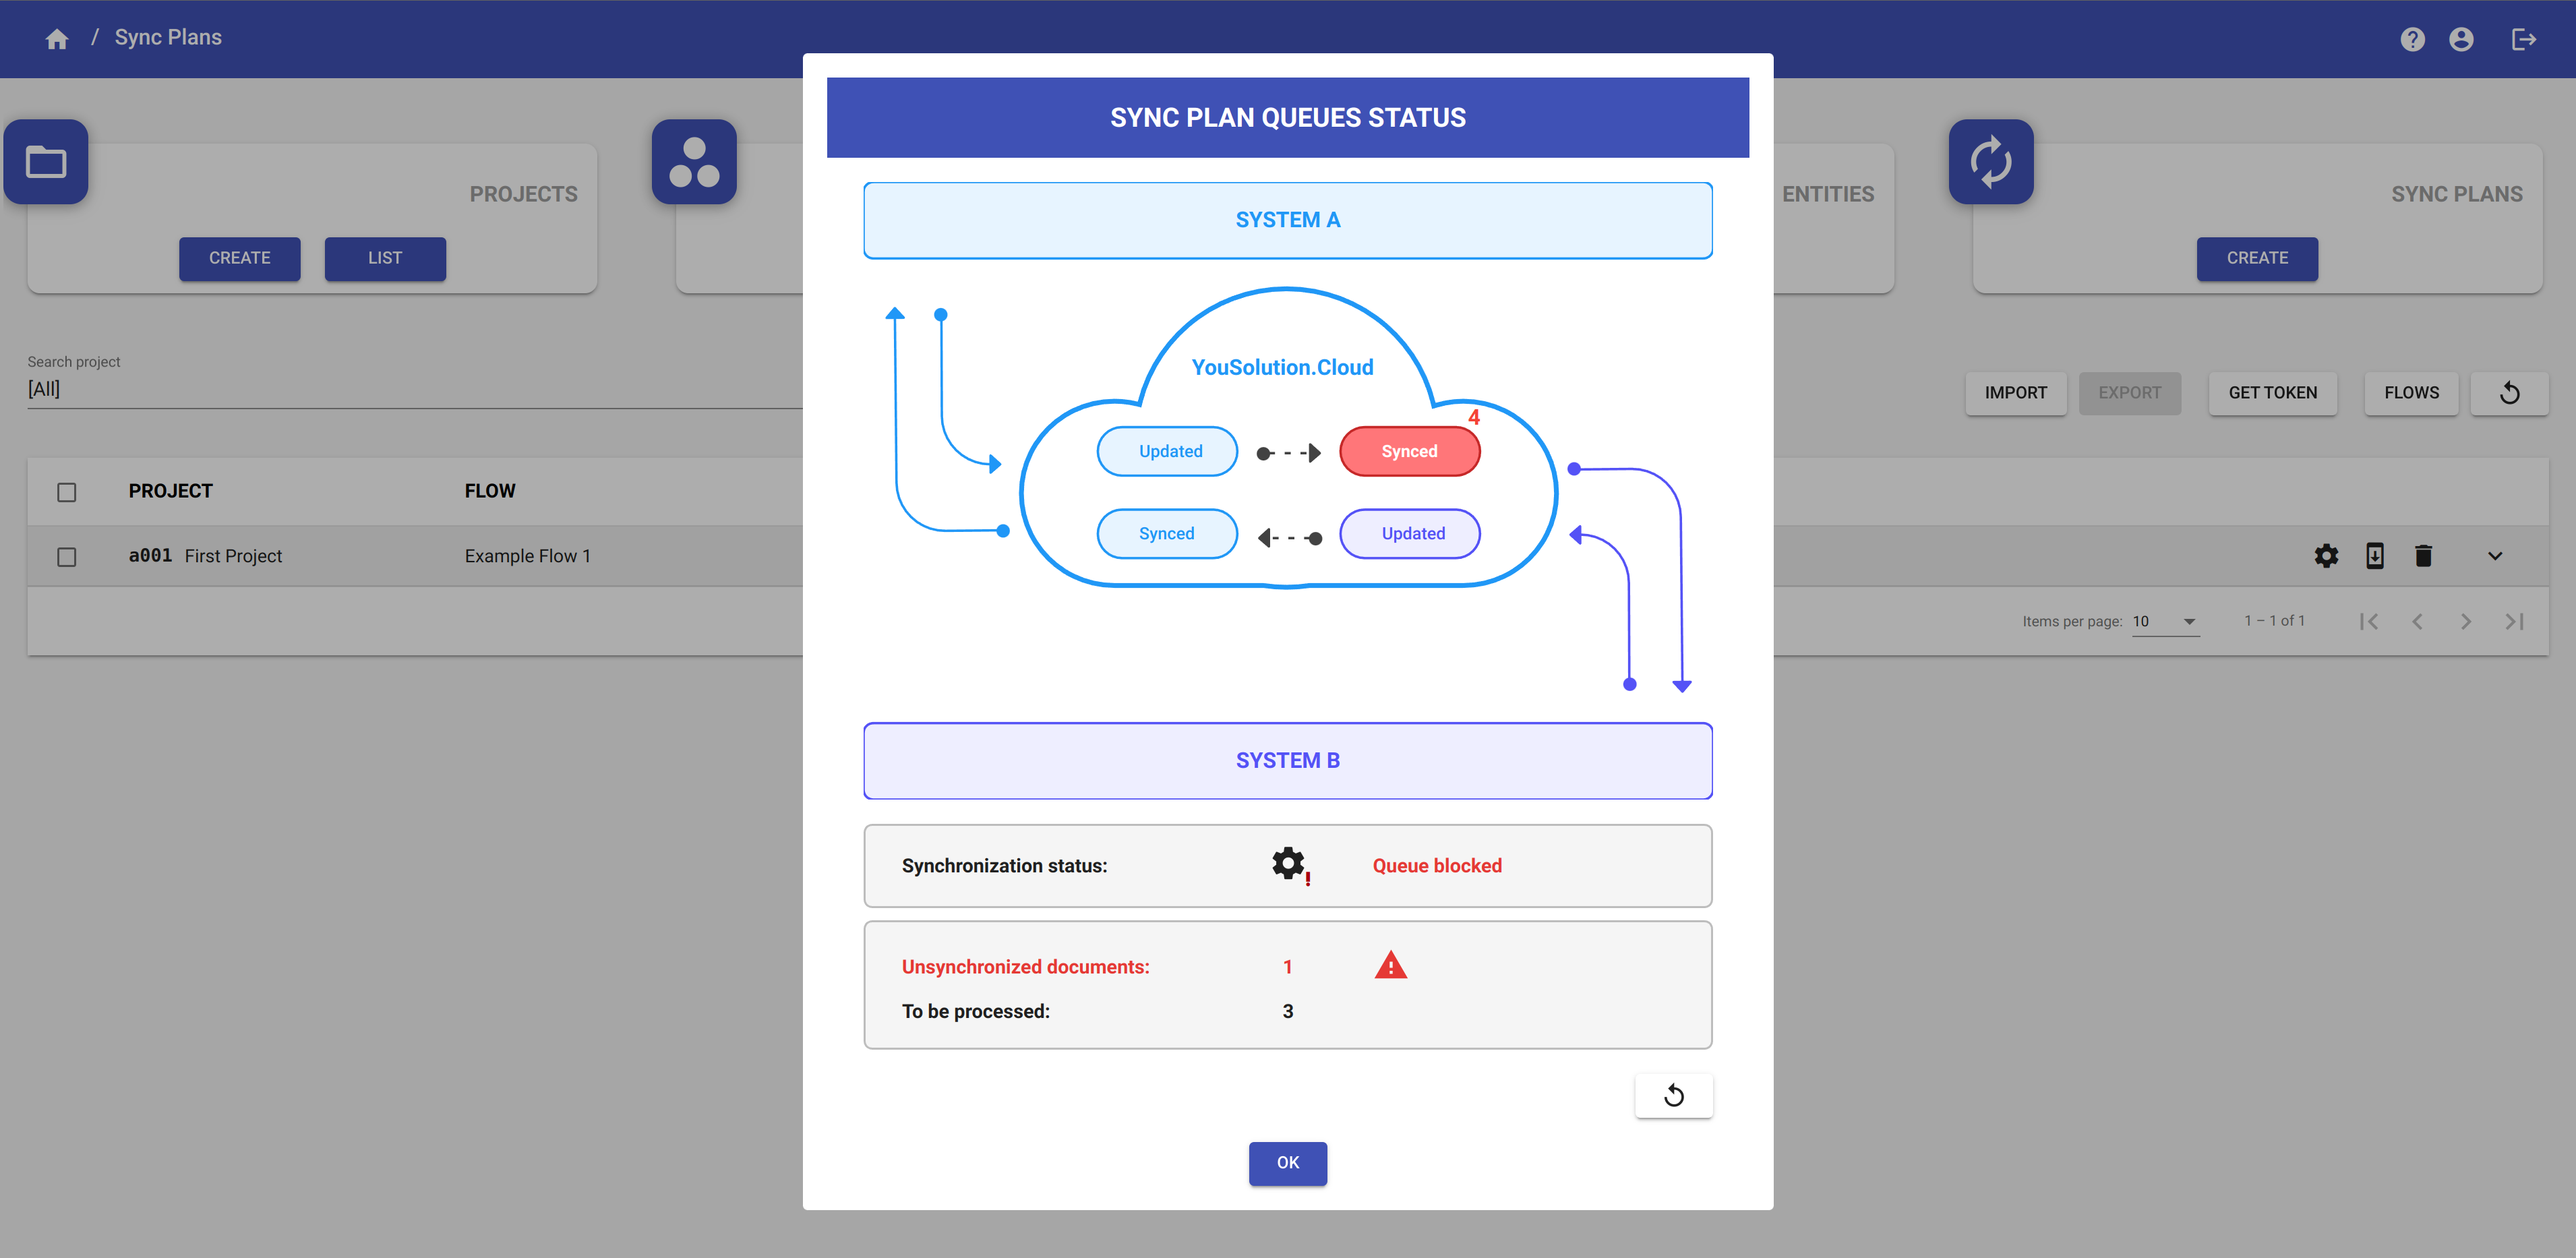
When there are some messages blocked in a queue, that queue will marked in red and will become clickable. The number near the queue indicates the number of messages blocked in that queue.
Click on the queue to visualize the blocked messages.
WARNING
You must first stop the synchronization in order to access the queues.
You can access only the queues which contains blocked messages.
From inside of the queue, you can view the list of all the messages stored in the queue in that moment.
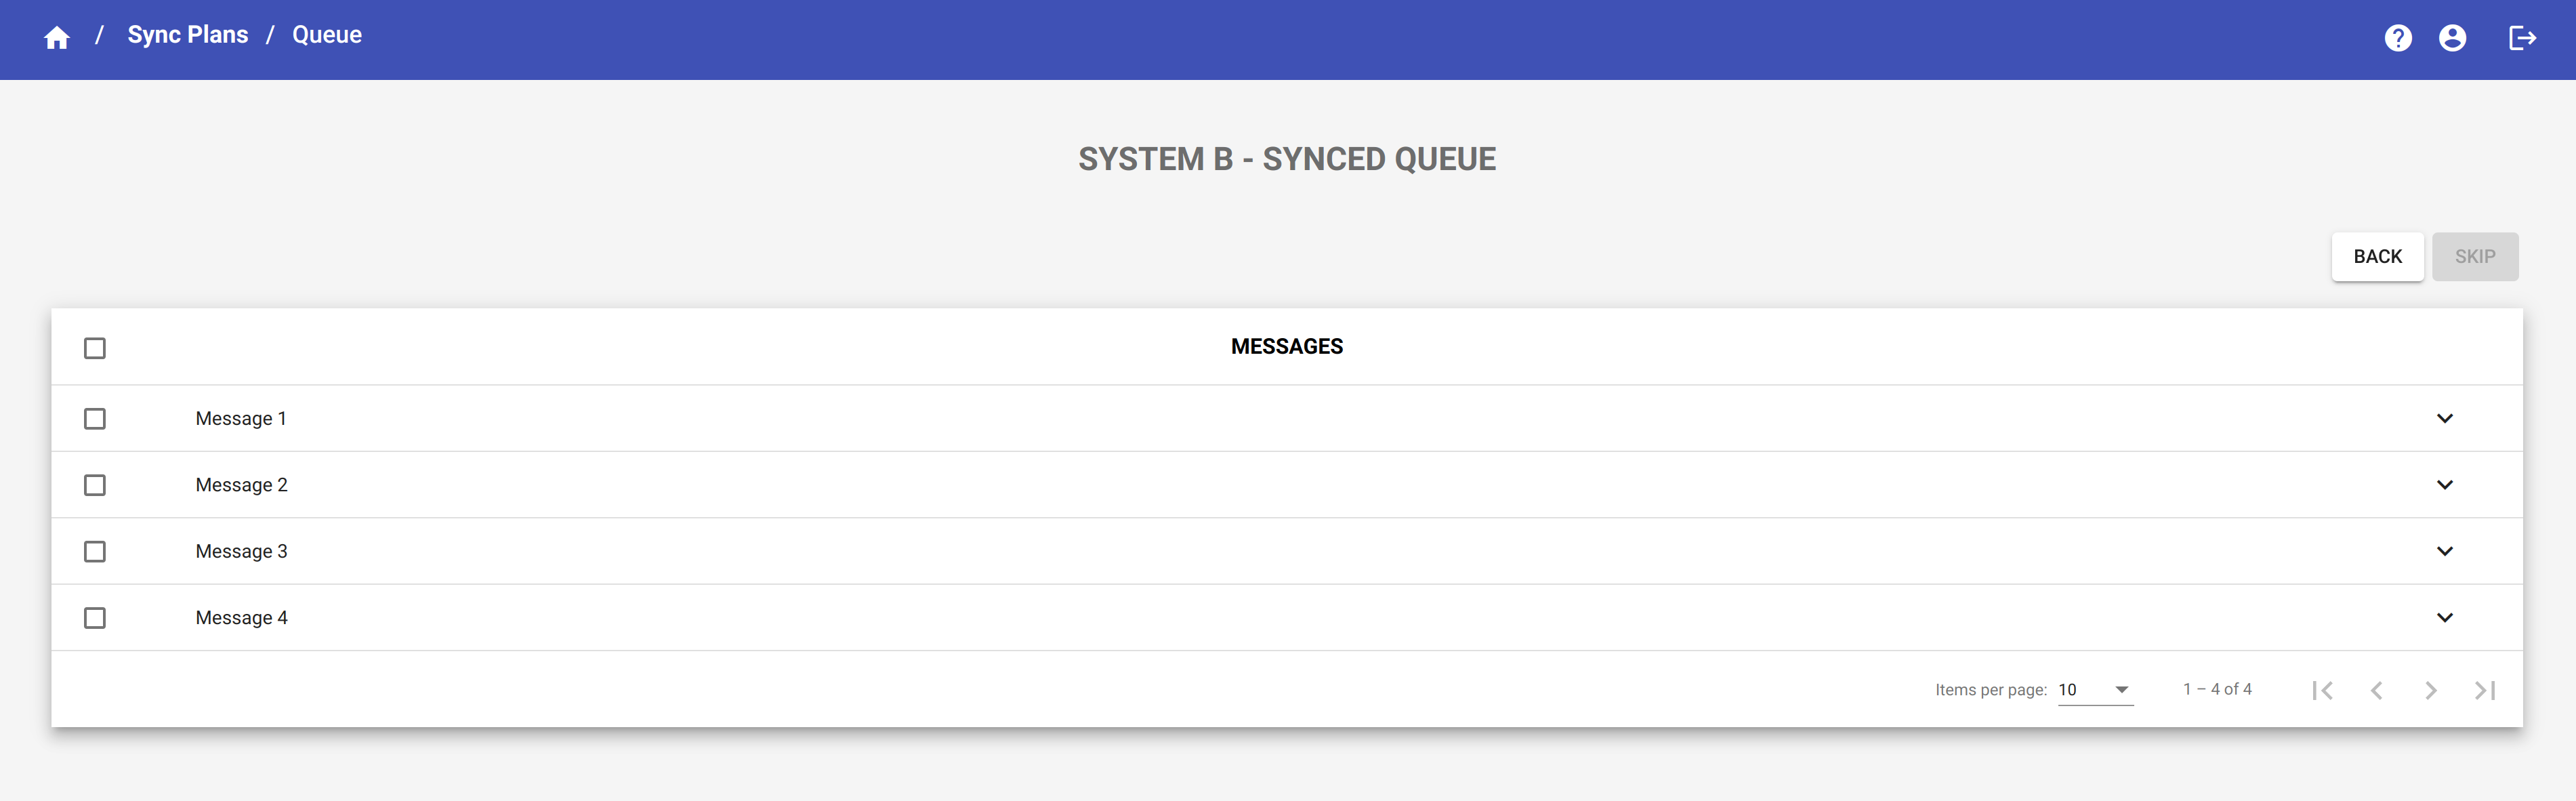
NOTE
The messages are sorted from oldest to newest. It means that the message that blocks the queue is always the first message of the table (named as Message 1).
By clicking on the row of the table, you can expand the row and visualize the content of the message.
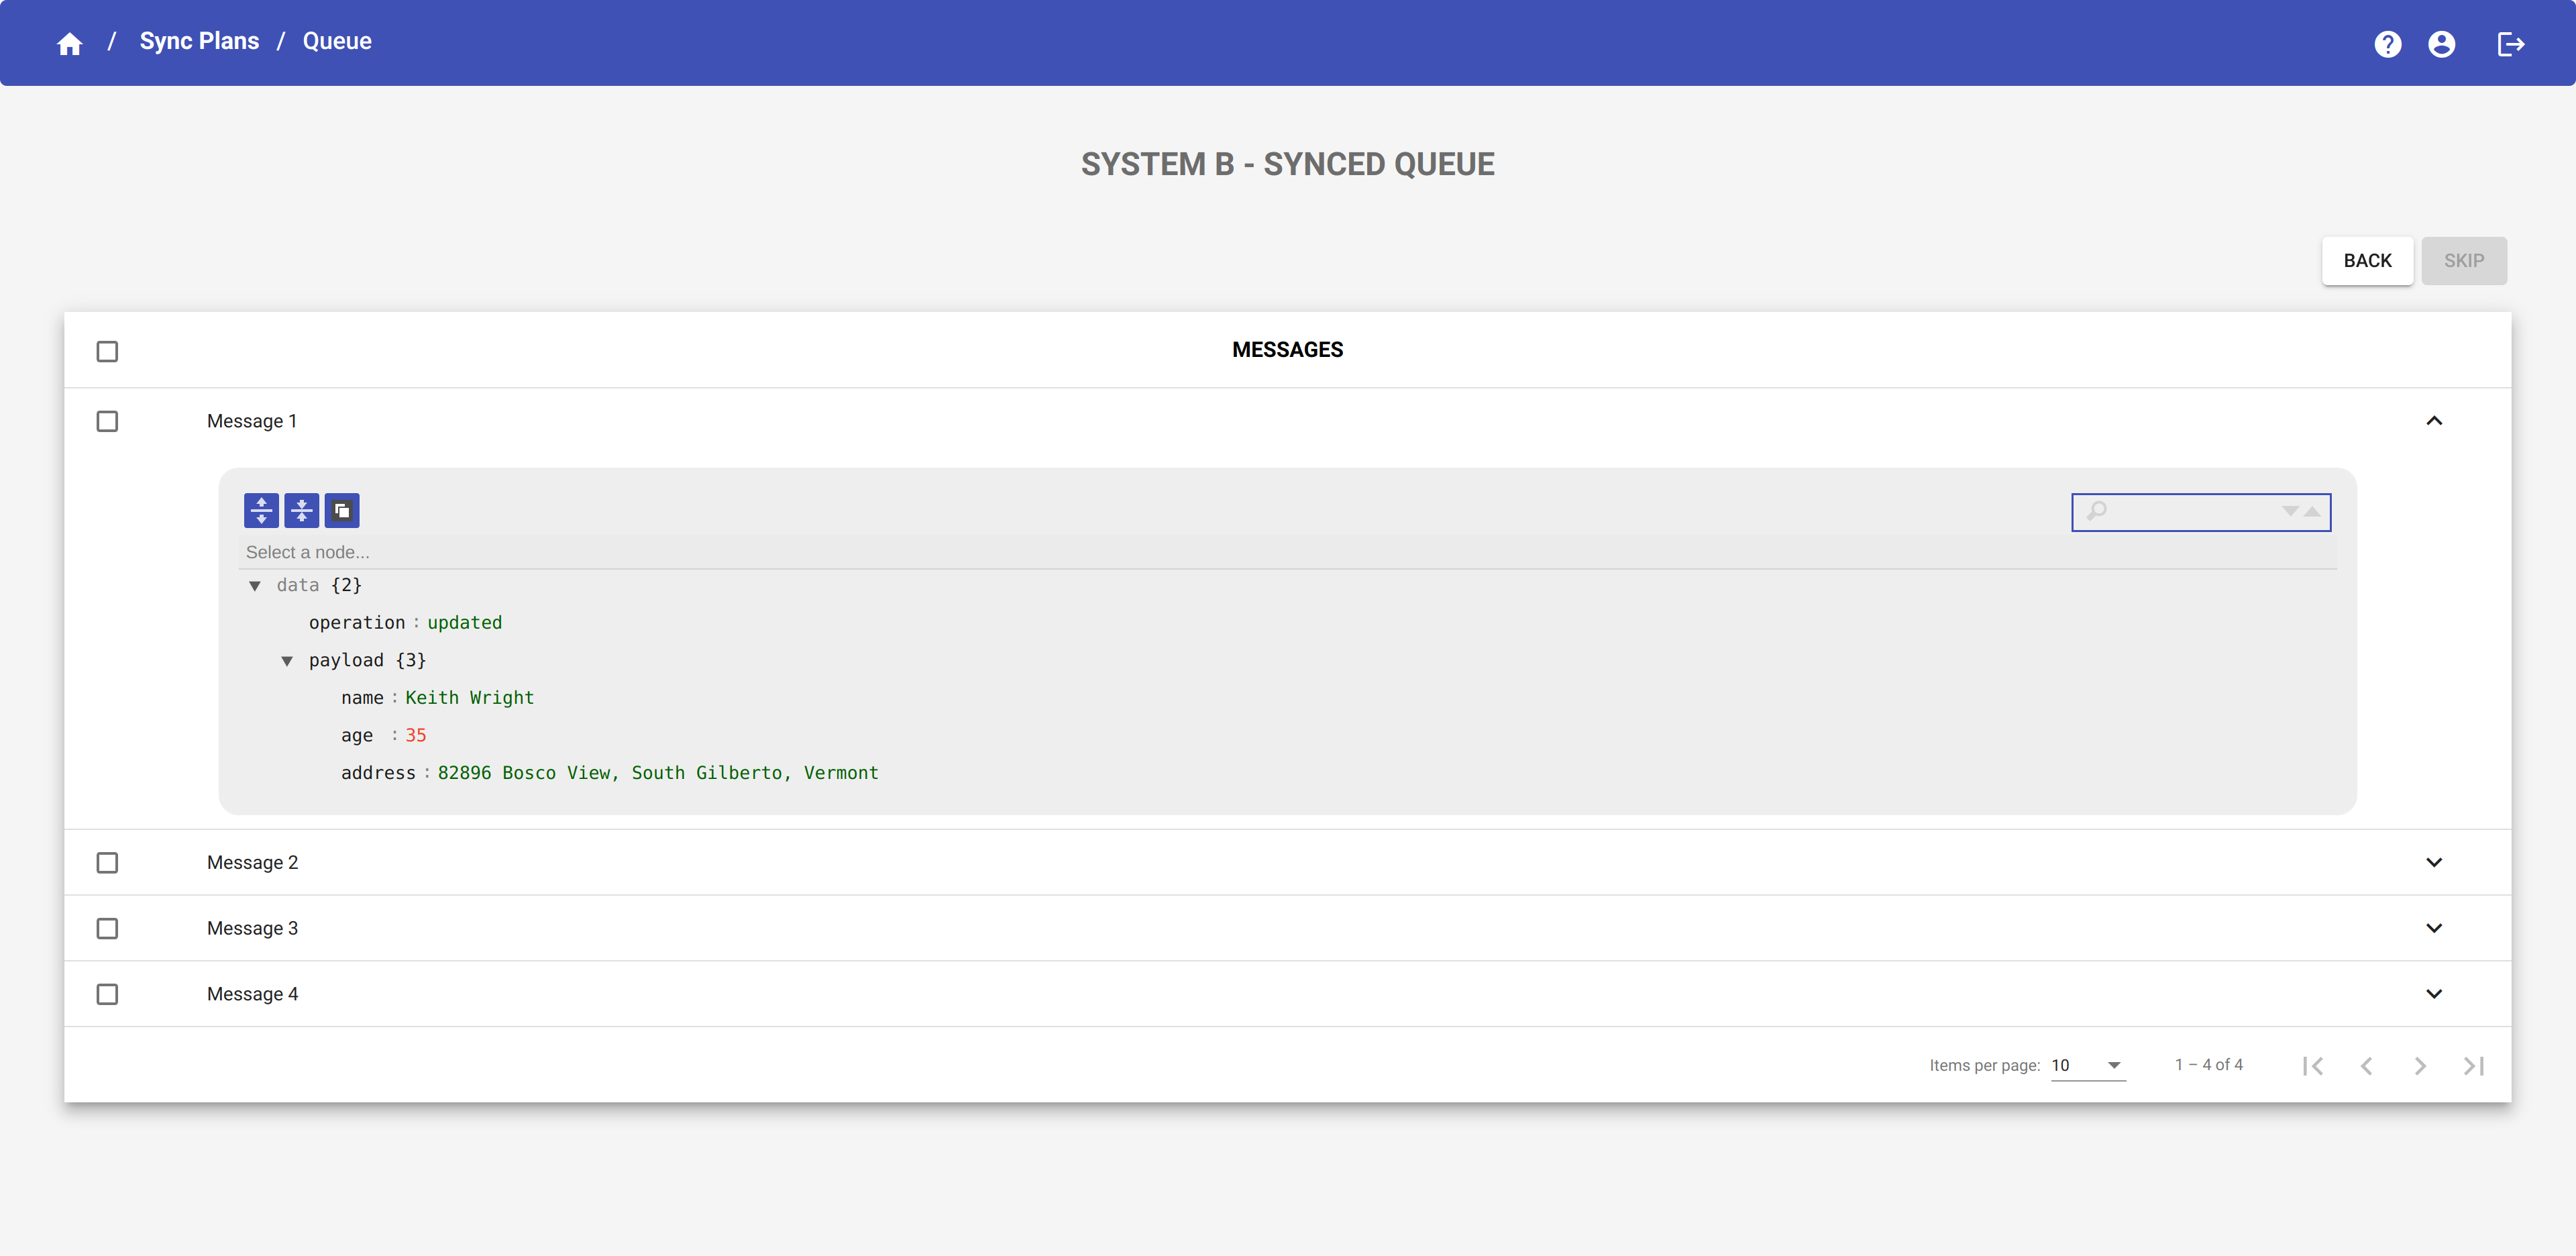
If you want to visualize the cause of the error, check the corresponding document in the Unsynchronized tab of the Documents page.
Delete messages from queue
To delete the messages from a queue, select one of the messages in the table. All the previous messages of the selected one will be selected automatically. In fact, the deletion of the queue takes place by removing all messages from the first one in the queue up to the selected one.
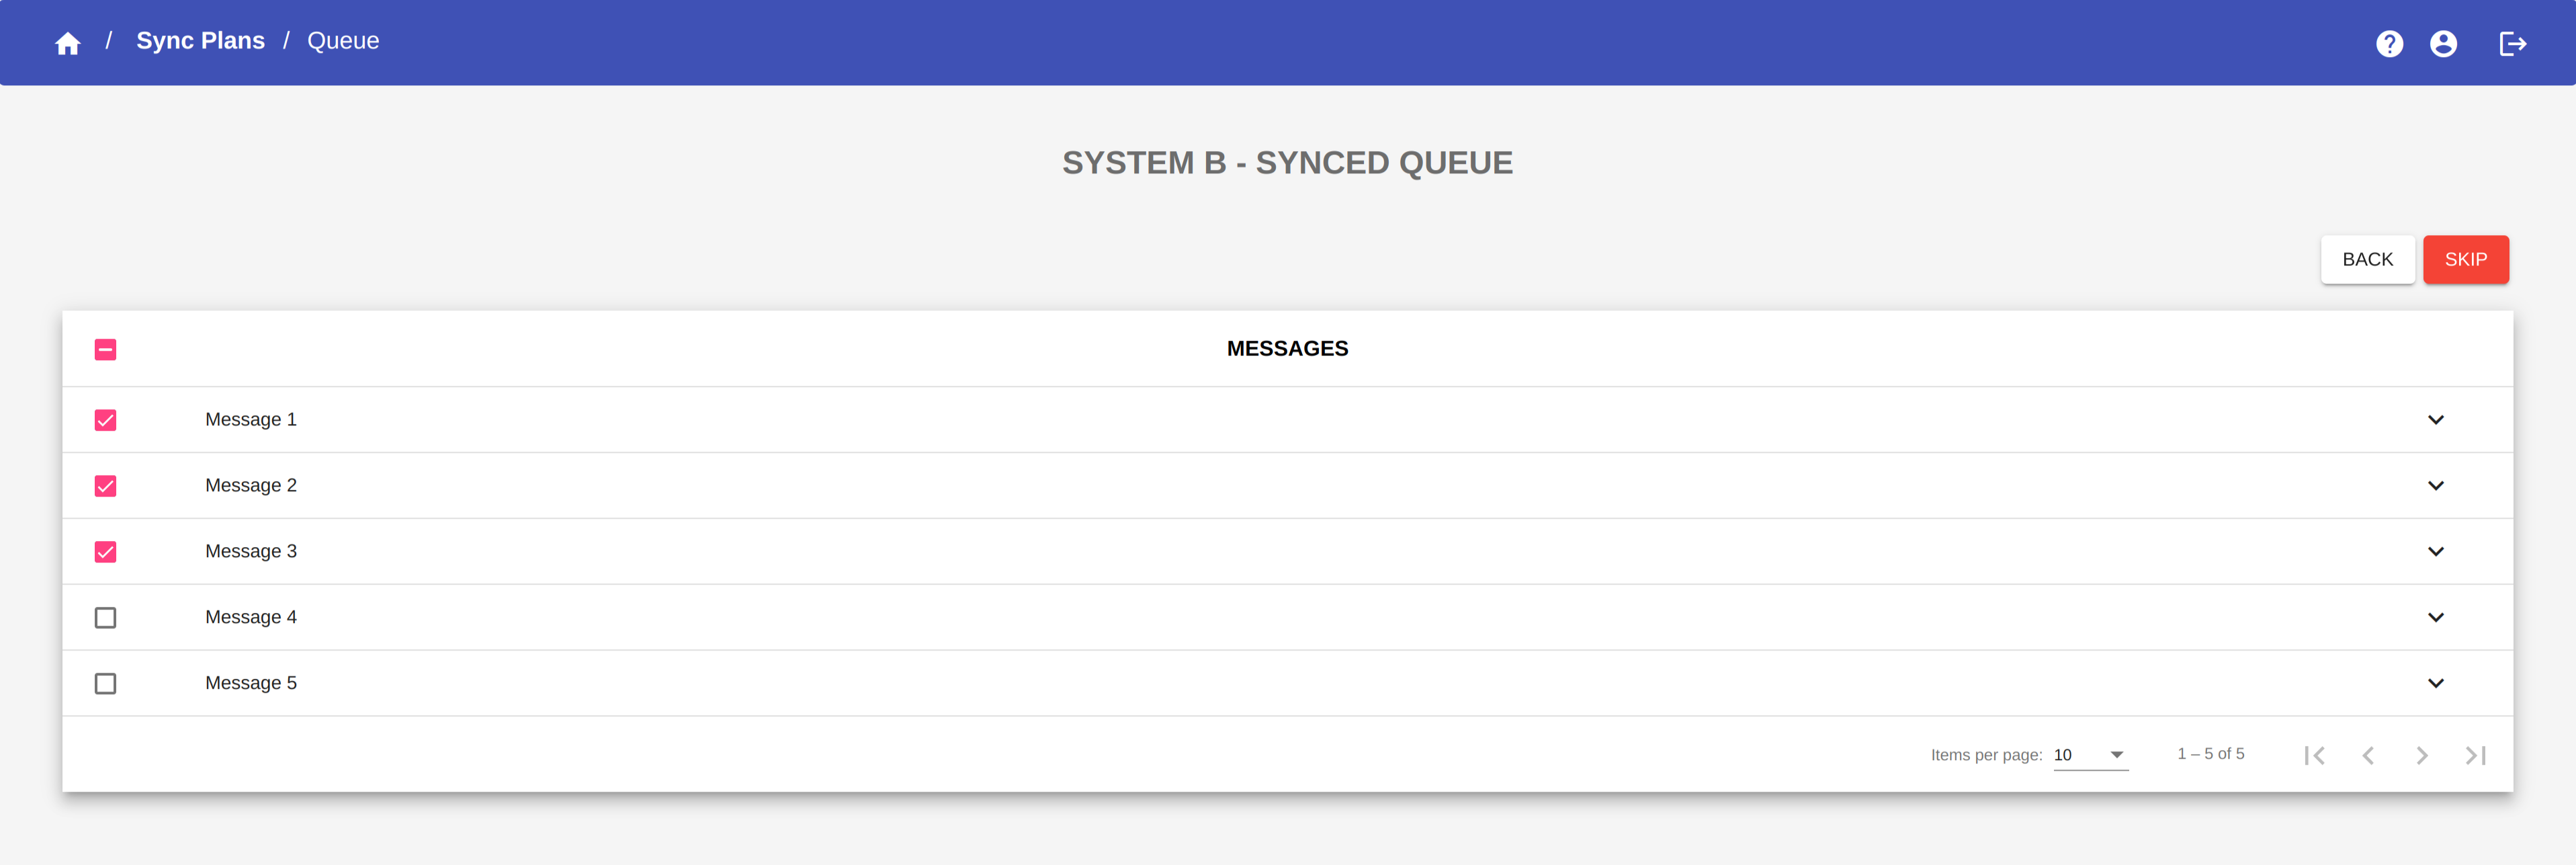
To select all the messages in the queue, click on the checkbox in the table header.
Then click on the button  to definitively remove the messages from the queue.
WARNING
The message removed from the queue are irreversibly lost.
In some cases, the messages blocked in a queue have generated the corresponding documents in the platform. You can visualize them in the Unsynchronized tab from the Documents page, and eventually you have to manually delete them.
When all the blocked messages are removed, you can exit from the queue and restart the synchronization.
Synchronization status events
There are some additional icons that appear around the sync plan status icon when special events occur.
The events are different for push and pull flows, except for the Sync plan off with messages in queues and Queues retention period expired event that can occur in both types of flows.
Push flow events
Synchronization in progress
The icon ![]() appears when the synchronization in on and a message is being processed by the platform. This is a transitional state that ends when the synchronization of the data is successfully completed or has failed.
appears when the synchronization in on and a message is being processed by the platform. This is a transitional state that ends when the synchronization of the data is successfully completed or has failed.
You should not take any action while the synchronization is in this state.
Retry in progress
The icon ![]() appears when a retry attempt is in progress. The number in red indicates how many documents are currently unsynchronized (not those involved in retry operation).
appears when a retry attempt is in progress. The number in red indicates how many documents are currently unsynchronized (not those involved in retry operation).
You can visualize the current retry attempt by clicking the STATUS icon and opening the Sync plan queues status dialog:
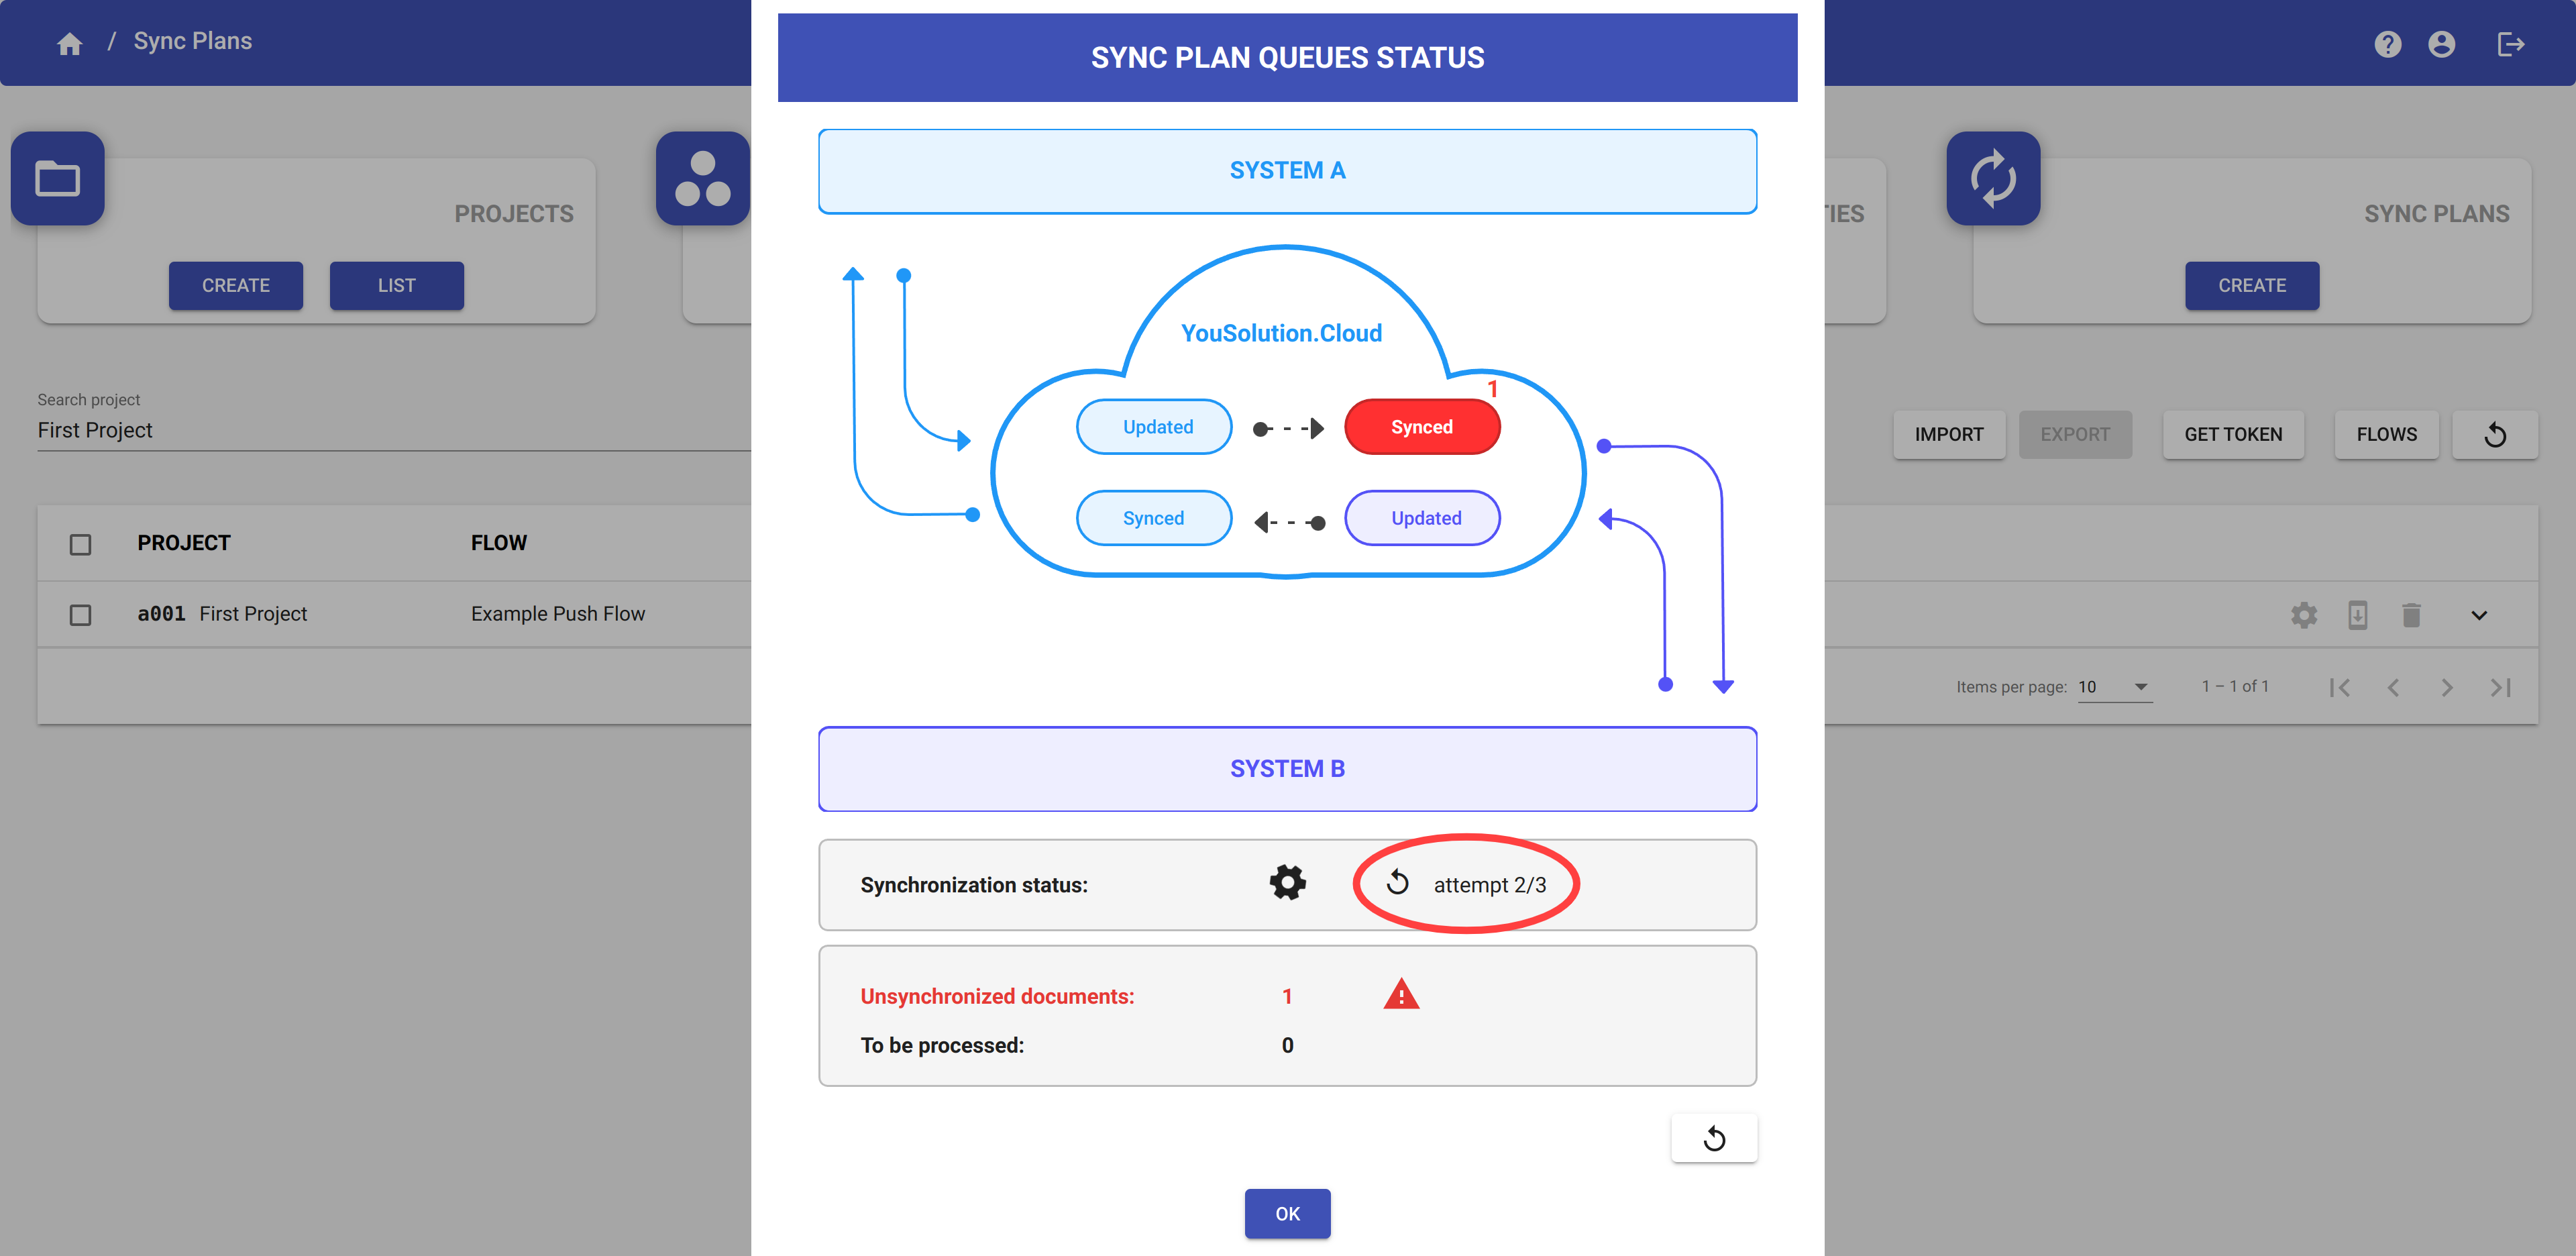
When all the retry attemps have been completed, you can see if the data has been successfully synchronized or not.
Pull flow events
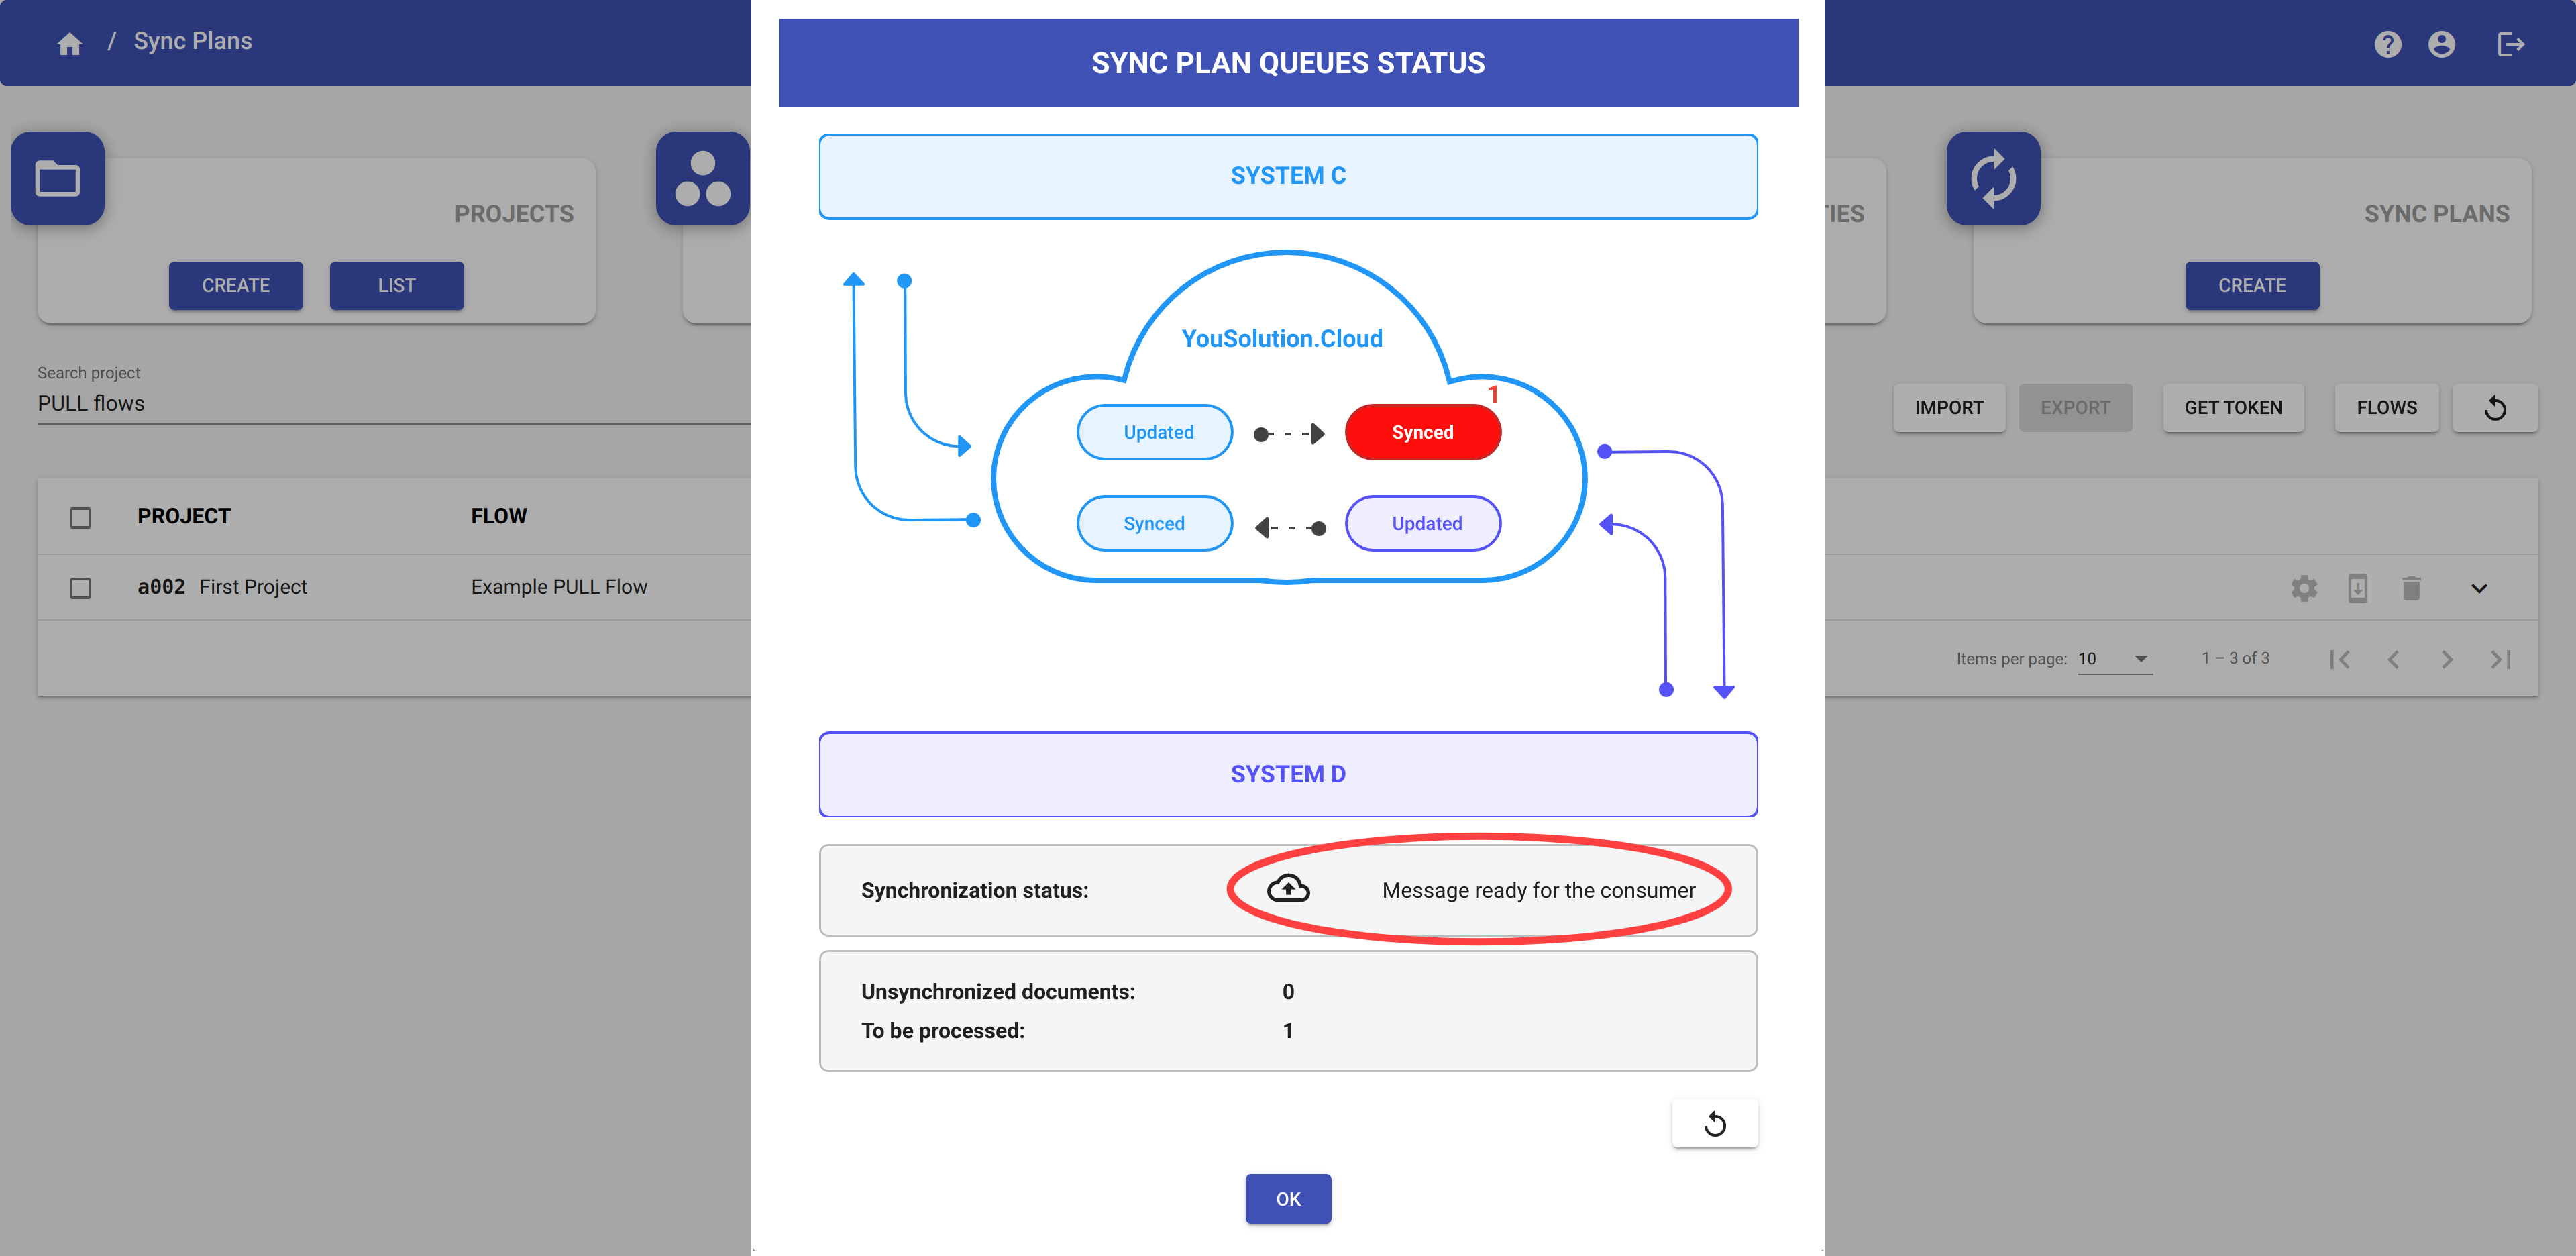
Data ready for the consumer
The icon ![]() appears whenever the platform has completed to elaborate one or more messages. The green status indicates that there is no errors in the synchronization so the messages are ready to be read by the consumer.
appears whenever the platform has completed to elaborate one or more messages. The green status indicates that there is no errors in the synchronization so the messages are ready to be read by the consumer.
If you click on the STATUS icon, you see the queue with the messages ready:
You can call the api GET:
http://api.yousolution.cloud/messages
to get the data from the platform.
After that, you have to unblock the queue by committing the data. To commit the data, you can call the api POST:
http://api.yousolution.cloud/messages/commit
with the following body:
{
  operation: 'updated',
  payload: {
    // the data to commit
  }
}
IMPORTANT
You must have the authentication token to use this api.
You can also commit the data returning an error to the platform by calling the previous api POST with the following body:
{
  operation: 'error',
  payload: {
    "statusCode": 500,
    "name": "Example error",
    "description": "This is an example error"
  }
}
WARNING
The payload must have exactly the fields statusCode, name and description.
When you commit a data with an error and you don't have the skip error option enabled, the queue is blocked and no new messages can be taken by the consumer. See Queue blocked section.
NOTE
When you commit a data with an error, the corresponding document is marked as in error with the icon ![]() .
.
EXAMPLE
Suppose you have to commit a message for the sync plan SystemA-SystemB-Person.
To get the message from the queue, you have to call the api GET:
http://api.yousolution.cloud/messages?sourceNode=systemA&targetNode=systemB&entity=person
To commit the message, call the api POST:
http://api.yousolution.cloud/messages/commit?sourceNode=systemA&targetNode=systemB&entity=person
with the following body:
{
  operation: 'updated',
  payload: {
    firstName: 'John',
    lastName: 'Smith',
    age: 46
  }
}
To commit the data with an error, call the same api POST with the following body:
{
  operation: 'error',
  payload: {
    "statusCode": 404,
    "name": "User not found",
    "description": "The user John Smith cannot be found"
  }
}
Queue blocked
The icon ![]() appears when you have committed a message returning an error (see Data ready for the consumer).
appears when you have committed a message returning an error (see Data ready for the consumer).
The red status indicates that the queue is blocked and no new messages can be taken by the consumer until the queue has been cleaned.
You can also see information about the status from the Sync Plan Queues Status dialog:
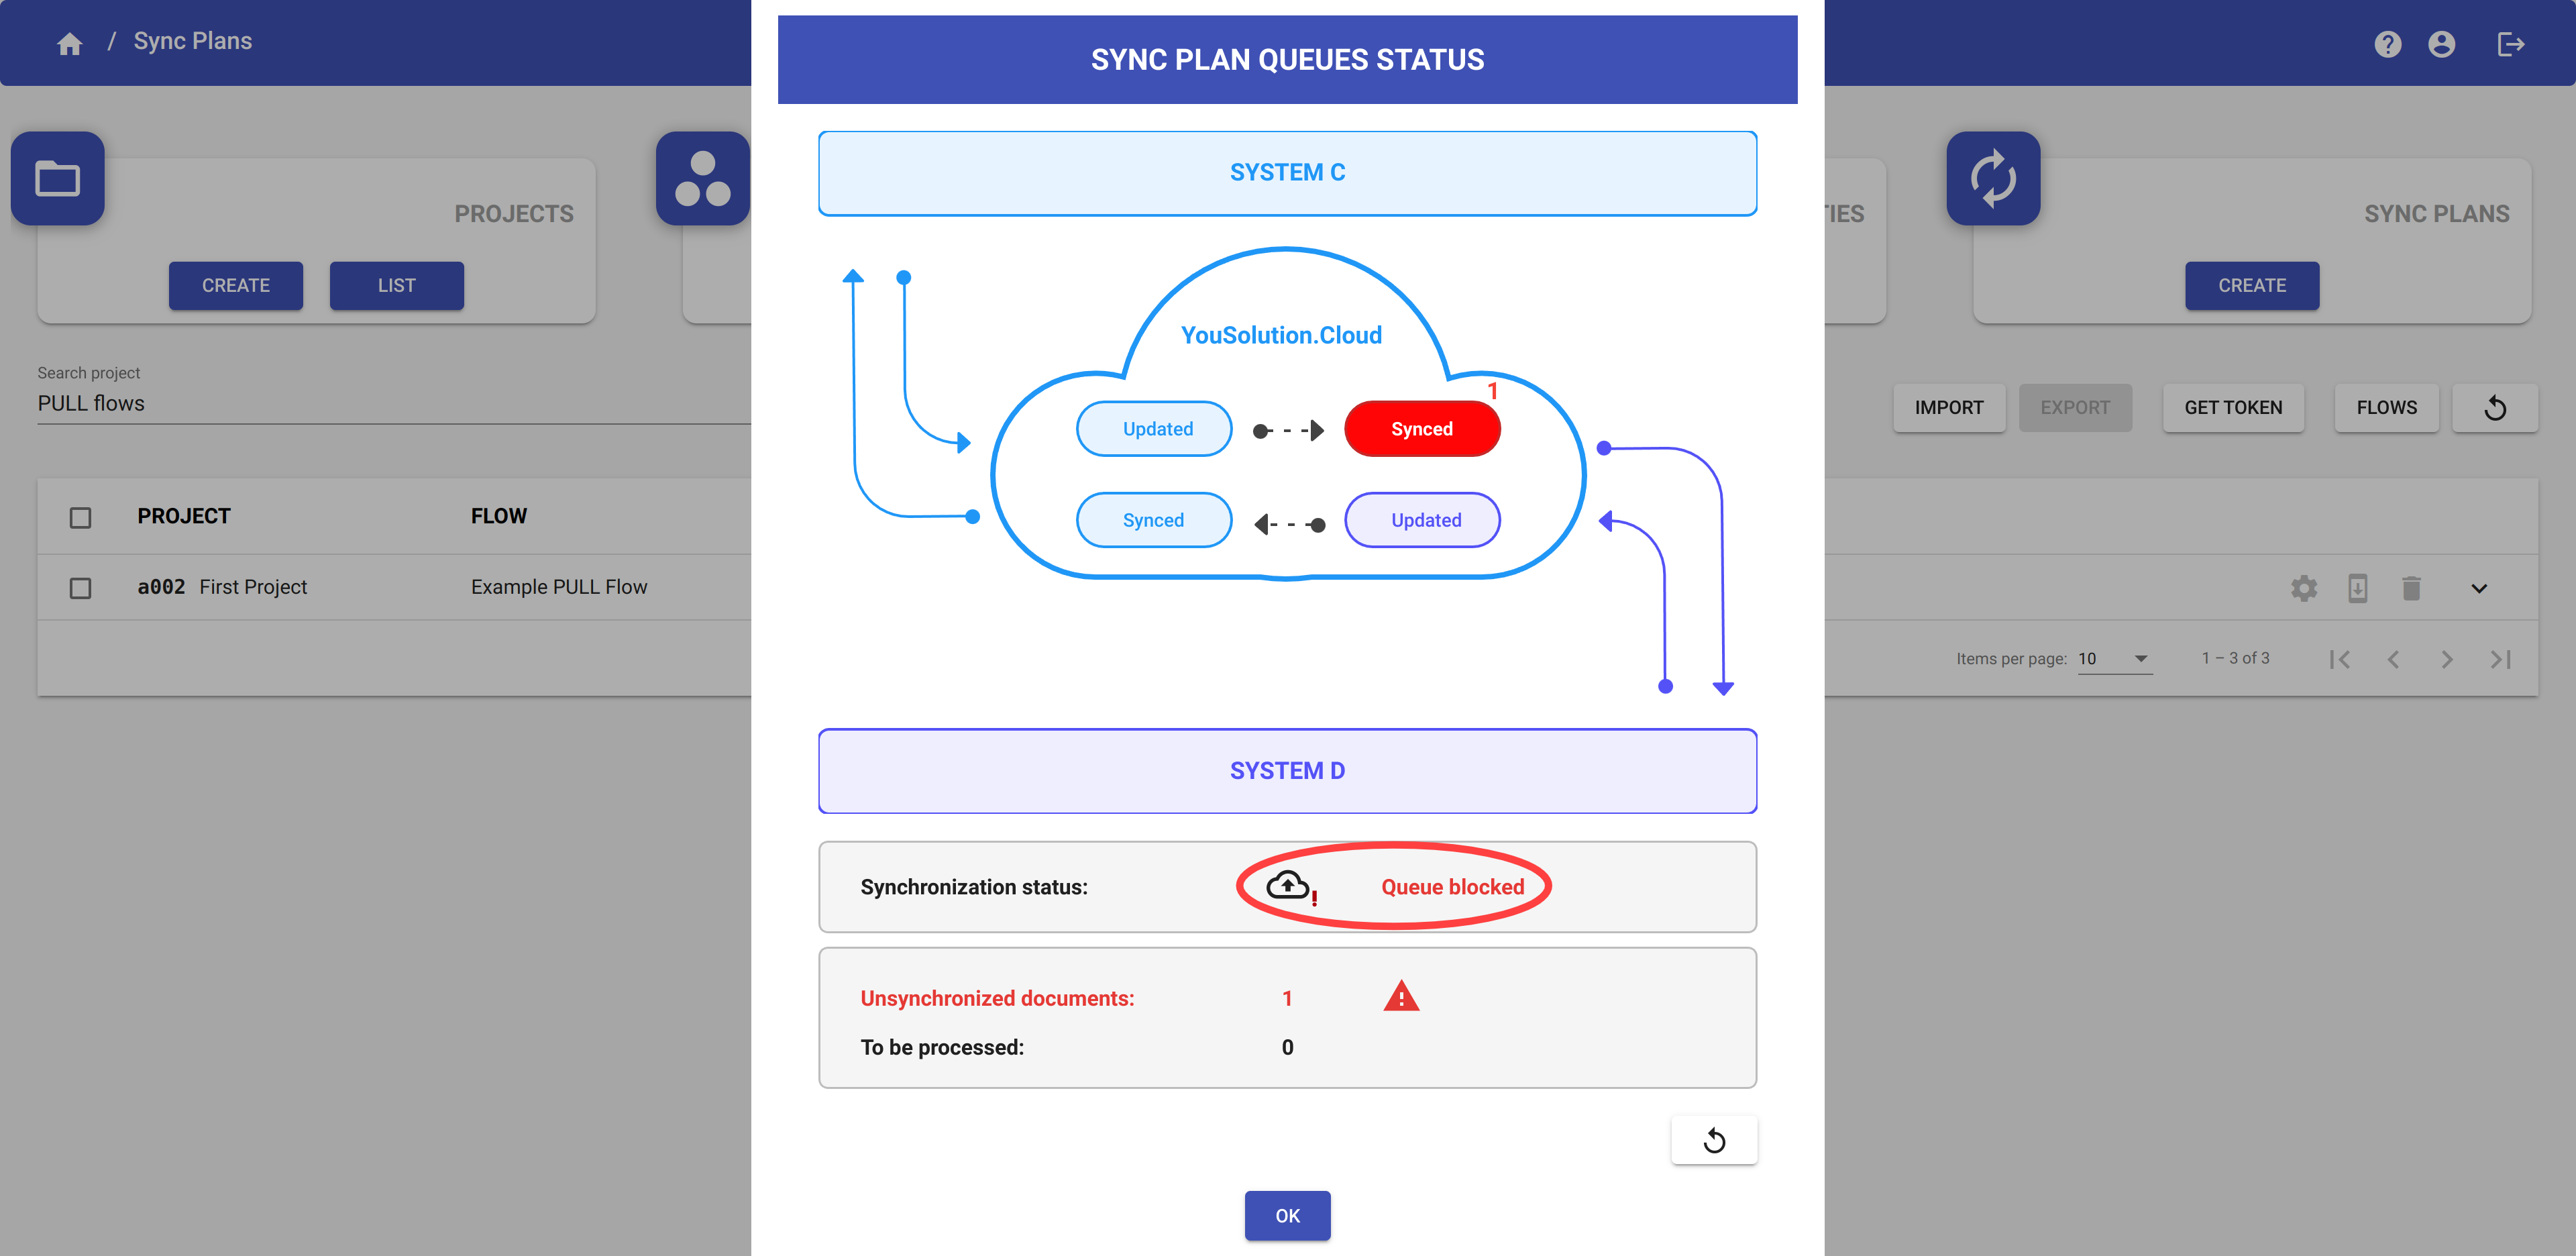
If you don't have the skip error option enabled, you have to manually clean the queue by skipping the message with error.
After cleaning the queue, new messages can be sent to the platform.
Sync plan off with messages in queues
The icon ![]() appears when the sync plan is off and there are one or more messages in the queues.
appears when the sync plan is off and there are one or more messages in the queues.
The number indicates the quantity of messages in queues.
These messages will not be synchronize until you switch on the sync plan (see Start/Stop synchronization).
IMPORTANT
When the queues retention period expires, all the messages in queues will be deleted.
Queues retention period expired event
The queues have a maximum time limit after which the contained data are deleted. (see Queues retention period).
The icon ![]() appears to notify you that the queues retention period has expired and some messages in the queues have been deleted.
appears to notify you that the queues retention period has expired and some messages in the queues have been deleted.
IMPORTANT
In this situation, you have to restore the queues, otherwise the new messages cannot be read by the consumer.
Click on the icon STATUS of the sync plan and follow the steps indicates in the yellow box:
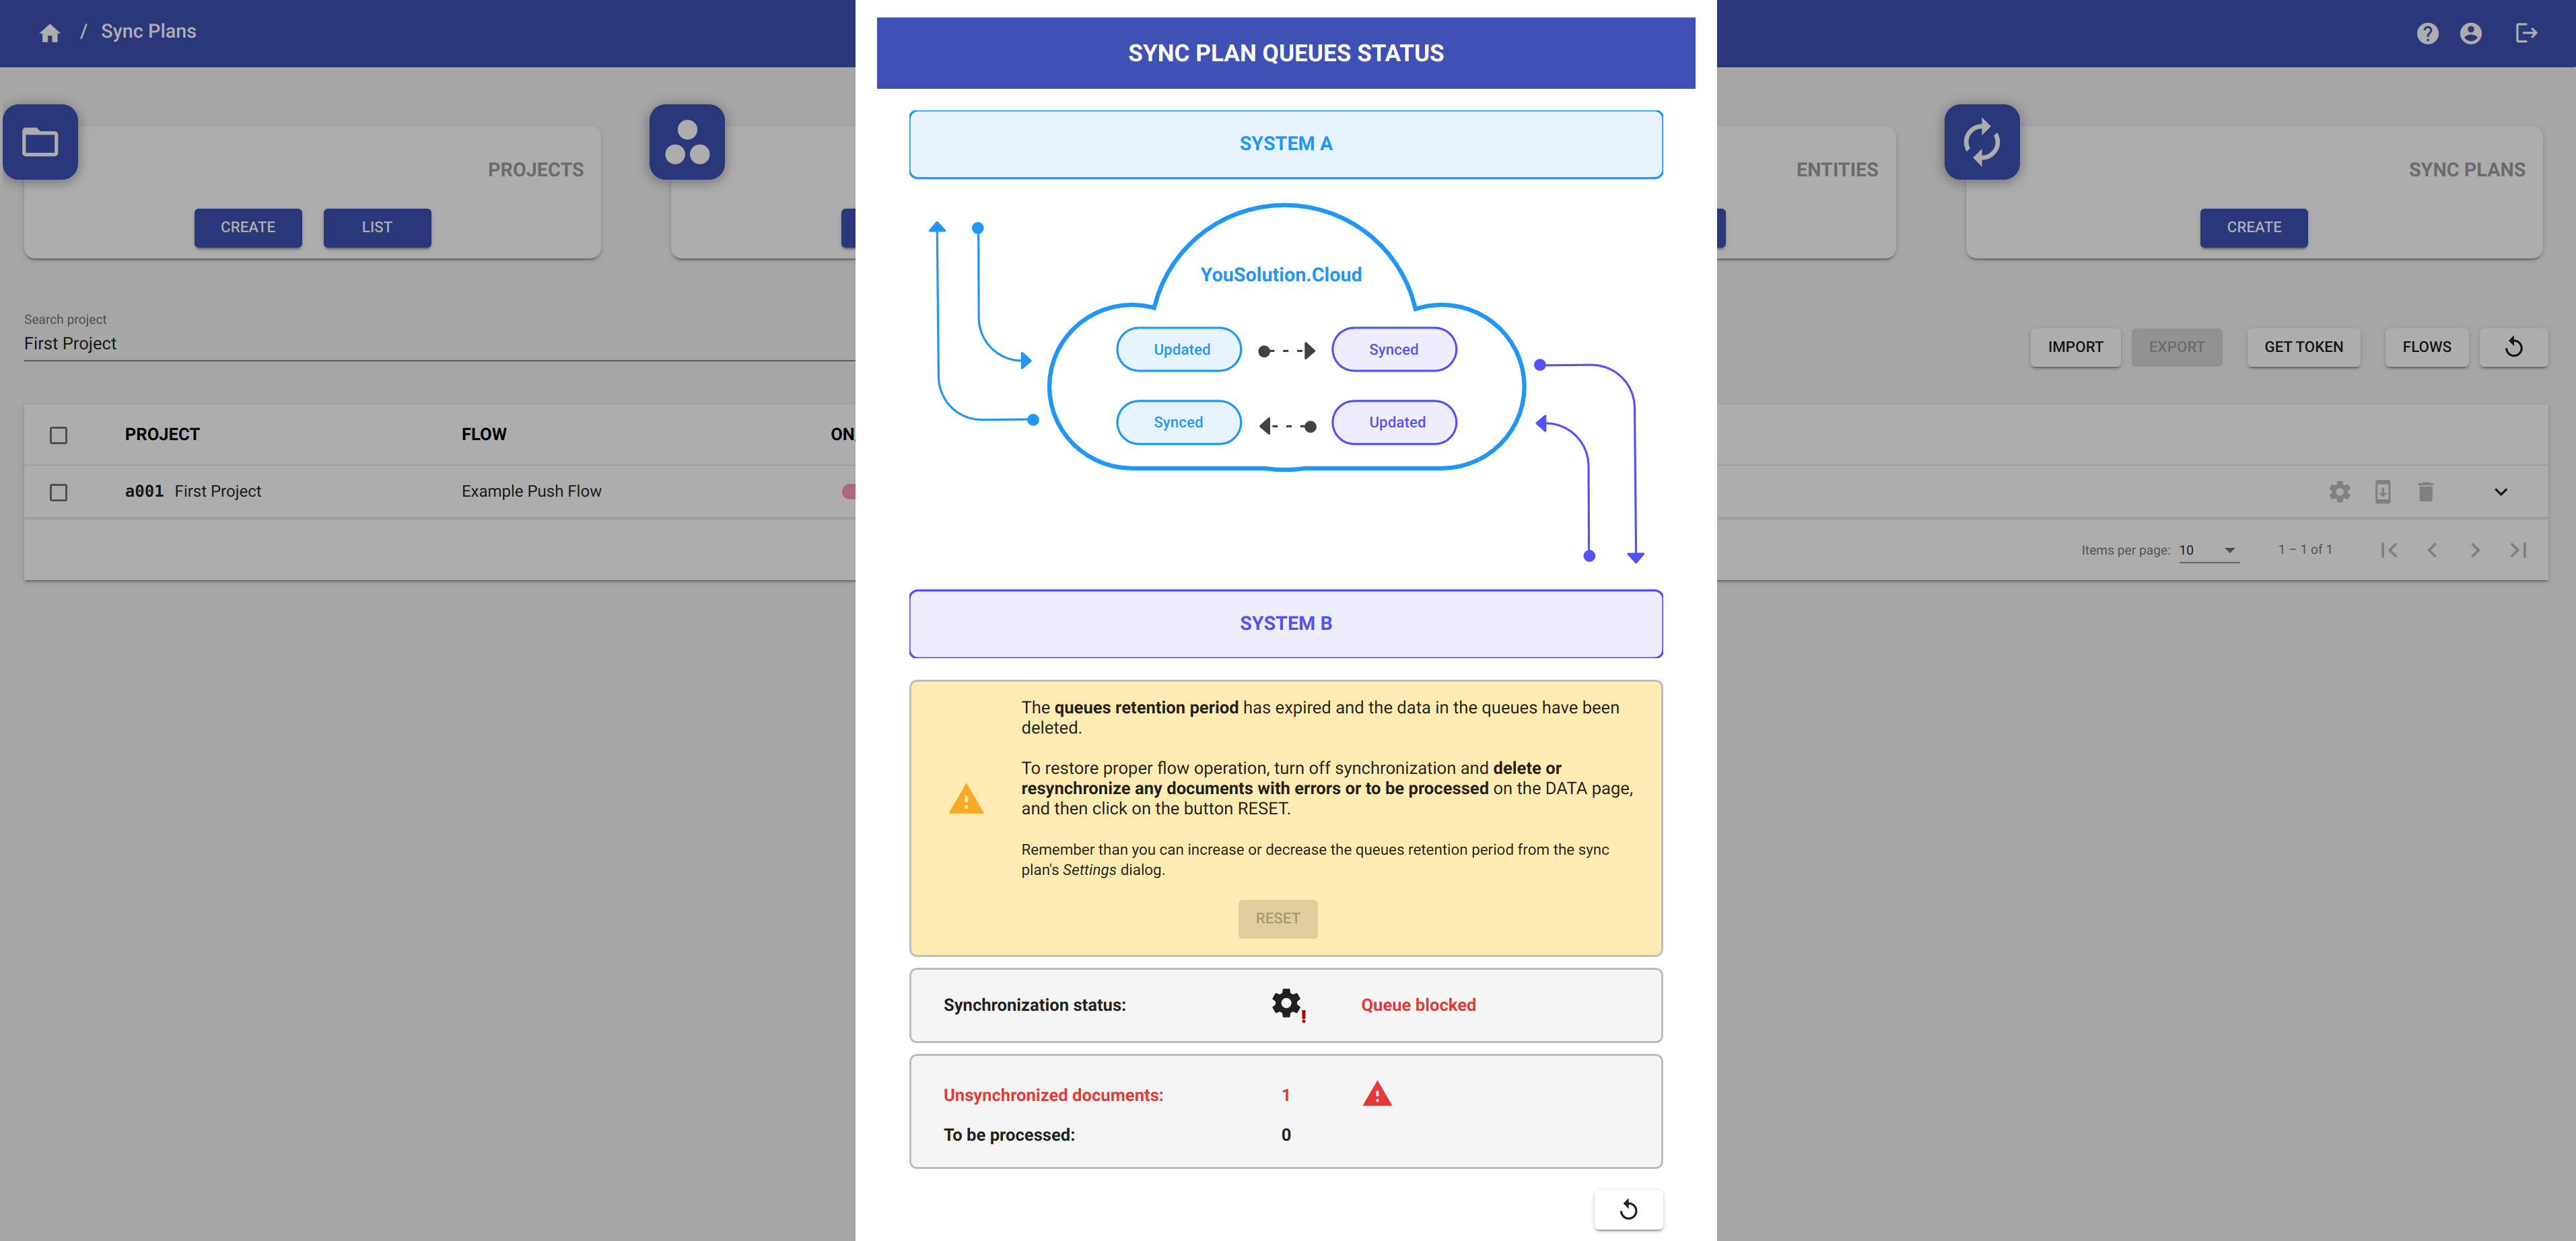
- Stop the sync plan.
- From the Documents page, delete or resynchronize all the documents with errors and the documents to be processed. These are the documents that have been deleted in the queues and can no longer be elaborated by the platform. You must resend (or resynchronize) these messages with the producer.
- Click on the RESET button in the Sync Plan Queues Status dialog to restore the queues.
- Restart the sync plan.
Import/Export sync plans
From the Sync Plans page, you can import or export one or more sync plans.
Export
Select the sync plans you want to export by clicking on the checkbox of the corresponding flows and then click on the EXPORT button.
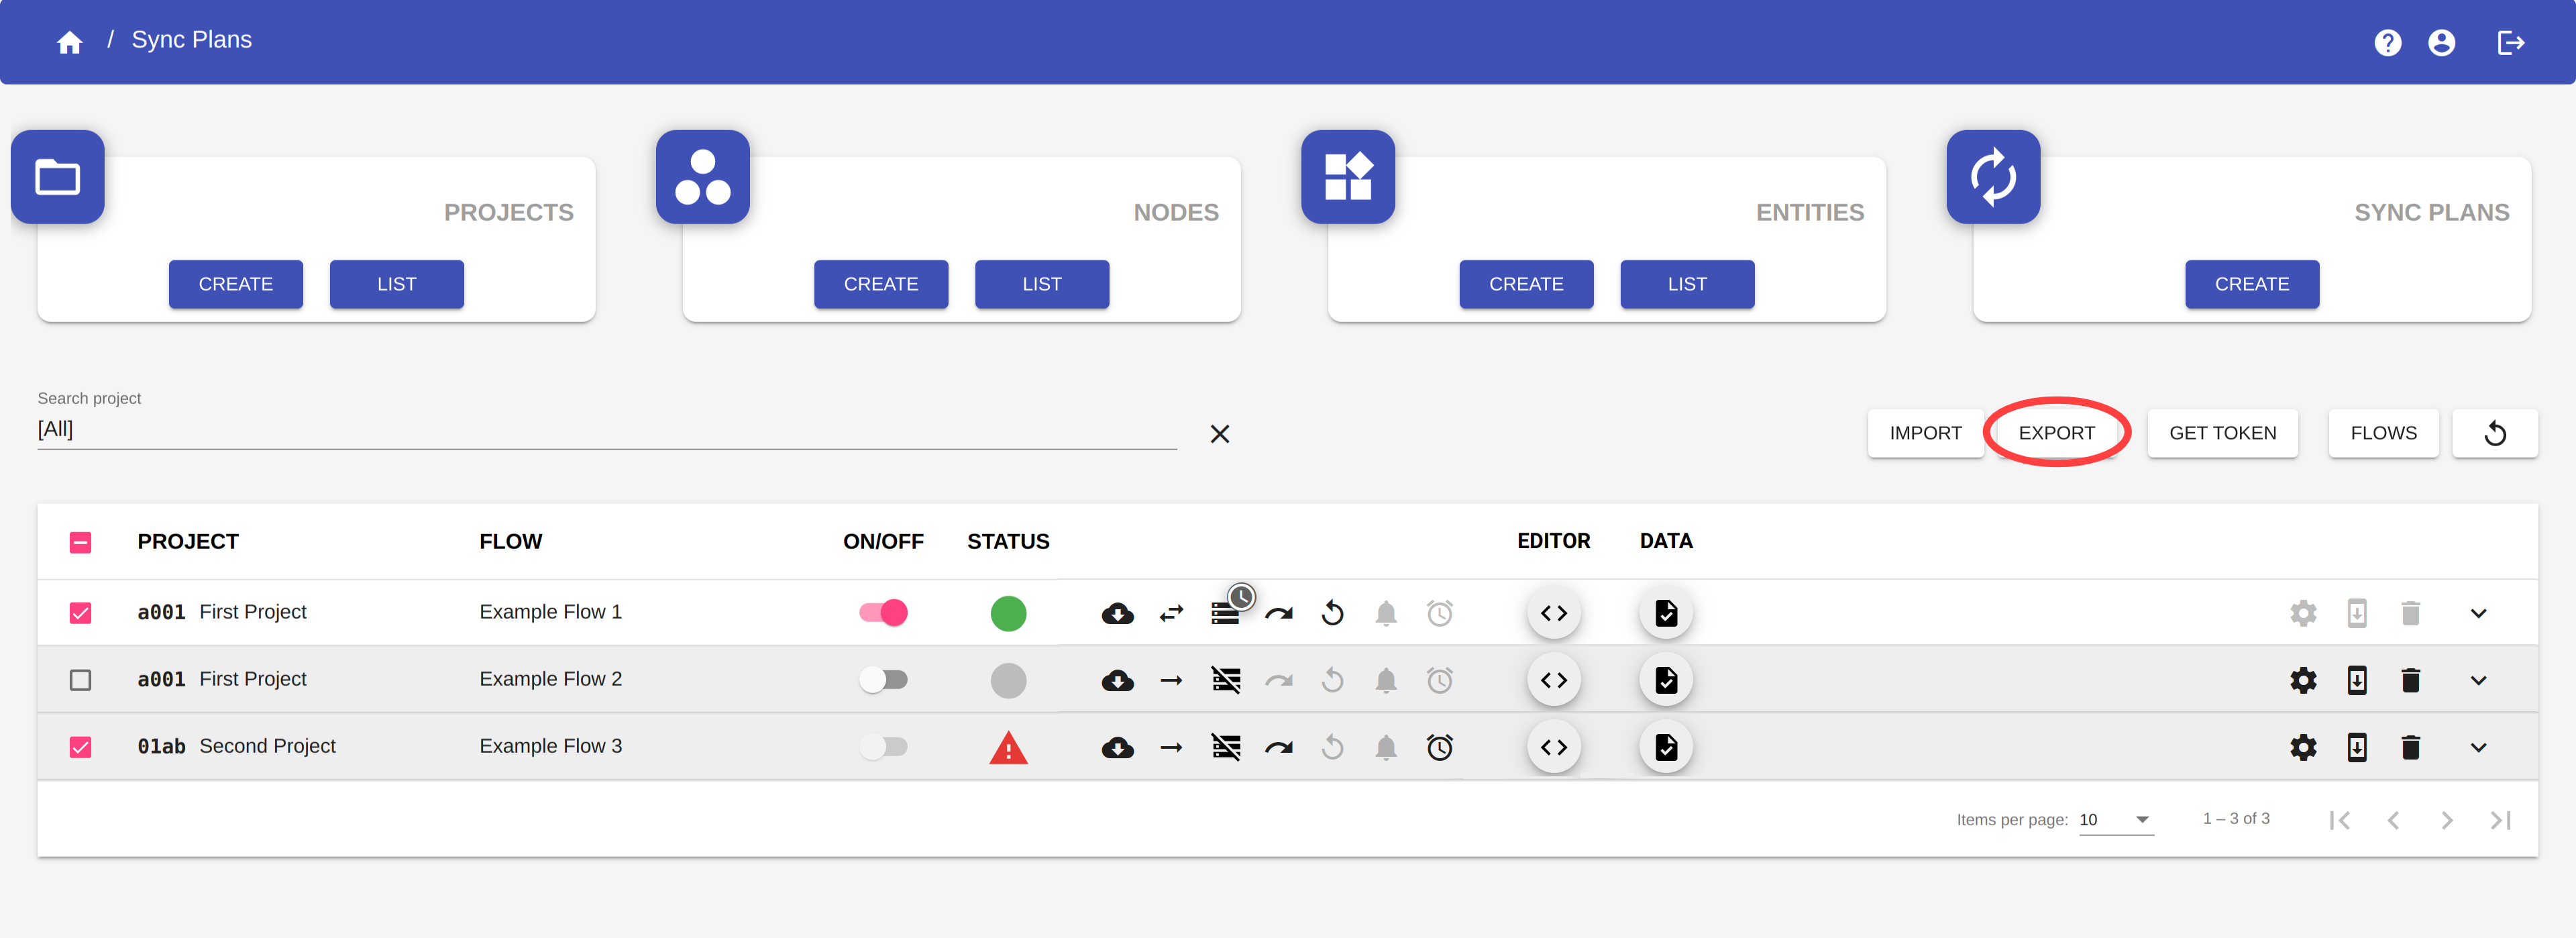
NOTE
You can export the sync plans regardless of their status (on, off, compiled, non-compiled, etc...).
Choose the name of the folder where the file containing the exported flows will be saved, and confirm. The format of the saved file is JSON.
NOTE
When you export a sync plan:
- all its settings will be exported.
- the Node-RED tabs connected to it will also be exported.
- the documents synchronized and unsynchronized will not be exported.
Import
You can import one or more sync plans from a JSON file or from a pre-built model.
Import from a file
Click on the IMPORT button.
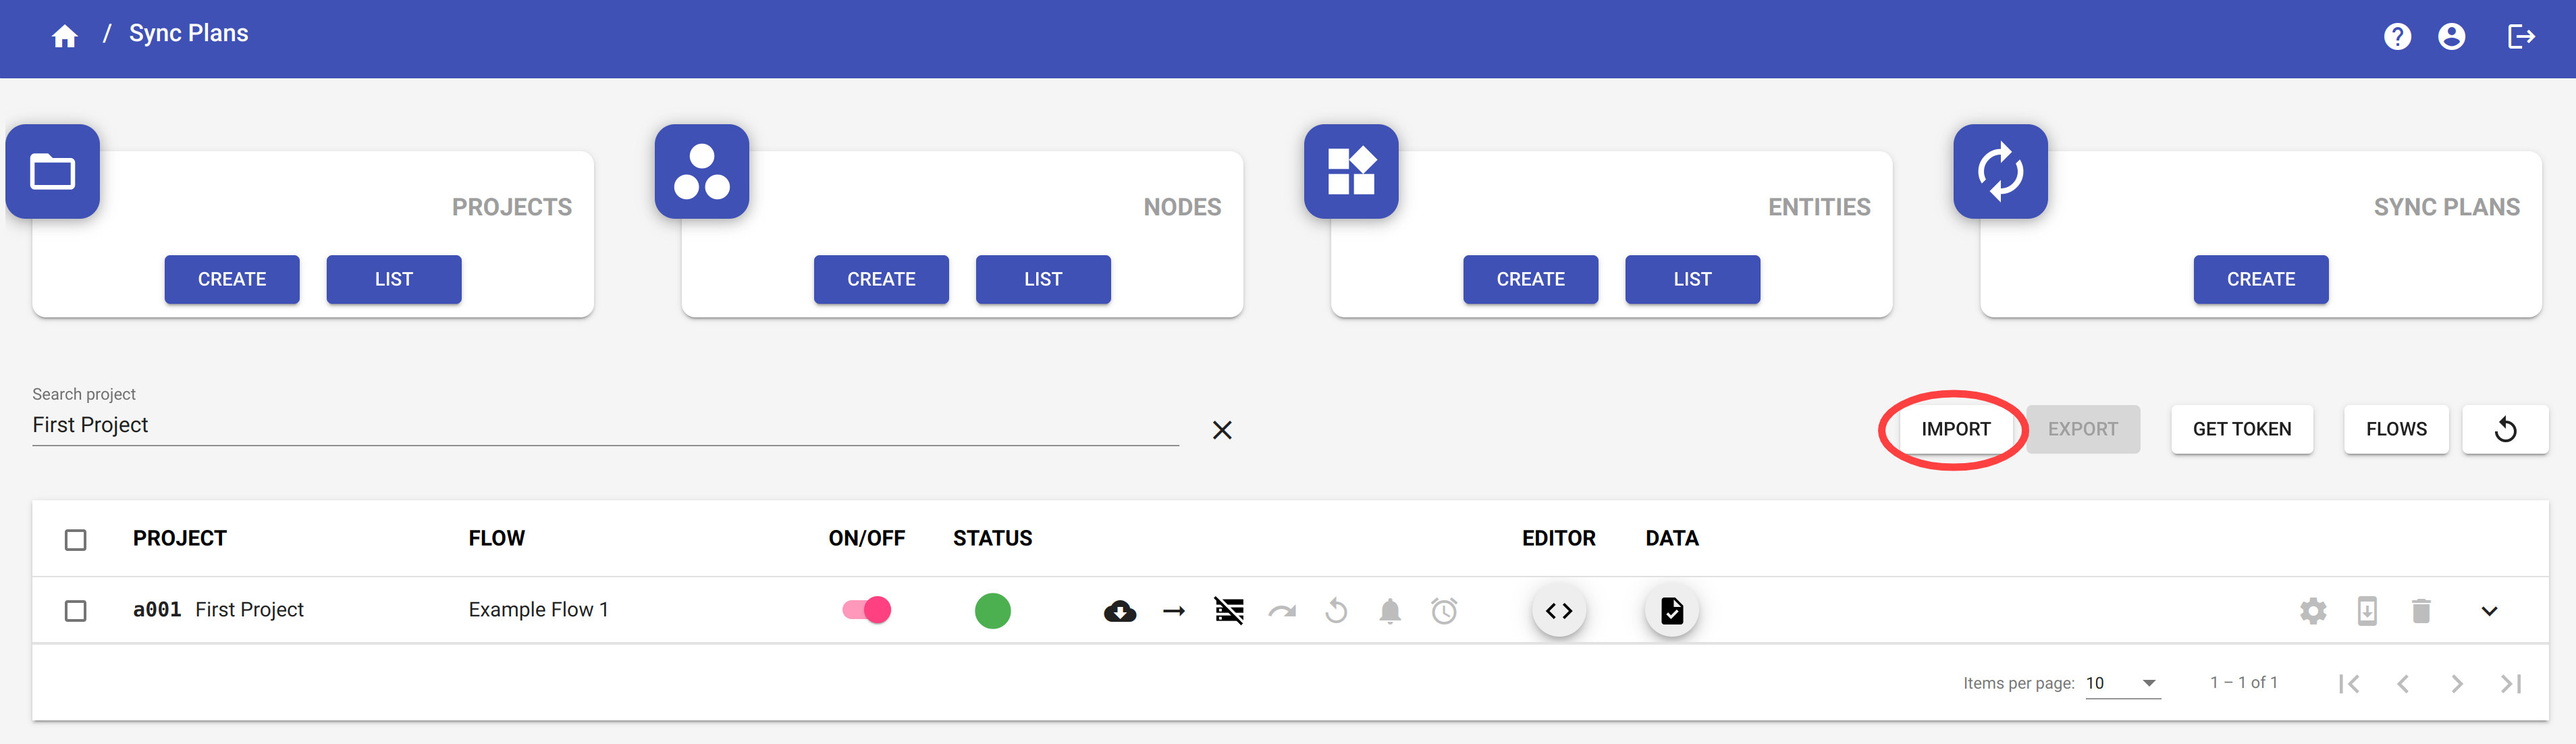
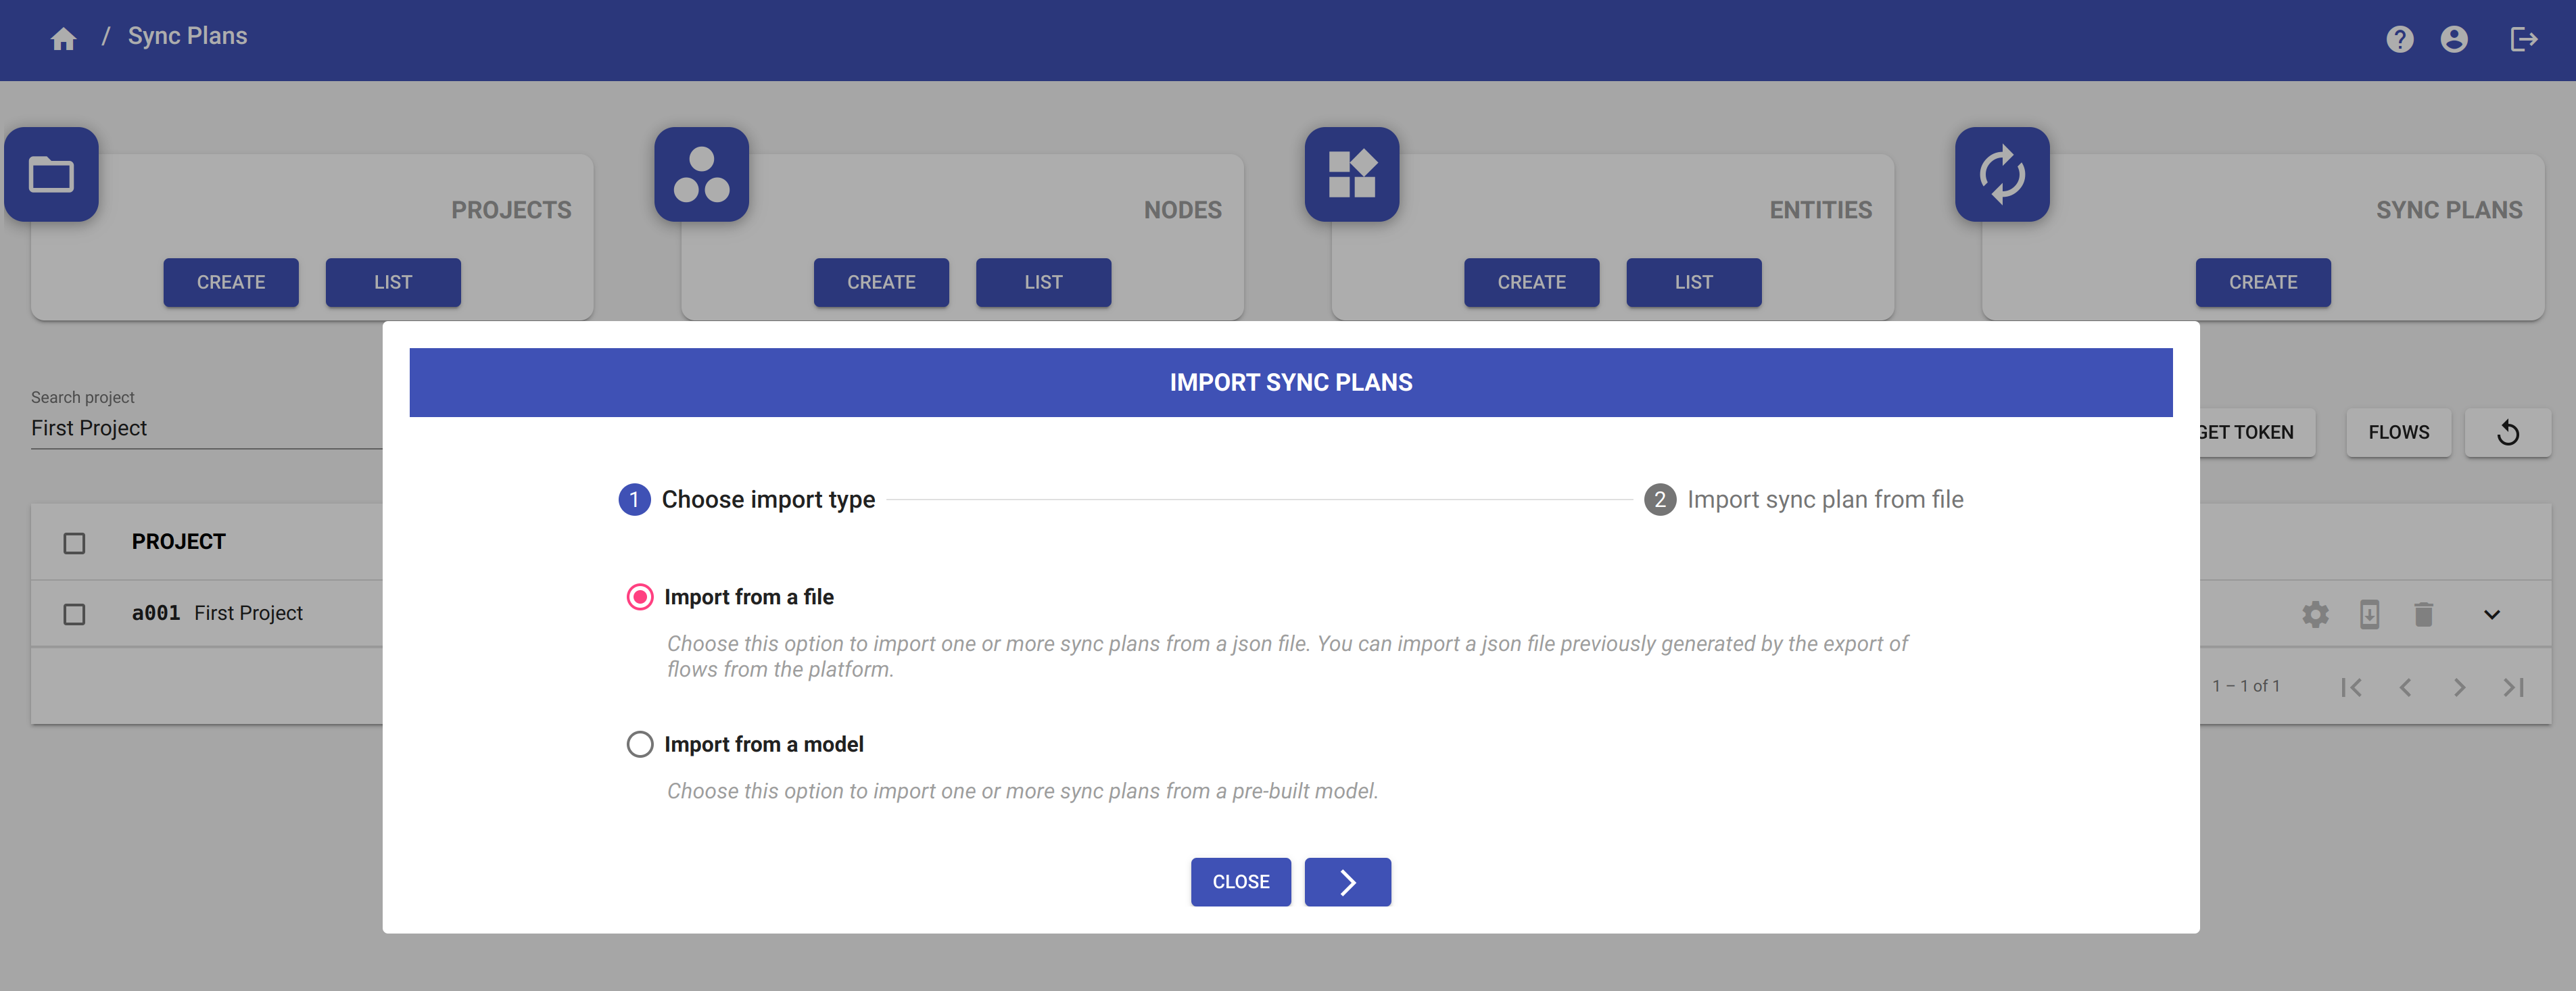
Choose the option Import from a file and click on the button 
A dialog box will open and ask you to select the JSON file with the flows to import.
WARNING
Only JSON format file can be imported.
WARNING
If the data have a wrong format or the file is not a JSON, the import failed and you can see an error like the following:

NOTE
Click on the button  to return in the previous page of the dialog.
Click on the button  to close this dialog without importing the sync plans.
Once you have selected the file, click on the button  to import the sync plans.
The flows contained will be imported and they will appear in the sync plan table highlighted in yellow.
In the example below, we have imported the flow Example Flow 2.
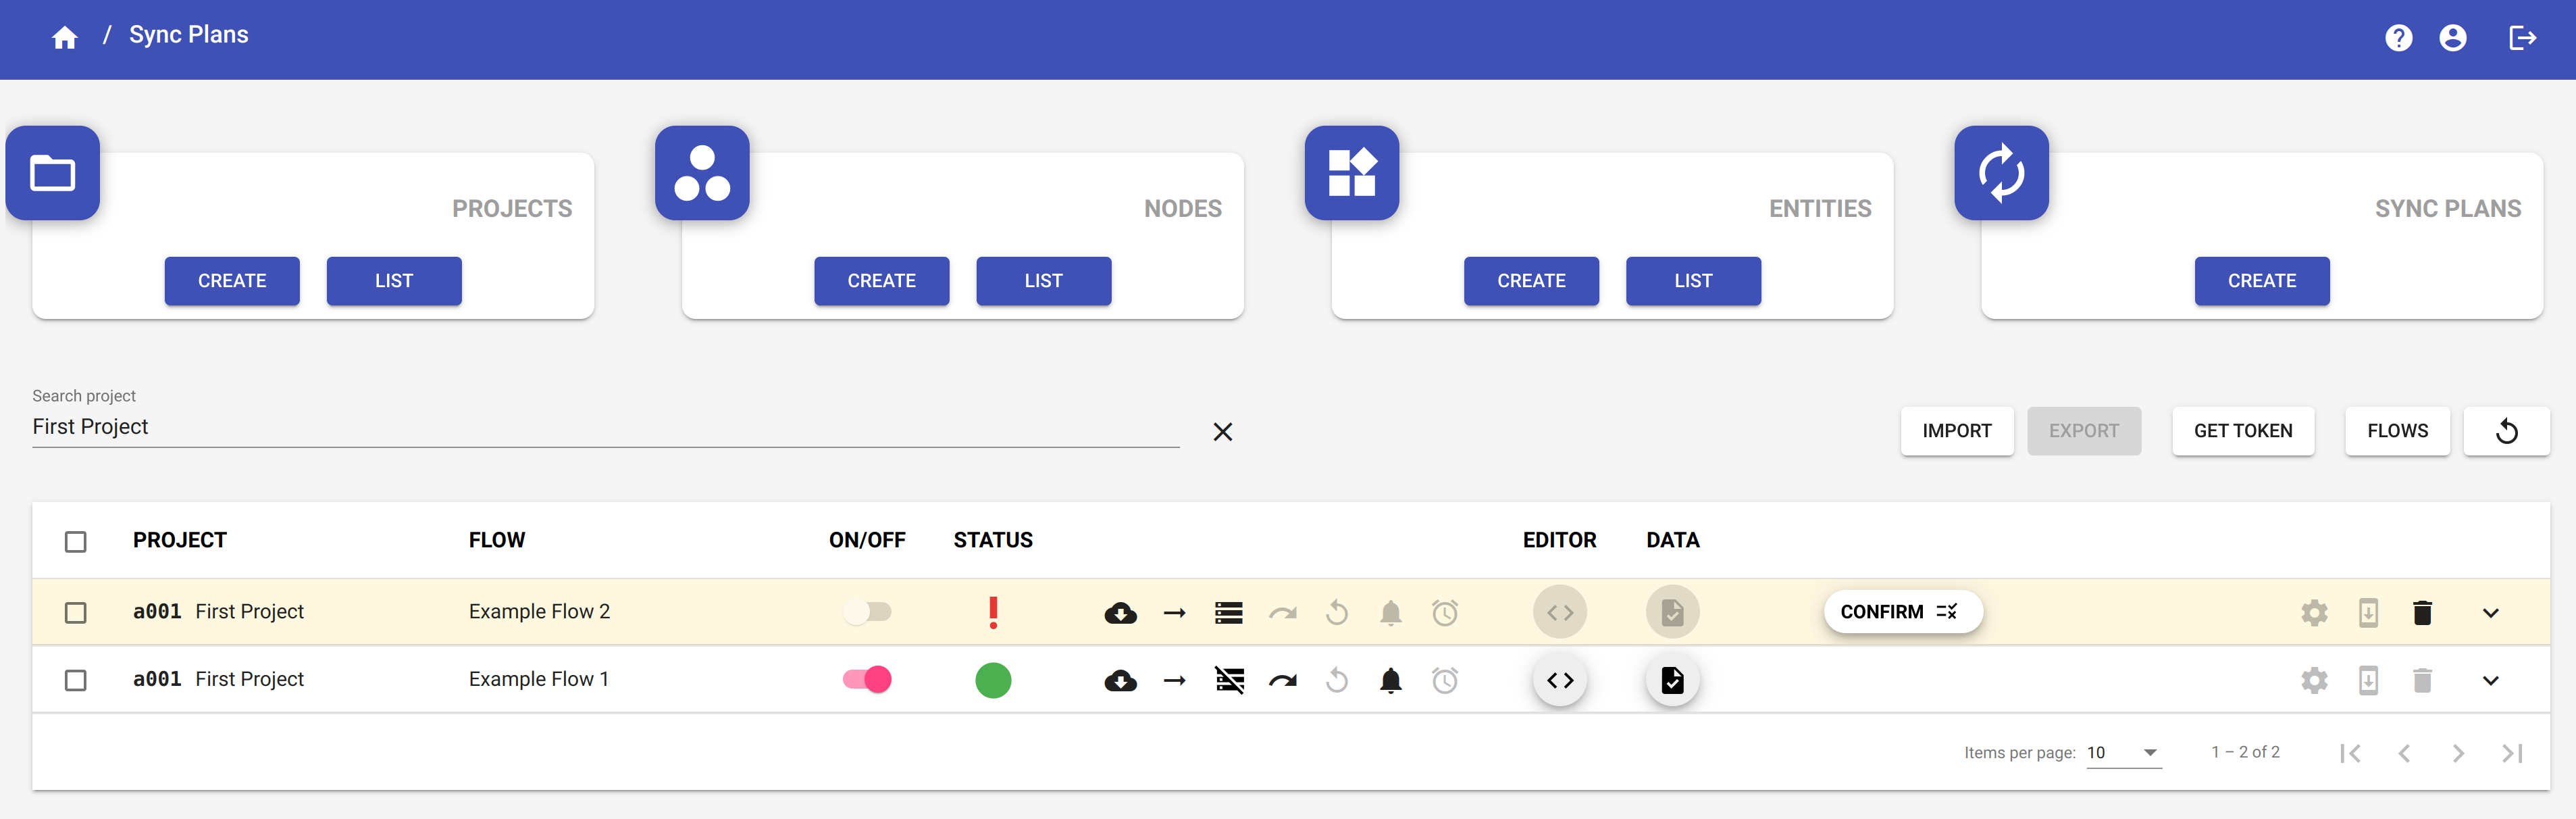
The status of the imported flows is indicated by the icon ![]() . It means that the import of these sync plans have not yet been confirmed.
. It means that the import of these sync plans have not yet been confirmed.
Click on the CONFIRM button of the imported sync plan to confirm the operation. A dialog box will open and ask you to confirm the data of the sync plan.
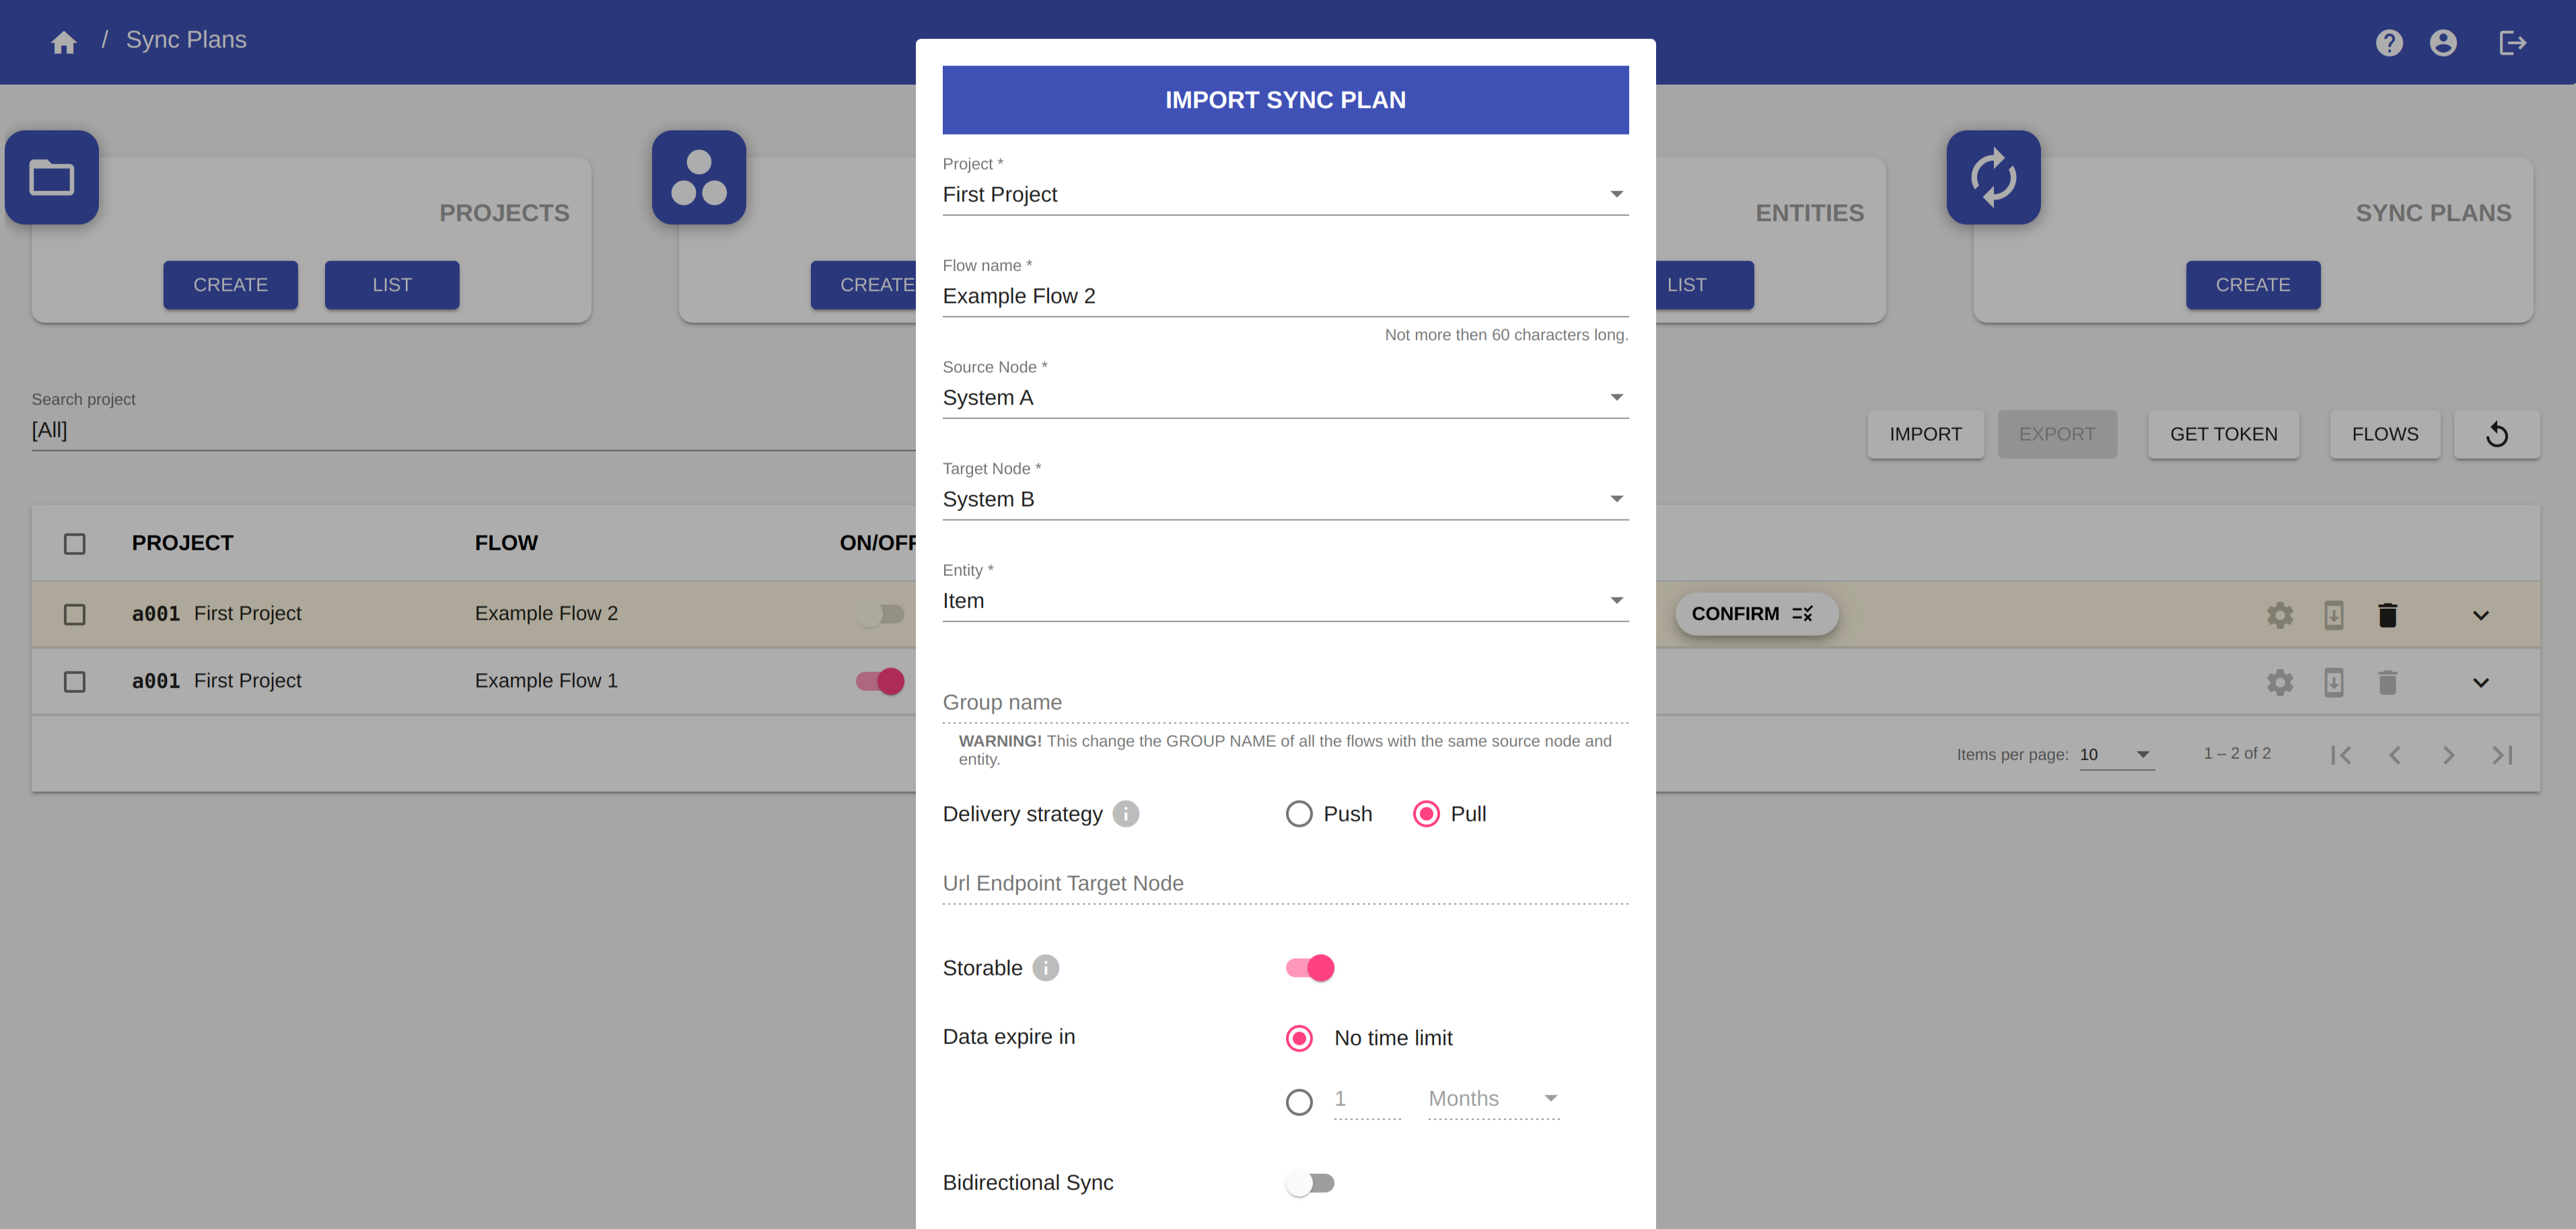
You can confirm the original data of the sync plan or you can modify each field as you like.
WARNING
If the name of the project of the imported sync plan already exists with a diffent code, the imported sync plan project will not be imported.
By default, the imported sync plan will be inserted into the existing project unless you create a new one.
Click on the OK button to confirm. Now the sync plan Example Flow 2 is correctly imported.
NOTE
The sync plan has been imported with all its settings and its Node-RED tabs, but the code is not compiled.
You must compile the code of the imported sync plan before starting synchronization.
The token must be reinserted in the Node-RED producer.
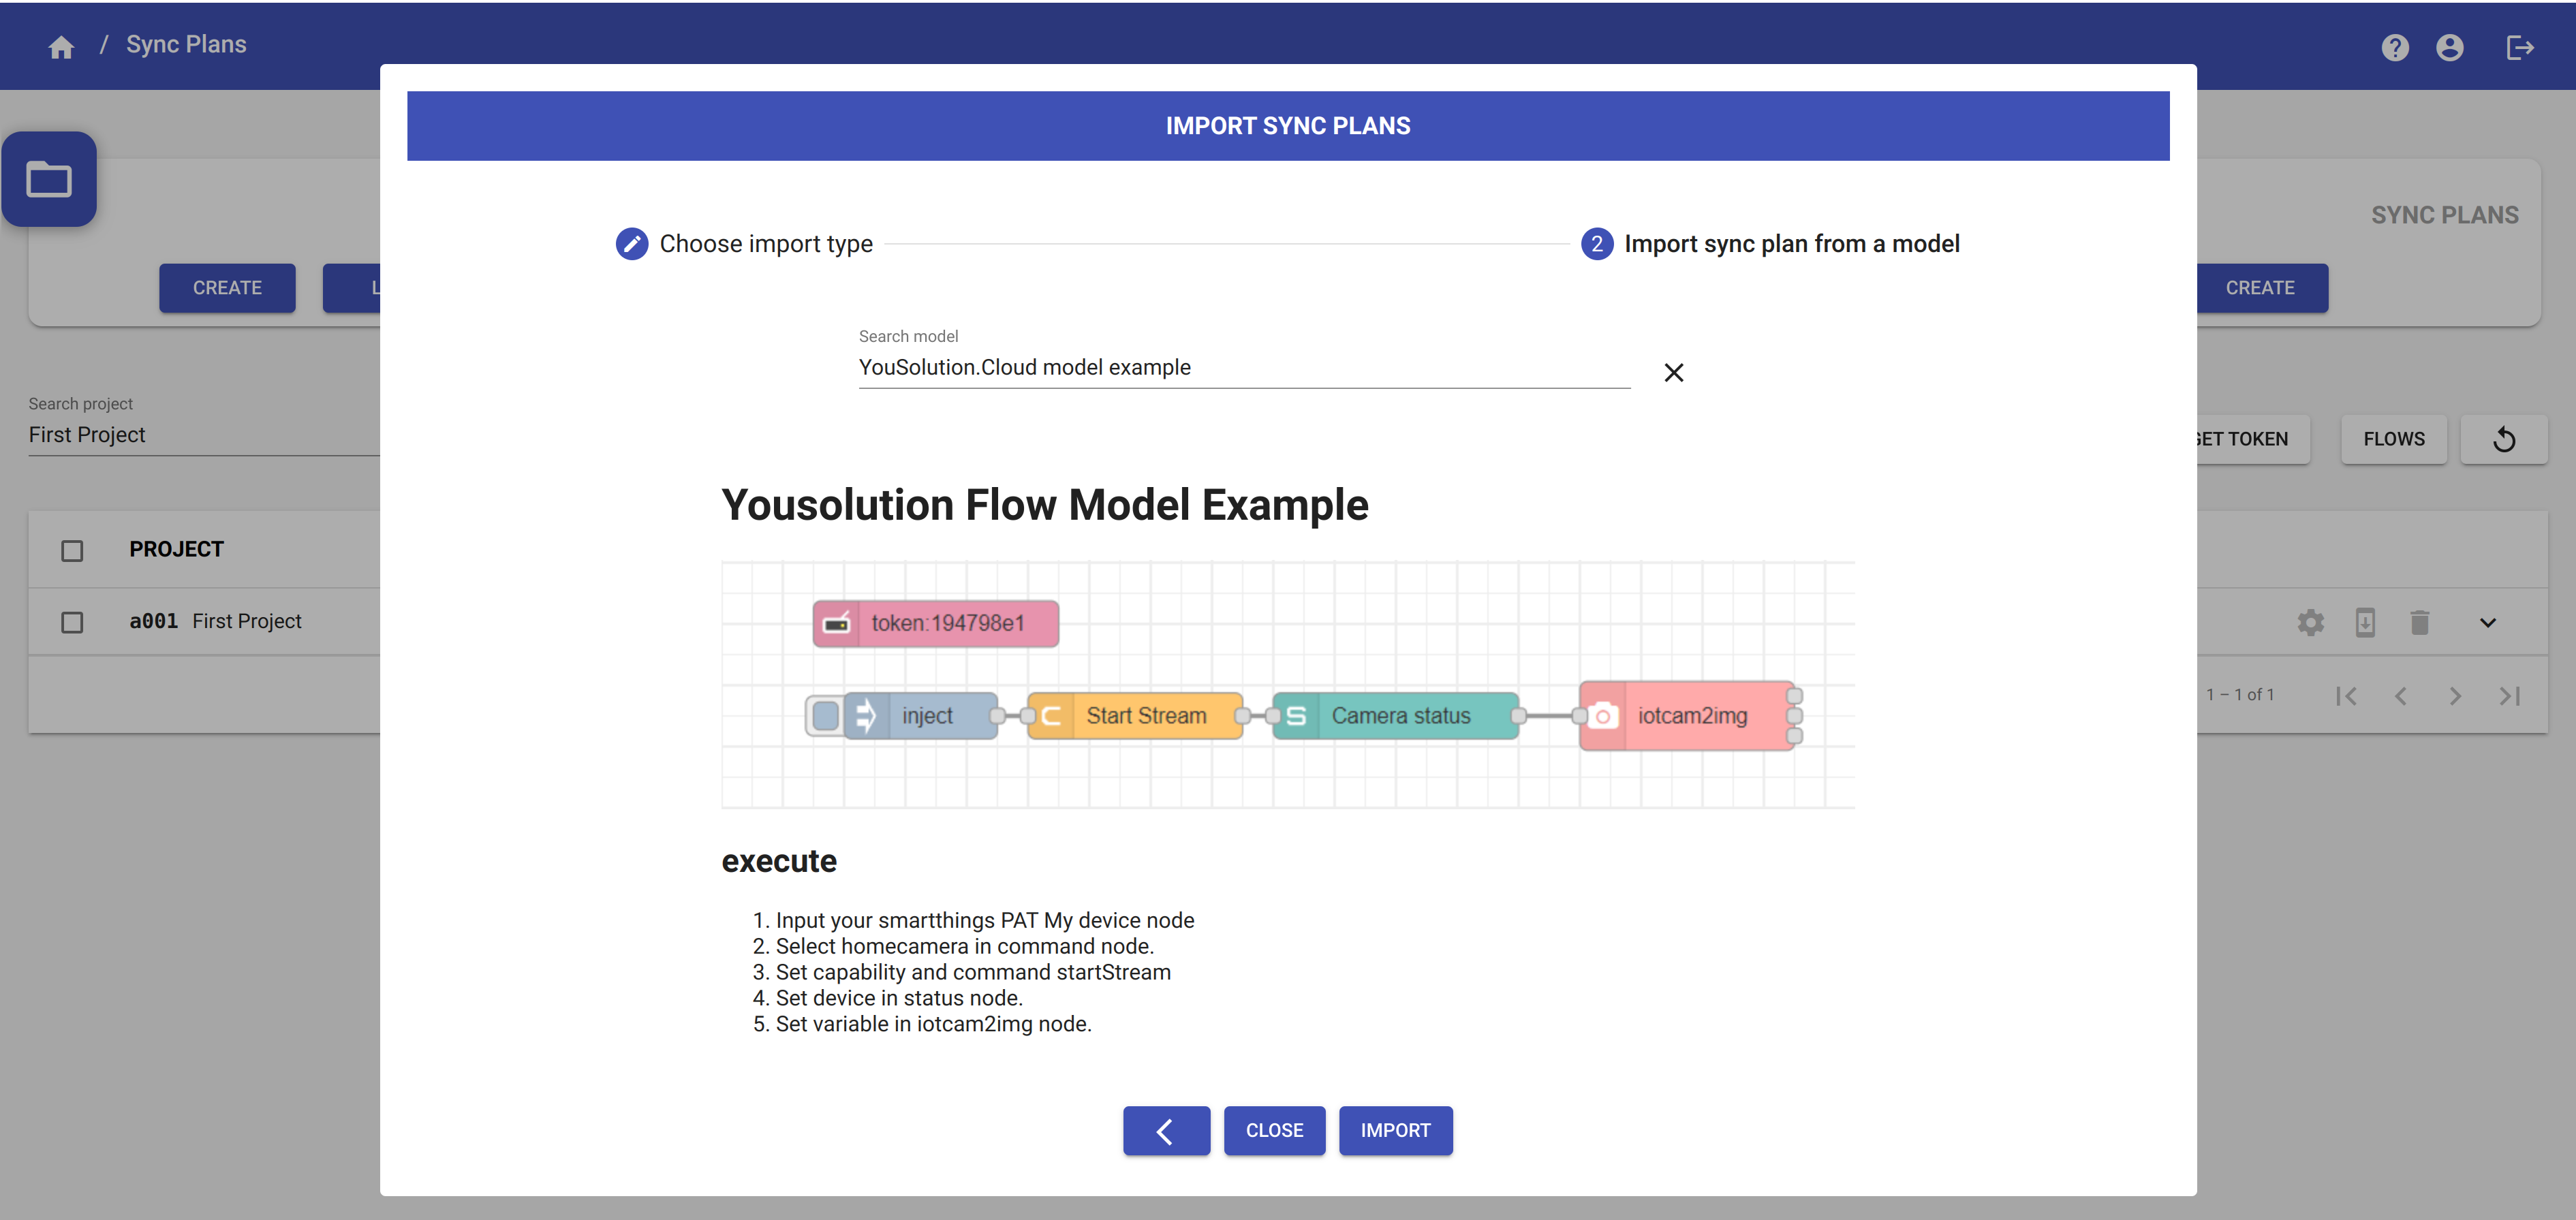
Import from a model
Click on the IMPORT button.
Choose the option Import from a model and click on the button .
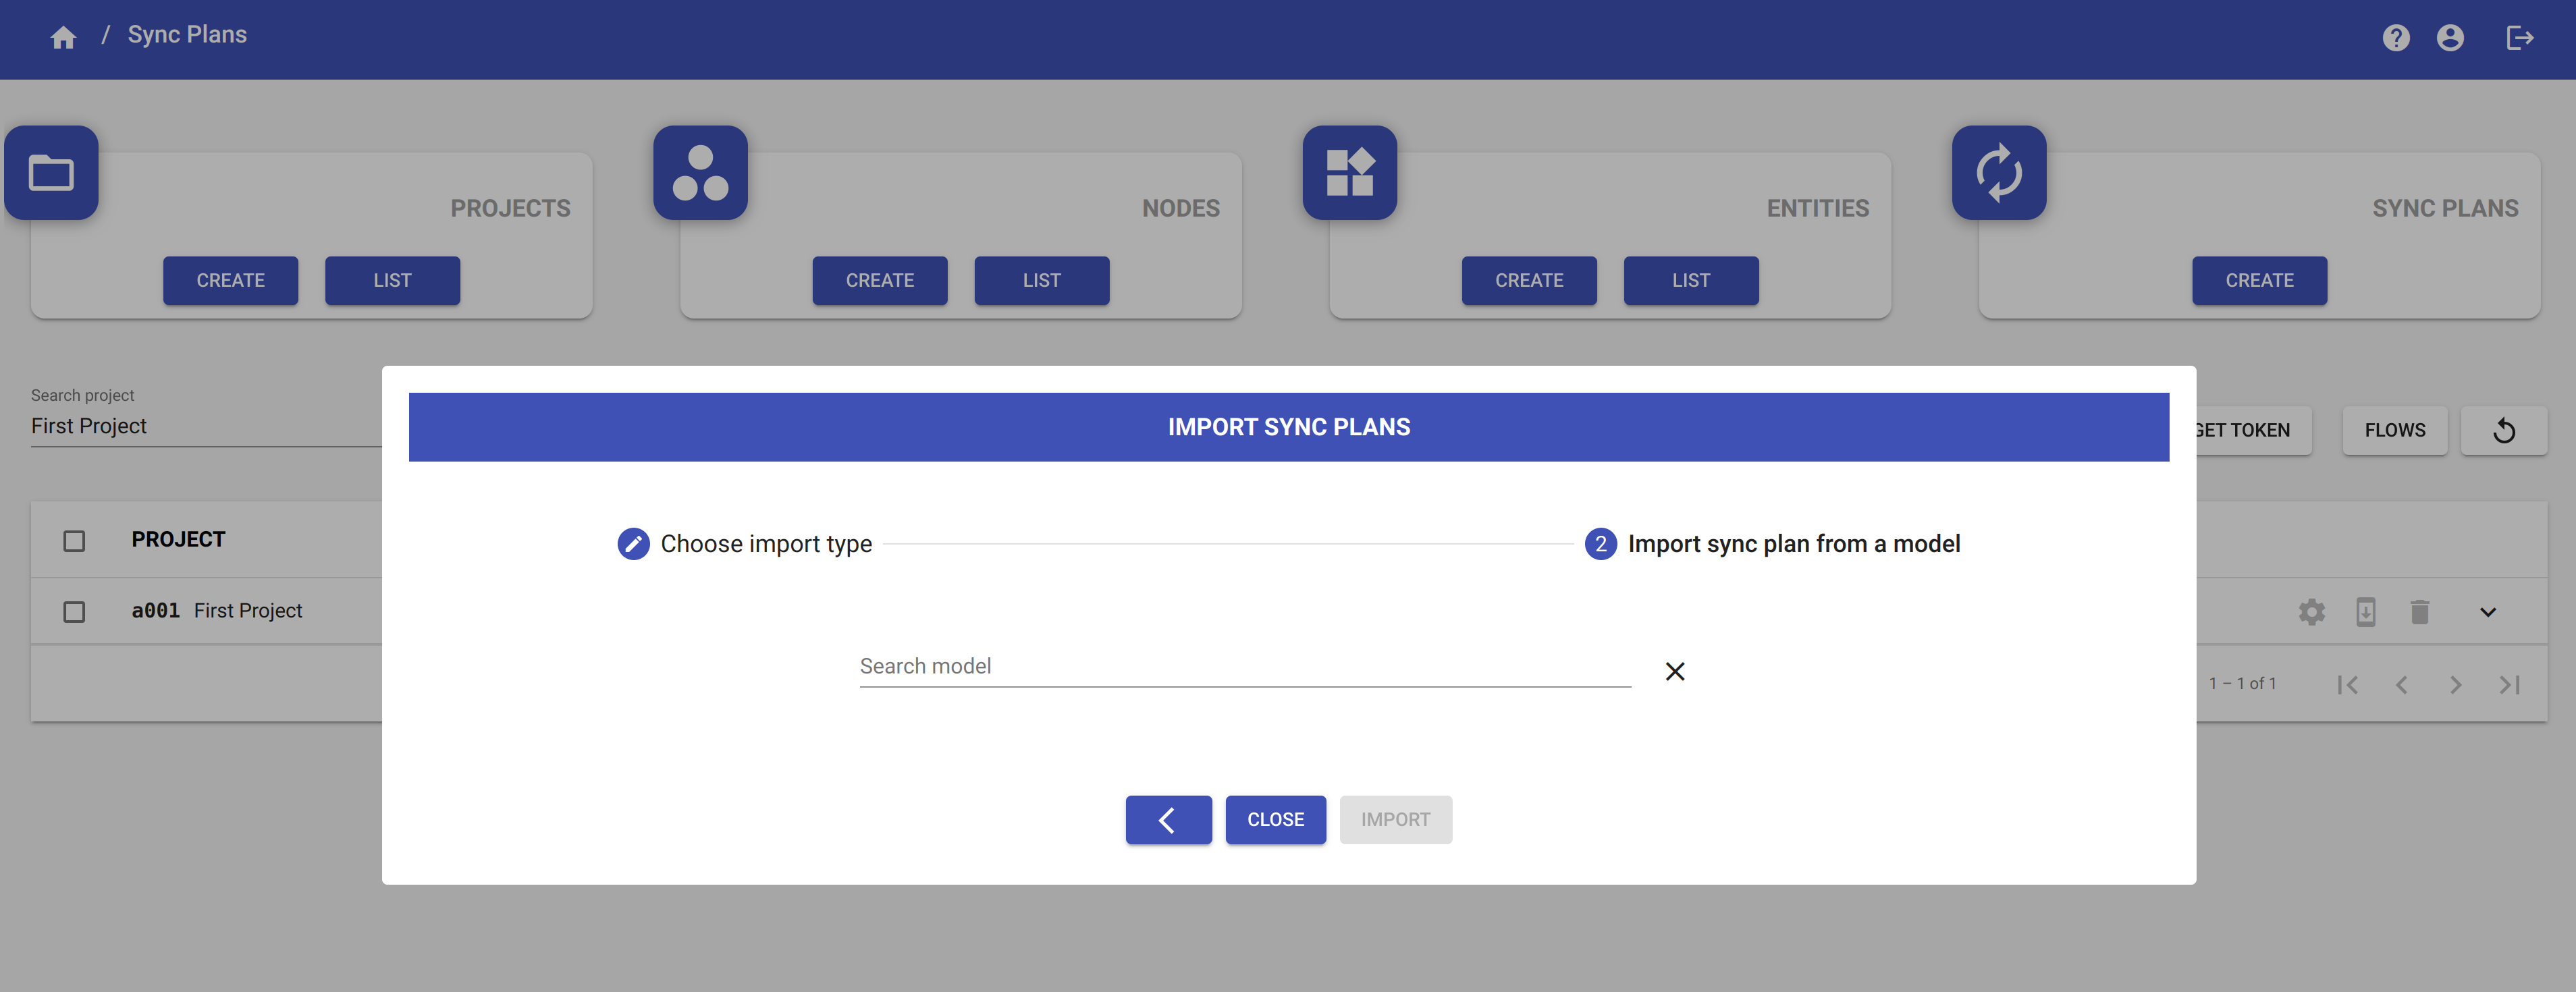
Search for a model by entering the name of the model, then select the model from the list of the models found.
You can visualize a preview of the selected model.
NOTE
Click on the button to return in the previous page of the dialog.
Click on the button to close this dialog without importing the sync plans.
Click on the button to import the sync plan model.
The flows contained in the model will be imported and they will appear in the sync plan table highlighted in yellow.
In the example below, we have imported the flow Yousolution Flow Model Example.
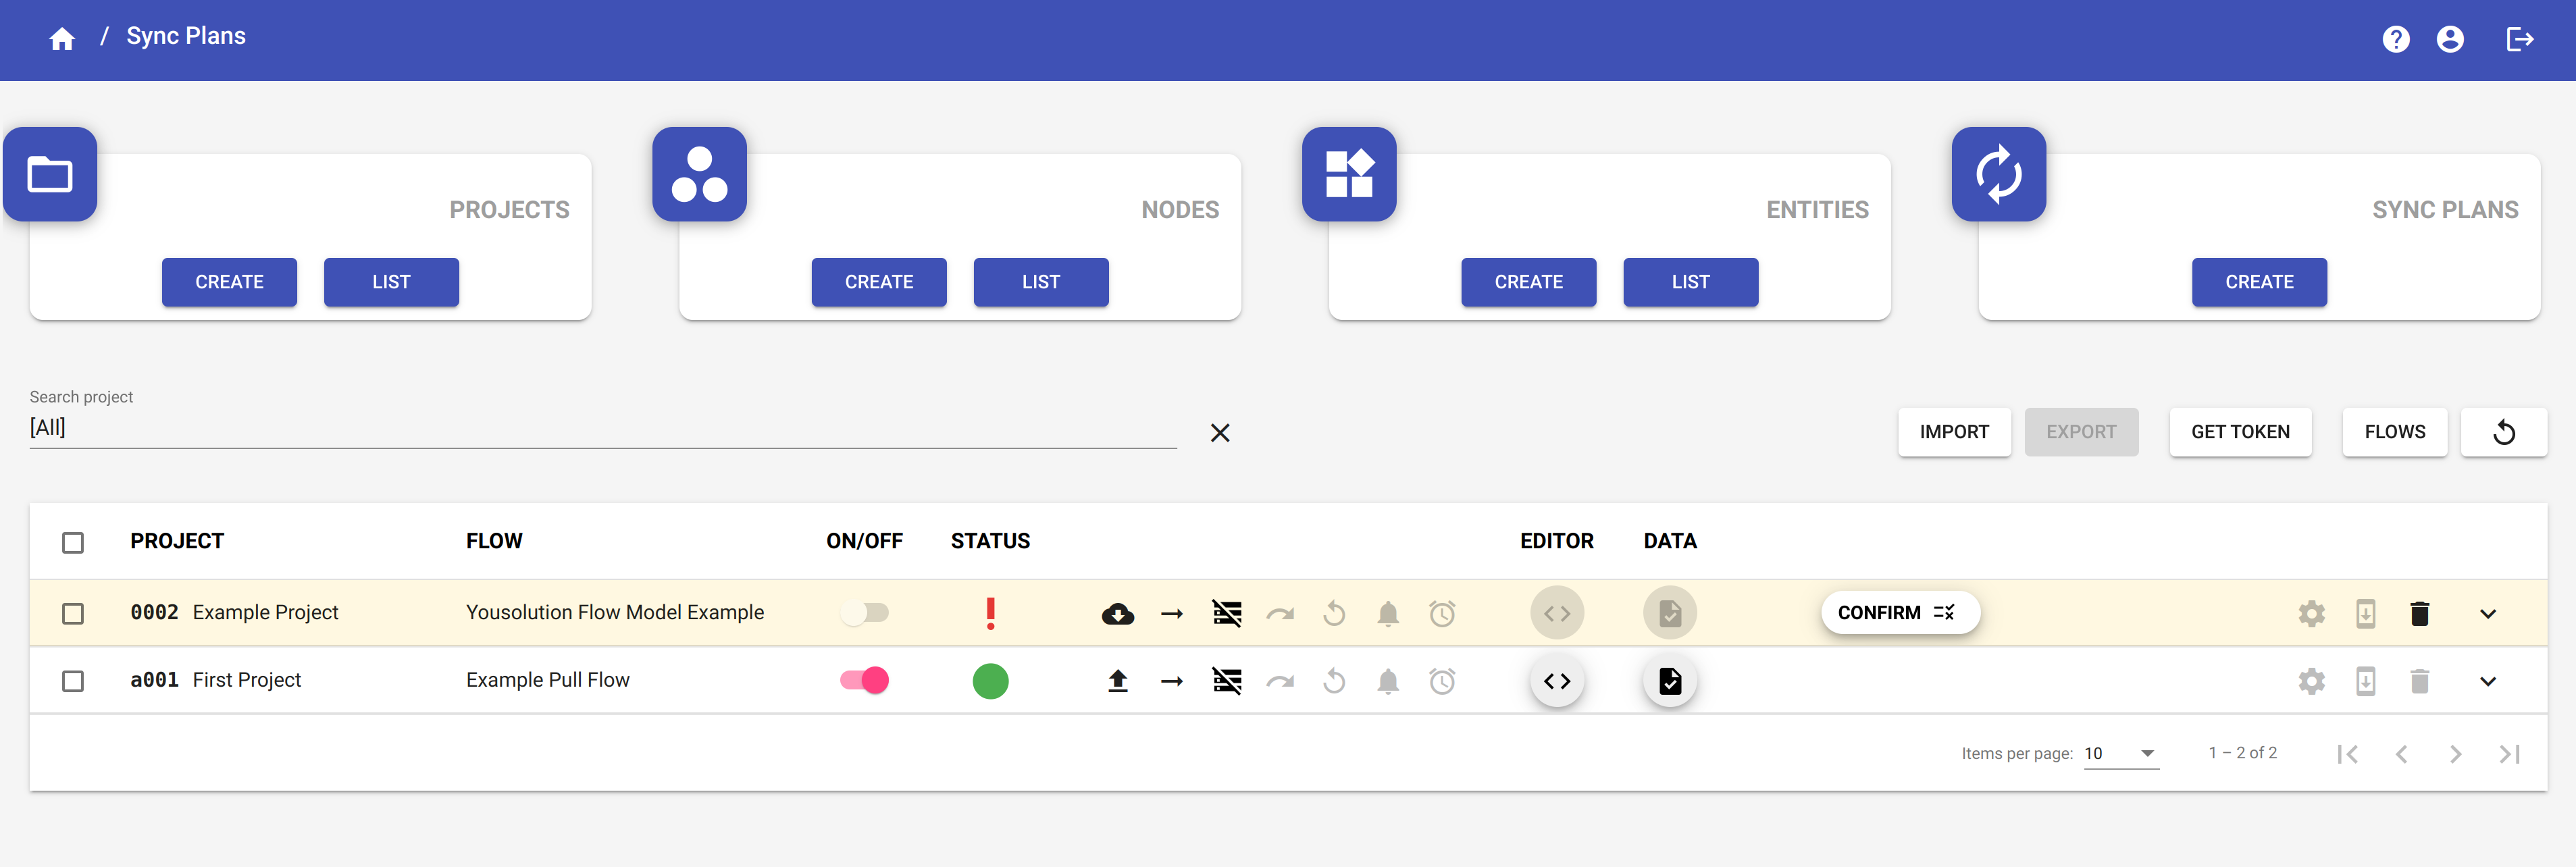
The status of the imported flows is indicated by the icon ![]() . It means that the import of these sync plans have not yet been confirmed.
. It means that the import of these sync plans have not yet been confirmed.
Click on the CONFIRM button of the imported sync plan to confirm the operation. A dialog box will open and ask you to confirm the data of the sync plan.
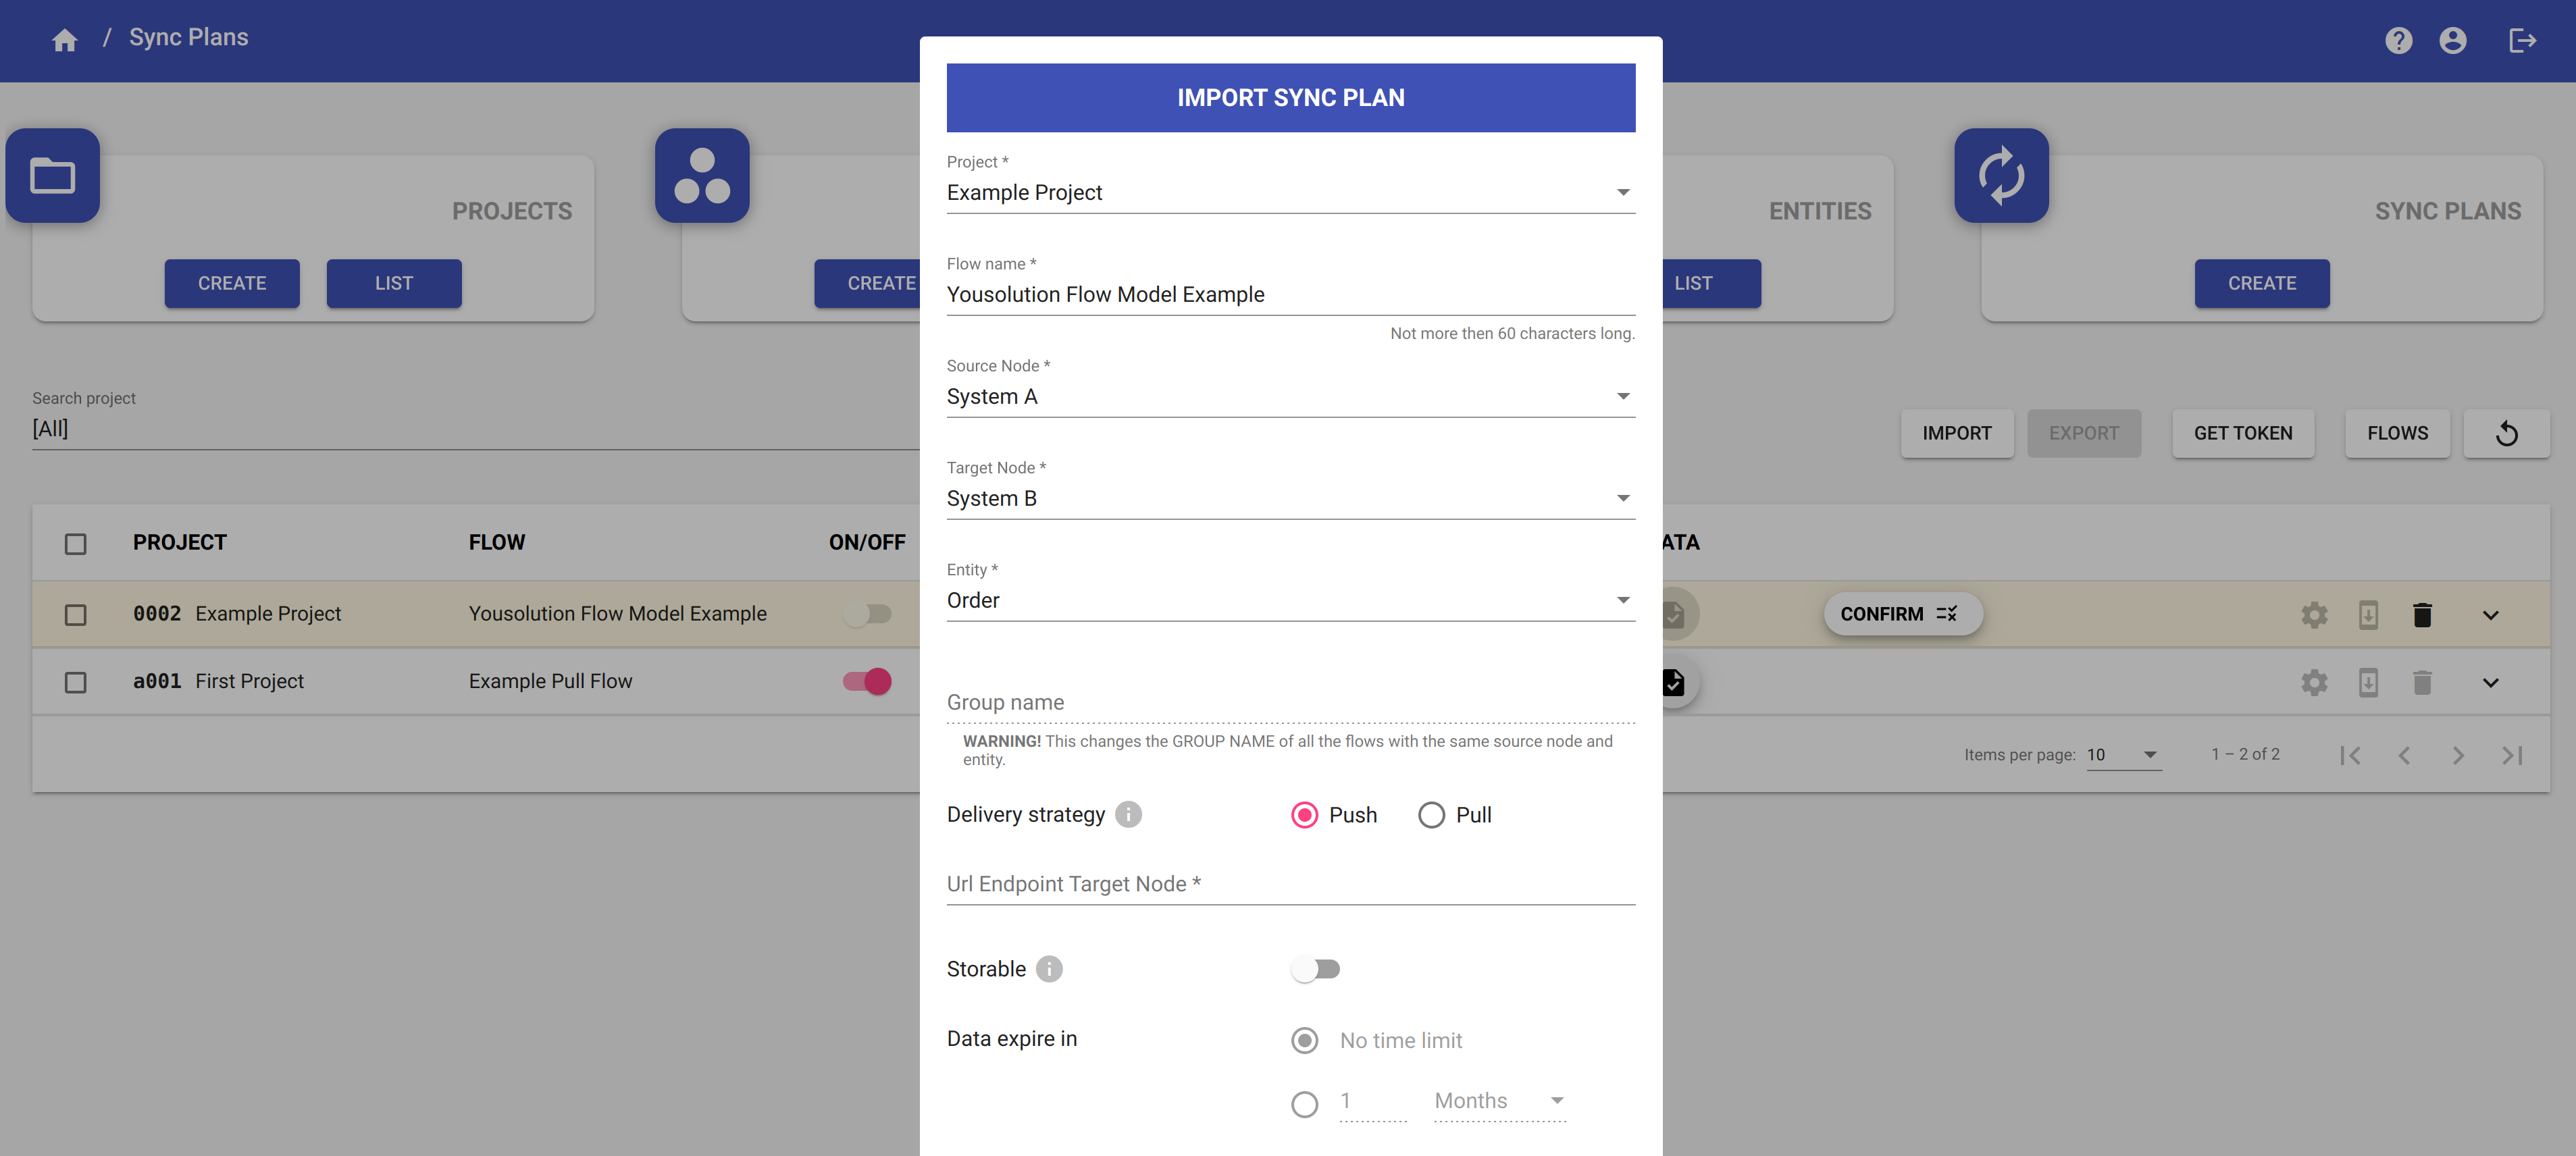
You can confirm the original data of the sync plan or you can modify each field as you like.
WARNING
If the name of the project of the imported sync plan already exists with a diffent code, the imported sync plan project will not be imported.
By default, the imported sync plan will be inserted into the existing project unless you create a new one.
Click on the OK button to confirm. Now the sync plan Yousolution Flow Model Example is correctly imported.
NOTE
The sync plan has been imported with all its settings and its Node-RED tabs, but the code is not compiled.
You must compile the code of the imported sync plan before starting synchronization.
The token must be reinserted in the Node-RED producer.